-->

Monday, June 16, 2014

C# - Variables

A variable is everything in programming, in which we can store values also change it during program execution. Before declare a variable in c#, must use type of it, so you say Each variable in C# has a specific type. You can perform multiple operation on a single variable, which value stored in memory. Now in this topic we will cover
1. How to declare a variable
2. How to internalize a variable.
3. Types of a variable

1. How to declare a variable
 during the declaration of a variable, we use type of it. Through comma separation we declare multiple variable with single type. Lets take a simple syntax with example.

Syntax of single variable declaration 
<data_type> single_variable_declaration;
Example of single variable declaration
int Employee_age;

Syntax of list of variable declaration
<data_type> variable1, variable2, .....variableN;
Example of list of variable declaration
String Employee_Name, Employee_address, Employee_Country;

2. How to initialize a variable
The meaning of initialization is assigning some value into the variable. There are two types of initialization, first one is declaration time initialization, in which we can assign some value into the variable at declaration time. Lets take simple example
int employee_age=24;
In this example we are passing value(24) from the right side to left side. Also here we use assignment operator, In later session we will discuss about operators.

The last one is after declaration, in which we can pass the value into the variable after declaration of it. Like
int a,b,c; // Declaration over
a=10 ; // after initialization 
b=20 ; // after initialization 

c=a+b; // expression initialization

3. Types of a variable
In the c#, there are two types of variable, first one is local variable and second one is global variable. If we initialize a variable outside the block known as global variable you can consider public specifier as a example of it. If we initialize it inside the block known as local variable. lets take a simple example.

using System;
using System.Collections.Generic;
using System.Linq;
using System.Text;

namespace ConsoleApplication4
{
    class Program
    {
        static void Main(string[] args)
        {

            int a = 10;
            {
                int b;
                a = 20;
                Console.WriteLine(a);
            }
            b = 30;  // b is a local variable , can't initialize here. 
            Console.WriteLine(a);
            Console.ReadKey();
        }
    }
}
In this program we get error because a local variable can't initialize outside the block.

In this program we get error because a local variable can't initialize outside the block.

Sunday, June 15, 2014

C# - Type Conversion

In Type casting you can change types or convert one types of data into another type.In c#, Basically there are two types. First one implicit type casting and another one is explicit type casting. Both are very useful in c# application development like, in web application text box return by default text value and you want to take int type value then you must convert text to int.
Implicit type conversion - conversion is performed by c# compiler automatically with type-safe manner. Now lets to take an simple example here.

using System;
using System.Collections.Generic;
using System.Linq;
using System.Text;

namespace ConsoleApplication4
{
    class Program
    {
        static void Main(string[] args)
        {
            Double d;
            int a=15;
            d = a;
            Console.Write(d.ToString());
            Console.ReadKey();
        }
    }
}
Code Generate the following output
Implicit type conversion


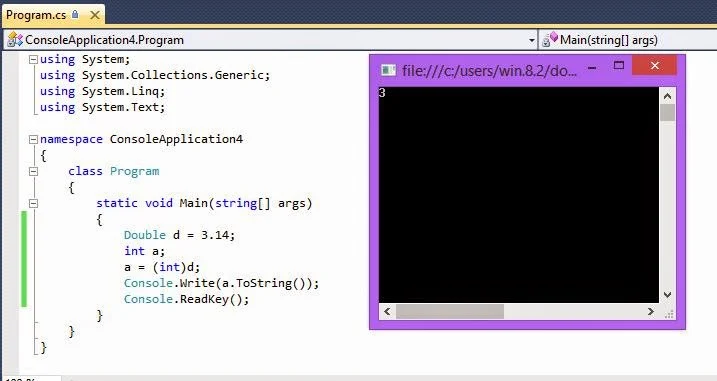
Explicit type conversion - conversion is performed by programmer explicitly using the pre-defined functions. Suppose you want to change double type value into int type then must use pre-defined functions. This type of conversion is not safe. Lets take an simple example.

using System;
using System.Collections.Generic;
using System.Linq;
using System.Text;

namespace ConsoleApplication4
{
    class Program
    {
        static void Main(string[] args)
        {
            Double d = 3.14;
            int a;
            a = (int)d;
            Console.Write(a.ToString());
            Console.ReadKey();
        }
    }
}
Code generate the following output
Explicit type conversion
So there are various types available in c#, these are
ToBoolean : Convert one type to boolean type , if possible
ToByte : Convert one type to Byte type , if possible
etc.

Wednesday, June 11, 2014

How to add image and icon on button control in windows form c#

On a Button control, Text is not enough to making it beautiful. So If you want to make attractive windows application then you should go for images. In this article i will show you how to add image on button control also how to align with text. Now lets to start.
Step-1 : Add a new windows form project in visual studio, i have visual studio 2013, you can work in earlier version.
Step-2 : Add a button control in designer view of form
Step-3 : Select 'Image' property of Button control. Button control-->Property-->Image

Image resources in windows form c#
Step-4 : Click on "ok" Button
Step-5 : After adding the image on button control, Set "ImageAlign" property of Button control to MiddleLeft.
Step-6 : Also set "TextAlign" property of Button control to MiddleRight.
Step-7 : Set Text Property of button control, decide you. In this article button with image is related to fruits so i giving you fruits title.
Text = " Fruits"
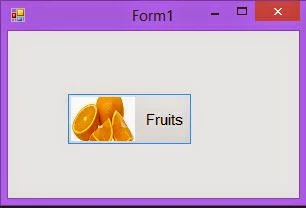
Now, your button control looking like
How to add image and icon on button control in windows form c#

Tuesday, June 10, 2014

Change Text to Voice in windows form c#

Suppose your pronunciation is not right at this time and you want to use text to voice converter software. We are presenting to you  a very easy and simple converter, which convert text to voice. There are various steps to designing this types of converter, these are:
Step-1 : Create a new project in windows form.
Step-2 : Add a reference file (System.Speach) in the project.
Change Text to Voice in windows form c#
Step-3 : Add one rich textBox and menu strip control on windows form.
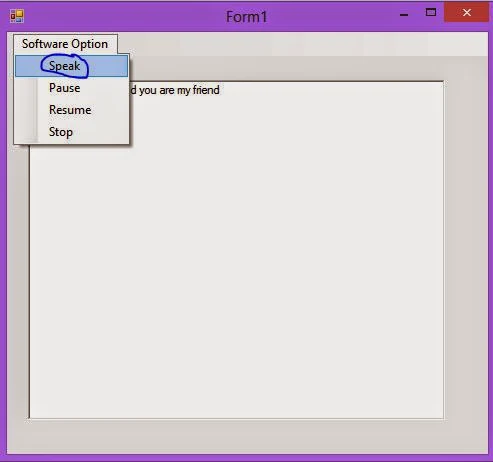
Step-4 : Add items into menuStrip control looking like
Change Text to Voice in windows form c#
Step-5 : Add two namespaces in code file, which are
using System.Speech;
using System.Speech.Synthesis;

// Both are used for reading text and doing operation on it.
Step-6 : Copy this code and paste into your menu strip item handlers.

using System;
using System.Collections.Generic;
using System.ComponentModel;
using System.Data;
using System.Drawing;
using System.Linq;
using System.Text;
using System.Windows.Forms;
using System.Speech;
using System.Speech.Synthesis;

namespace text2spech
{
    public partial class Form1 : Form
    {
        public Form1()
        {
            InitializeComponent();
        }
        SpeechSynthesizer speech_reader = new SpeechSynthesizer();
        private void speakToolStripMenuItem_Click(object sender, EventArgs e)
        {
            if (richTextBox1.Text != "")
            {
                speech_reader.Dispose();
                speech_reader = new SpeechSynthesizer();
                speech_reader.SpeakAsync(richTextBox1.Text);


            }
            else
            {
                MessageBox.Show("Write some text into your text box");
            }

        }

        private void pauseToolStripMenuItem_Click(object sender, EventArgs e)
        {
            if (speech_reader !=null)
            {
                if (speech_reader .State == SynthesizerState.Speaking)
                {
                    speech_reader.Pause();
                }
            }
        }

        private void resumeToolStripMenuItem_Click(object sender, EventArgs e)
        {
            if (speech_reader != null)
            {
                if (speech_reader.State == SynthesizerState.Paused)
                {
                    speech_reader.Resume();
                }
            }
        }

        private void stopToolStripMenuItem_Click(object sender, EventArgs e)
        {
            speech_reader.Dispose();
        }
    }
}

Code Generate the following output

Change Text to Voice in windows form c#

Monday, June 9, 2014

Returns CheckBox Input element using Html.CheckBox() Handler: MVC

Html.CheckBox() handler, used to return check box input element to be input true or false value by user. Selected checkbox will return true and un-selected will return false, otherwise it returns null for the programmer to store/use the value.

In compare to other input element, this handler is easy to bind to with the data source provided by the programmer for the page. This handler/method have its own parameters list as Html.Label() or Html.TextBox() handlers have.

Parameters

  • Name: specifies the name of form field. It is string type of parameter.
  • isChecked: programmer should pass true to select the checkbox, otherwise false. As the name implies it is Boolean type of parameter.
  • htmlAttributes: specifies an object that contains all the html attributes to set for the element as discussed earlier.
@Html.CheckBox("isMarried", true);

This line will return an check box input element on the page with checked true value, as passed with the method. The name of form field will be isMarried, used to get the value of this element.

@Html.CheckBoxFor(…)

This handler works same as above but for a particular property in the object specified in the expression. This handler is used to return check box input for only the bind to property exists in the mode passed by an action to this view page.

Parameters are almost same except the expression which is a predicate to be bind this element with the specific property.

Let’s suppose this view page is bind to a model of type student having the properties like name, age, isMarried and etc. To bind this check box handler programmer have to write the following line of code:

@Html.CheckBoxFor(model => model.isMarried, false)

This handler now binds to isMarried property of the model and by default it will be un-selected on the page.

How to Execute Server-side code based on condition: Razor

Razor syntax helps developers to execute the code based on some condition specified like if-else or may be switch statement. Programmer can easily decide, which statement(s) need to be executed, based on the condition given within if statement.

IF-Else Statement:

To test a condition by using IF statement, write a condition in if parenthesis, start an IF block and at the last write the statements to be executed in the curly braces i.e. called if block. This block will be execute when the given condition is true, to execute some statements on the false of this condition, programmer have to write ELSE part.

@{
    var value = 5;
}

@if (value >4)
{
    <p style="font-size:20px; font-weight:bold">Value is greater than "4"</p>
}
else
{
    <p style="font-size:20px; font-weight:bold">Value is less than or equal to "4"</p>
}

In the above block variable value have initial value 5. According to the given condition the first block will execute. If we change the value as 4 then it will execute the second block i.e. ELSE part of the statement. What if we have some more condition to be check, either we have to use if-else if-else condition or switch statement.

Switch Statement

To execute statements based on number of individual conditions, switch statement is used by the developer. Switch statement specifies some cases to be check by compiler and execute the statements written in particular case on which condition matches. Just notice the following lines of code:

@switch (value)
{
    case 5: <p>Value is: 5</p>
        break;
    case 4: 
    case 3: 
    case 2: <p>Value is >= 2 and <=4</p>
        break;
    case 1: <p>Value is: 1</p>
        break;
    default: <p>Value is either <1 or >5</p>
        break;
}

Here, I have specified individual statement for case 1 and 5 but a single statement for case 2, 3 and 4. This feature of switch statement is used when a single statement is to be executing for one or more cases. Now for value = 2 /3/4 a single statement “Value is >= 2 and <=4” will execute.

Like in if condition the else part will execute when false, switch statement provides “default” case for all other case except specified. This value can also be changed or assigned at runtime to execute code dynamically.

How to Optimize Indexes in SQL Server

SQL Server automatically maintains indexes whenever insert, update, or delete operations are made to the underlying data. These modifications cause the information within the index to become scattered in the database. Fragmentation exists when indexes within the index to become scattered in the database.

Fragmentation exists when indexes have pages where the logical ordering does not match the physical ordering within the data file. Heavily fragmented indexes can degrade the query performance and cause your application to respond slowly.

Fragmentation normally occurs when a large number of insert and update operations are performed on the table. Fragmented data can cause the SQL Server to perform unnecessary data reads. This affects the performance of the query. Therefore, index defragmentation is necessary to speed up the query performance.

The first step in deciding which defragmentation method to use is to determine the degree of index fragmentation. You can detect index fragmentation by using the sys.dm_db_index_physical_stats system function.

The following statement displays a list of all the indexes on the HumanResources.Employee table with their fragmentation level:

SELCET a.index_id AS IndexID, name AS IndexName,
Avg_fragmentation_in_percent AS Fragmentation
FROM sys.dm_db_index_physical_stats (DB_ID (N’AdventureWorks’),
OBJECT_ID (‘HumanREsources.Employee’), NULL, NULL, NULL ) AS a
JOIN sys.indexes AS b ON  a.object_id = b.object_id AND a.index_id = b.index_id ORDER BY Fragmentation desc

In the preceding output given by this query, you can notice that the AK_Employee_LoginID index shows a high level of fragmentation.

After the degree of fragmentation is known, the fragmentation needs to be corrected. The following table lists the actions to be taken at different fragmentation levels to defragment the index.

Fragmentation Level                         Action to be Taken
>5% and <=30%  ALTER INDEX REORGANIZE
>30%  ALTER INDEX REBUILD WITH (ONLINE – ON)

Method of Degragmentation

You can execute the following command to defragment the AK_Employee_LoginID index:

ALTER INDEX AK_Employee_LoginID ON HumanResources.Employee REBUILD
After executing the preceding command, the degree of fragmentation is reduced.
© Copyright 2013 Computer Programming | All Right Reserved