-->

Saturday, November 14, 2015

Getting started with MVC Application

Getting started -Introduction

MVC is a framework used for building web application using latest and somewhat different approach. According to this architecture, whole application divides in to three part i.e. Model, View and Controller which is also the pronunciation stands for MVC.
  • Model: keeps the application core. It includes some classes written to interact with database.
  • View: how is to be displayed on the page? falls into this category.
  • Controller: what is to be transfer on the views? falls into this category.


More about MVC can be easily read through here, but we will start some practical work here. I suppose every DotNet programmer knows about Visual Studio. Let’s start with creating a new MVC application using below steps. Step 1. Create new project and select ASP.NET MVC 4 Web Application under the Web categories. Step 2. Change the directory where solution will exist, it takes default if not changed and click on OK button. Step 3. It will asks about the type of application e.g. empty, internet, intranet etc. listed in the image provided. Select Internet application because it loads the default controllers and their actions with authentication.

Getting started with MVC Application

Through this we can only creating application, on the next we will code with empty MVC application. Step 4. Congratulation, you have successfully created a new MVC 4 application. Now run this with F5 or from Start debugging option in DEBUG menu. When it run it looks like the below image. In the browser’s address i.e. http://localhost:port/  localhost is the computer which is running that application at that time, means the client machine and the port is the number assigned for that application.

Getting started with MVC Application

Friday, November 13, 2015

How to read data from excel file in ASP.NET, Example

This article will cover, How to read data from Excel spreadsheet using ASP.NET. First we need to connect Microsoft Excel workbook using the OLEDB.NET data provider. Add excel file path to connectionString, after doing this the connectionstring will be look like

string connString = "Provider=Microsoft.Jet.OLEDB.4.0;" + "Data Source=" + Server.MapPath("first.xls") + ";" + "Extended Properties=Excel 4.0;";

Here, you can connect .xls file using Microsoft.Jet.OLEDB.4.0 provider also display data into gridview. In Data Source, you can take .xls file path.

You can follow some steps for reading data from excel file. 

Step 1: Open Visual Studio > File > New >Website > Under Templates, click ASP.NET WebSite and choose Visual C# as the language. Select a system location and click Ok.

Step 2: We will create excel sheet and add them to the website folder. Excel sheet will be created in Office 2003(first.xls).

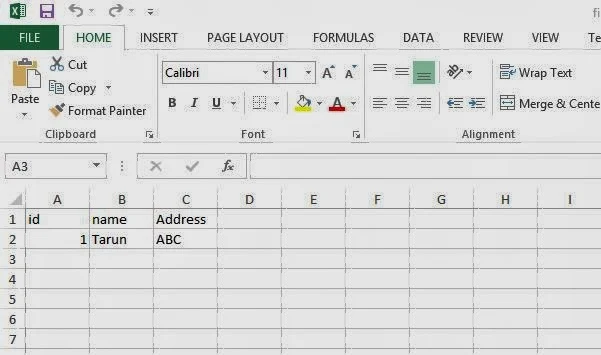
Step 3: Add three column called id, name and Address to the Sheet1. Also add some data into the columns. Once these excel files are created, add them to your website folder. To add them to the solution, right click website name > Add Existing Item > Add the excel file.

excel file in asp.net

Step 4: Add a web form called 'excelfile.aspx' into the website folder.
Step 5: Add a GridView and label control to the 'excelfile.aspx' page. We will extract data from the excel file and bind it to the GridView on page_load method.
Step 6: Bind GridView on page load method

Complete code is


<%@ Page Language="C#" AutoEventWireup="true" CodeFile="excelfile.aspx.cs" Inherits="excelfile" %>

<!DOCTYPE html PUBLIC "-//W3C//DTD XHTML 1.0 Transitional//EN" "http://www.w3.org/TR/xhtml1/DTD/xhtml1-transitional.dtd">

<html xmlns="http://www.w3.org/1999/xhtml">
<head runat="server">
    <title></title>
</head>
<body>
    <form id="form1" runat="server">
    <div>
        <asp:GridView ID="GridView1" runat="server">
        </asp:GridView>
    </div>
    <asp:Label ID="Label1" runat="server" Text="Label"></asp:Label>
    </form>
</body>
</html>

using System;
using System.Collections.Generic;
using System.Linq;
using System.Web;
using System.Web.UI;
using System.Web.UI.WebControls;
using System.Data.OleDb;
using System.Configuration;
using System.Data;

public partial class excelfile : System.Web.UI.Page
{
    protected void Page_Load(object sender, EventArgs e)
    {
        string connString = "Provider=Microsoft.Jet.OLEDB.4.0;" + "Data Source=" + Server.MapPath("first.xls") + ";" + "Extended Properties=Excel 4.0;";

        OleDbConnection oledbconn = new OleDbConnection(connString);
        try
        {
            oledbconn.Open();
            OleDbCommand cmd = new OleDbCommand("Select * from [Sheet1$]", oledbconn);
            OleDbDataAdapter oleda = new OleDbDataAdapter();
            oleda.SelectCommand = cmd;
            DataSet ds = new DataSet();
            oleda.Fill(ds, "first");
            GridView1.DataSource = ds.Tables[0].DefaultView;
            GridView1.DataBind();
        }
        catch (OleDbException ex)
        {
           Label1.Text = ex.Message;
        }
        finally
        {
            oledbconn.Close();
        }
    

    }
}


Code generate following output 

Computer Programming : How to read data from excel file in ASP.NET, Example


Wednesday, November 11, 2015

WPF Window attribute | Properties examples

Introduction
In this article, we will learn many more attributes or you can say properties of window tag in WPF. First of, I will take Width and Height properties of Window Tag. Width defines Horizontal size of window and Height vertically. Both takes numbers. If you do some changes in these attribute then your window will resize. Now, come to Next attribute that is Title, Define the label of title bar, which is the Top most bar of your window. Title is aligned in center bydefault. 


Icon: If you want to put image in left corner which is realted to your project like suppose your project window is related to login, now you can put login image into your title bar in left corner.

ResizeMode : Change the window size at run time, if you want. Minimize and Maximize button appear by using this arrtibute. Also you can hide both buttons, if you assign "NoResize" value in it. By using this value, hide minimize and maximize button as well as resize arrow. 

ShowInTaskbar : The default value of it is 'True'. It means when your application will run  then your application icon will display into your taskbar. If you assign False then does not appear in Taskbar.

SizeToContent : Define the window size which is totaly depend on your content. If you assign 'width' as a value in it then your window's width resized. Similarly in case of Height.

TopMost : Your window will always appear at top position. The Default value of it is false.

Tuesday, November 10, 2015

Example domainUpDown control in windows form c#

Introduction
In this article, we will see, How to use domainUpDown control in windows form c#. This control is used to choose single item at time, In this we have multiple options. If you see this control then you notice that this control is similar to Numeric UpDown control. But NumericUpDown control display numbers only. domainUpDown control display string like display month's name and many more things. In this article we will see many more interesting things which are related to domainUpDownControl.
Example domainUpDown control in windows form c#

How to use doaminUpDown Control
  1. First of all add domainUpDown control from ToolBox
  2. Copy this code paste into your code file

    private void Form2_Load(object sender, EventArgs e)
        {
            DomainUpDown.DomainUpDownItemCollection collection = this.domainUpDown1.Items;
            collection.Add("Jan");
            collection.Add("Feb");
            collection.Add("Mar");
            collection.Add("Apr");

            //How to set the text default in DomainUpDown

            this.domainUpDown1.Text = "Jan";

        }


The Last line of code explain the default value of domainUpDown Control. 
In the Second example, I will explain you how to retrieve value from domainUpDown Control using SelectedItemChanged.

        private void domainUpDown1_SelectedItemChanged(object sender, EventArgs e)
        {
            MessageBox.Show(domainUpDown1.Text);
        }

When, first time the page is load then appear message box on your screen with the text message of selected item of domainUpDown Control.

Now, Learn how to add domainUpDown control using code file. Also learn how to fire SelectedItemChanged event using code file.

using System;
using System.Collections.Generic;
using System.ComponentModel;
using System.Data;
using System.Drawing;
using System.Linq;
using System.Text;
using System.Threading.Tasks;
using System.Windows.Forms;

namespace WindowsFormsApplication3
{
    public partial class Form3 : Form
    {
        public Form3()
        {
            InitializeComponent();
        }

        private void Form3_Load(object sender, EventArgs e)
        {
            DomainUpDown dynamicallyadd = new DomainUpDown();
            dynamicallyadd.Location = new System.Drawing.Point(12, 50);
            dynamicallyadd.Name = "domainupdown";
            dynamicallyadd.Width = 250;
            dynamicallyadd.Height = 100;
            dynamicallyadd.Items.Add("Apple");
            dynamicallyadd.Items.Add("mango");
            dynamicallyadd.Items.Add("Grapes");
            dynamicallyadd.Text = "Apple";
            this.Controls.Add(dynamicallyadd);
            dynamicallyadd.SelectedItemChanged += new System.EventHandler(Itemchanged);
        }

        private void Itemchanged(object sender, EventArgs e)
        {
           // throw new NotImplementedException();
            DomainUpDown item = sender as DomainUpDown;
            MessageBox.Show(item.Text);
        }
    }
}


Now, In this last section of the domainUpDown Control, we will learn how to bind it with Database table. If you bind it with SQL server then  first to add EDMX file in the project.

      private void Form1_Load(object sender, EventArgs e)
        {
            BankingSystemEntities bs = new BankingSystemEntities();
            var item = bs.userAccounts.ToArray();
            foreach (var item1 in item)
            {
                domainUpDown1.Items.Add(item1.Account_No.ToString());
            }


Monday, November 9, 2015

How to get cell value from dataGridView in windows form c#

In this article, I will teach you, How to get cell value from dataGridView in windows form c#. First of all bind the dataGridView with any Data Source then you can access cell value from it. I bind it with many data source, check this link. In previous article, I get the cell value from selected row of  dataGrid but on this time, we set the default row. In this article, I will give an example of cell click event.


private void dataGridView1_CellClick(object sender, DataGridViewCellEventArgs e)
        {
     
            decimal accno = Convert.ToDecimal(dataGridView1.Rows[e.RowIndex].Cells[0].Value);
            MessageBox.Show(accno.ToString());
}

Here, Cells[0] return the first column's cell value from dataGridView.

Friday, November 6, 2015

LOAD IMAGE WITH IMAGE DATATYPE INTO TABLE IN ASP.NET WEBFORM

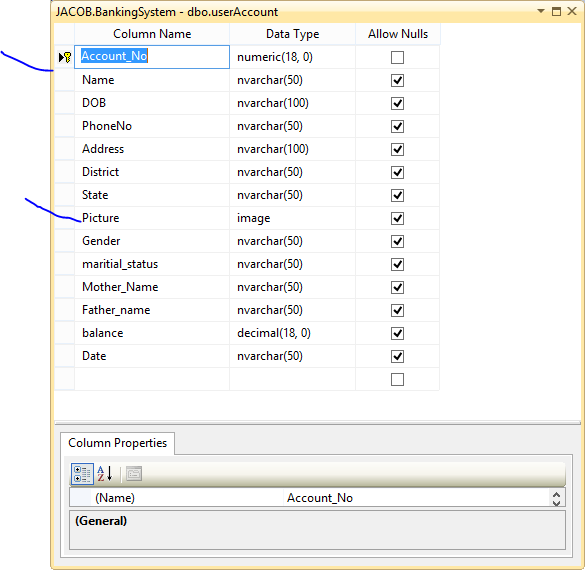
In this article, I will teach you, How to load image into database table with image type in ASP.NET. In previous article i already explained how to save image with their path.So, If you want to do this task then first of all design a table with image datatype.

Database table

LOAD IMAGE WITH IMAGE DATATYPE INTO TABLE IN ASP.NET WEBFORM


Source code 

<form id="form1" runat="server">
    <div>
 
        <asp:FileUpload ID="FileUpload1" runat="server" />
 
    </div>
        <asp:Button ID="Button1" runat="server" OnClick="Button1_Click" Text="Button" />
    </form>

Code behind page

using System.Drawing;
using System.IO;
protected void Button1_Click(object sender, EventArgs e)
    {
        BankingSystemEntities1 BS = new BankingSystemEntities1();
        Bitmap bitmap;
        if (FileUpload1.HasFile)
        {
            FileUpload1.SaveAs(Server.MapPath("~/image/" + FileUpload1.FileName));
            bitmap = new Bitmap(Server.MapPath("~/image/" + FileUpload1.FileName));
            MemoryStream ms = new MemoryStream();
            bitmap.Save(ms, bitmap.RawFormat);


            userAccount uacc = new userAccount();
            uacc.Account_No = 123456789;
            uacc.Picture = ms.ToArray();
            BS.userAccounts.Add(uacc);
            BS.SaveChanges();

         
        }
    }

Code generrates the following output


Wednesday, November 4, 2015

Get data From Database table using EDMX in ASP.NET

In this article, I will show you, how to get data from Database table using EDMX file. Actually EDMX reduces lots of codes, you can see this article which contains lots of codes. EDMX file provides model as well as context class. By using public property of context class, we can communicate with the table.  Before copy this code, first to add EDMX file in solution.

Get data From Database table using EDMX in ASP.NET


Source code

   <form id="form1" runat="server">  
   <div>  
     <asp:GridView ID="GridView1" runat="server">  
     </asp:GridView>  
   </div>  
   </form>  


Code Behind 

   private void loadgrid()  
   {  
     //throw new NotImplementedException();  
     dbEntities dbe = new dbEntities();  
     var item = dbe.usertables.ToList();  
     GridView1.DataSource = item;  
     GridView1.DataBind();  
   }  
© Copyright 2013 Computer Programming | All Right Reserved