-->

Tuesday, September 30, 2014

File Pointer in C

In order to use files it is mandatory to learn the file Input / Output operations. Learning of these is nothing but to understand the functions to write data into a file, to read data from a file, etc. For at any of such operations the file must be opened. The file opening operation is done through a pointer variable called as file pointer. So, file pointer is nothing but a variable which is declared and then I to any required physical file. All the I/O operations are done to physical file through the logical file.

A File Pointer is a special type of pointer variable of the type FILE that is used to store the address of a physical file.

FILE I/O is almost identical to the console and terminal I/O operations. The pnntf() function is used to display the data on the screen. And in file handling we use fprintf() to write the data into the file. We use scanf() function to read the data from the keyboard. And in file handling we use fscanf() to read the data from the file. This is called file manipulation.

The major difference between manipulation of file and terminal I/O is that the terminal I/O is standard no need to specify anything but it is necessary to specify files to be used in the programs where file I/O are performed. It is possible have many files on the disk. If you wish to use a file or files in the programs, then you must specify which file or files you wish to use. Specification of the file that is to be used is referred as opening a file.
At the time of opening the file it is also compulsory to specify the type of operation to be performed i.e. Read from the file, Write to the file, or both. This specification is done through the file opening mode. When different files are used in the program, it is required to specify a particular file for reading or writing. It can be done using a variable called a FILE pointer.

Every file you open has its own FILE pointer variable. When you wish to write to a fiie you specify the file by using its file pointer variable. The file pointer declared using FILE data type is called as logical file. The data is not stored permanently on the secondary storage with this name. It is stored with other file name which is called as physical file name. The logical file is linked with this physical file name. The read/write operations are done on logical file in the program which is indirectly transferred from or to the physical file. The linking of logical file with physical file is done through fopen() function. The FILE pointer variables can be declared as follows:

FILE *fP1, *fp2, *fp3;

The variables fpl, fp2, fp3 are the pointer variables of the type FILE or simply file pointers. They can store the address of any physical file.

Any name can be used as file pointer but must be a valid variable or identifier name of C language. The rules of standard data type identifiers apply to these variables also. The declared FILE Pointer variable may hold address of any physical file but only one at a time. So, at a given point of time logically a logical file points to one and only one physical file. The read / write operactions performed on the file pointer indirectly directed to physical file. At the time of opening file the file pointed by file pointer variable is mentioned along with the type of operation. The opened file is closed when the operation is finished or whenever a new file is to be attached. We will discuss file opening and closing in more details in the next article.

File Structure in C

The file meant for a C programmer is nothing but a data file. Using C programs the data in the form of character or characters is stored permanently on the secondary storage device. In file handling such programs are designed that store data in file and read back data from the file. It means the file replaces the input/output devices for I/O operations. Rather than displaying the data on the output device monitor, it can be written to the file or the data can be read from the file instead of the input device like keyboard. Contents of a file describe the structure of a file.

The way how the contents of a file are being managed or decided is called as file Structure. It may be character, fields, records or block of records.

Each and every data stored in a file can be treated simply as character. So, the character is simplest unit of transfer. In its simplest structure a file can contain a character. More number of characters can be stored in file to make it meaningful. If the transfer rate is simply a character then there is lots of overhead. In order to overcome this overhead the characters can be grouped into many numbers of characters. A file with ‘character’ structure looks as follows:

POEM.TXT
Twinkle twinkle little star!
How I wonder what you are?
Up above the world so high!
Like a diamond in the sky.


In this case of the file ‘POEM.TXT’ each time a single character is written in the file. The file is simply a collection of cnaracters. So, the structure of the file is 'character'. [A text file]
The grouped characters can be transferred to or from the file. In such case a ‘field' can be treated as unit of transfer. The field here is nothing but a variable of any standard data type. So, the file can now contain these fields in its structure. The length of the field varies according to the contents in it. It is not fixed. So, the random access is not possible. The field values must be separated by a marker indicating end of the value. The file creator must take care in such cases.

A file with ‘field’ structure looks as follows:

STUDENT.DAT
101 jacob 102 jacob2
103 bill  104  bill2
105 jacob3 106  bill3


In this case of the file ‘STUDENT.DAT’ each time the data from variables is transferred. Two variables like 'rollno' and 'name’ are used in this case. The file is a collection of data in the form of characters only. But the structure of the file is ‘field’.

The fields that logically explain the characteristics of a person or a thing can be grouped in the form of 'records’ and  these records can be stored in the file. The file is now a collection of records.So, the unit of transfer in this case will be a record. A whole record can be transferred at a time to or from the file. So, in this case the structure of a file can have records in it. Generally here the file contains fixed length records. Number of bytes transferred is equal to the length of record. So, a record containing many fields is transferred, individual fields.

A file with ‘record’ structure looks as follows:

EMP.DAT

101   A    25400
10    B    3240
13    C    12500
104   D    5400


In this case of the file ‘EMP.DAT’ each time the data from a complete record is transferred. For the sake of understanding each record is written in new line. The record structure consists of three fields (like ‘empno’, ‘empname’ and ‘salary’) are used in this case. The file is a collection of data in the form of records only. But the length of the record is fixed. So, there is chance of wastage of storage space. But random access or direct access is the great utilization of fixed length ‘record structure’.

 Further the records can be grouped into ‘blocks’. A block may contain ‘n’ number of records. In such case the data transfer rate is in terms of ‘block’. A block can be transferred at a time. So, the structure of file is ‘block’ of records.

 In order to support such files the definition of the control structure for streams defined in C which as “FILE structure” is defined as follows:

typedef struct {

int level;     /* Full or empty level of buffer*/
unsigned flags;    /* File status flags */
char fd;           /* File descriptor (handler) */
unsigned char hold; /* Used to indicate no buffer */
int bsize;           /* Buffer size */
unsigned char *buffer;  /* Data transfer buffer */
unsigned char *curp;  /* Current active pointer */
unsigned istemp;  /* Temporary file indicator*/
short token;      /* Used for validity checking*/

} FILE;

FILE is the structured data type name using which the logical file pointers are declared in C programs. Whenever a file is to be operated for input or output operations the pointer variable of the type FILE is used. We discuss such FILE pointer in the next article in detail.

File System Basics

The hard disk drive used as secondary storage device in the computing system provide  place to store data. The only way to store and access data on a hard disk drive is by either specifying the data’s physical location in terms of cylinder, head, and sector or by its logical location the block number on the disk. For a programmer specifying and referring the data like this is too difficult. So the operating system takes care of this by means of providing a good file system.

The operating system easily keeps track of the things stored on disks. It is nothing but a way of filing data in an easily accessible way. This is the major role played by the file system. In order to access such data on the disk the programmer is required to write ‘file-handling’ programs. The data on the secondary storage is stored only by means of file.

With reference to Operating System like "Linux", a File System is the whole structure in which the FILES are organized, stored and named especially for the users of the system.

File system treats different sets of data as files. Each file is separate from the other. Along with the A data stored within it, the file system includes additional information for each file like
  • The name of the file.
  • The access permissions on the file
  •  The time and date of creation, access, and modification of the file.


Using the available file system the user or many users can create many files. When all these files are at one place the identification is difficult for the users. The file system provides certain mechanism to make it easier to group related files together. The most commonly used mechanism is the directory structure’. The directory structure or simply directory is regularly implemented as a special type of file. The directories make it possible to create hierarchical structures of files and sub directories.

The file systems vary in implementation details. It means that all the file systems cannot be accessed by all the operating systems. The operating system ‘Linux’ includes support for many popular file systems. So, it is possible to access the file systems of other operating systems with ease. This is particularly useful in dual-boot scenarios, and when migrating files from one operating system to another.

Sunday, September 28, 2014

How to Add or Remove CSS class from element: jQuery

Earlier article was about to using basic jQuery syntaxes and changing default behaviour of html elements in MVC. As html easily provide to include CSS classes to change the design of an element or we can say anything on the web-page. The same operation can easily be performed by using jQuery according to some conditions or on some events triggering.

Add CSS class: To add a class using jQuery, programmer have to use the function addClass() which have some parameters including property name and the value to be assign.
Add below style on the page:
<style>    a.test {        font-weight: bold;    }</style>
This above style will make font-weight: bold for the anchor tag using this css class. To add this CSS class on the anchor tag, write the following line of code:

$( "a" ).addClass( "test" );

Remove Class: On click of this anchor tag or some other element, we can simple remove this class by using the below line of code:

$( "a" ).removeClass( "test" );

This code can be written on the click event of any element on the page or on some other event. Programmer must place all this jQuery code in the below block so that your code executes when the document is ready to be worked on.
$(document).ready(function(){ //write your code here});

Friday, September 26, 2014

Handling Errors and Exceptions using RAISERROR: SQL

A REISEROR statement is used to return messages to the business applications that are executing the SQL statements. This statement uses the same format as a system error or warning message generated by the database engine. Consider an example of an application that is executing a batch. If an error occurs while executing this batch, an error message will be raised and sent to the application. The application in turn will include the code to handle the error.

You can also return user-defined error messages by using the RAISERROR statement. A REISERROR severity of 1; to 19 executed in the TRY block causes the control to be transferred to the associated CATCH block.

Consider the following example of the AdventureWorks database that stores the details of the shift in which the employees work. You need to update the Shift table to update the time of a shift. While updating the shift details, you need to ensure that the difference between the start time and the end time is eight hours. If it is less than eight hours, an error is raised, and the update process is stopped.

BEGIN TRY
DECLARE @Start datetime
DECLARE @End datetime
DECLARE @Date_diff int
SELECT @Start = ‘1900-01-01 23:00:00.000’, @End = ‘1900-01-02 06:00:00.000’
SELECT @Date_diff = datediff (hh, @Start, @End)
IF (@Date_diff != 8)
 RAISERROR (‘Error Raised’, 16, 1)
ELSE
BEGIN
UPDATE HumanResources.Shift
SET StartTime = @Start, EndTime = @End
WHERE ShiftID = 3
END
END TRY
BEGIN CATCH
PRINT, ‘The difference between the Start and End time should be 8 hours’
END CATCH
GO

Thursday, September 25, 2014

Introduction to file handling

Introduction to file handling 
File system basics
Standard streams in c
File structure
FILE pointer
Opening and closing a file
File handling functions
File types, Text and Binary
Input / Output operations on file
Reading a character using getc()
Writing a character using putc()
Using feof()
Working with string using fputs() and fgets()
Using fprintf() and fscanf()
Using fread() and fwrite()
Direct Access file
fseek()

Introduction to file handling 

Main memory of the computing system is used to store temporary data that is processed to produce information. The data stored in memory is not permanent. When the system is switched off we lose the data stored in main memory. It is because of the volatile nature of main memory. But most of the time storing of data permanently for the sake of future reference is necessary. Of course in almost all organization storing of data is compulsory to produce very important resource "information". This data can be stored permanently only on the secondary storage like magnetic disk. The data on the secondary storage can be stored only through FILE. Without file nothing can be stored on the secondary storage.

Files are not only used to store data but also for other things. Our programs are also stored in the form of files are used widely in computers and play a pivotal role in data accessing. Contents are read from files and we write any contents in these files only. Various types of files are used in computers, but in C language we see two types of files namely, Text files and Binary files.
 File is nothing but a format to store data permanently on secondary storage device. A C programmer is interesting in handling the file to store data in two formats TEXT and BINARY

 The standard library 'stdio.h' in C has many files input/output functions. The file-handling functions are easy to use, powerful, and complete. We frequently use the files for storing data which can be processed by the programs. In order to store data permanently and retrieve it whenever required we need to use files.
 The editor which is used to enter the program and save it simply manipulates files. These files containing language statements are program files. The program can be translated by the compiler to make an object program. The object program is also a file. The object program is linked with other object programs to prepare an executable program. The executable program is also a file. But these all files are created and processed with operating system's file system. But using C language we organize the files to store the data in purely textual format or in binary format. The file contains data in the form of characters only is called as 'text file'. If the data is stored in the form of binary format then it is called as 'binary file'.

EnableClientScript in ASP.NET Vaildation, How to disable it

Script is a short of code, run on any browser, must to enable Java Script. If you want to enable validation along with the page then must to enable java script of the browser for running validation. That's type of validation is known as client side validation.
Let's start to learn about EnableClientScript property of control, if you will set true then validation is enable on single click or you can say validation enable on onfocus.
How to disable it
Controls_Id_name . EnableClientScript = false;


Wednesday, September 24, 2014

Breadth First Traversal in Graph

Graph Traversals

Traversing a graph is nothing but to visit or process all the nodes of the graph once and only once. two techniques are popular to traverse the graph. They are Breadth first traversal and depth first traversal. In both the traversal techniques the traversing starts from one of the nodes of the graph and from that starting node all other node are explored. In case of Breadth first traversal from the starting node all the adjacent nodes of that node are explored and the process of exploring is continued. In case of Depth first traversal only one adjacent node (from the adjacent nodes) is explored and the process of exploring continues. Understanding adjacent node is important in both the techniques of graph traversal.

Breadth First Traversal:

As the name of the traversal techniques suggests the traversal explores the nodes of graph by breadth. It means all the adjacent nodes of one selected node are explored first. From the start node all the adjacent nodes of that node are explored. From the list of explored nodes one of the node is selected as the next start node and the unexplored adjacent nodes of that node are explored. Then from the first list of explored nodes the second node is selected as the next start node and the unexplored adjacent nodes of that node are explored. The process continues till the exploration of all the nodes of the graph. The data structure QUEUE finds its application in this traversal. Consider the following graph:
Breadth First Traversal in Graph

The adjacent nodes of the node

A     :     B     C     E
B     :     A     D
C     :     A     D
D     :     B     C     E
E     :     A     D 
The breadth first traversal of the above graph, assuming node 'A' as start node is:
A     B     C     E     D
You can observe from the traversal result that the first node visited is the starting node. Then the next nodes visited are the adjacent nodes of the start node 'A'. In the last 'D' is visited because it is the only unexplored adjacent node of 'B' the exploring of nodes may be in any order. So, the traversal may also be like:

A     C     B     E     D     OR
A     E     B     C     D.
If the start node is 'C' then the BFT (Breadth First Traversal) is:
C     A     D     B     E

The formal algorithm for the BFT is :

GRAPHBFT
[TA is the one dimensional array of size n where n is the number of nodes in the given graph]
Mark the start node and insert it in the QUEUE
Repeat while QUEUE is not empty
Delete QUEUE.
Add delete node to TA at the next position.
Mark the unmarked adjacent nodes of the deleted node.
Insert the marked nodes (if any) of the deleted node in the QUEUE.
[End of while]
Print TA from the first position as traversal.
Exit.

The above algorithm works in the following manner:

Consider the following graph

Breadth First Traversal in Graph

Let us assume the start node as node 'A'. Let us insert node 'A' in the QUEUE. So, the QUEUE is:
Breadth First Traversal in Graph

When QUEUE is deleted, the node obtained is 'A'. It is added to the traversed array. So, the traversed array is:
Breadth First Graph example

The marked adjacent nodes of deleted node 'A' are, B, C and E. Insert the nodes B, C and E in the QUEUE(in any order) So, the QUEUE is:

Breadth First Traversal in Graph

QUEUE is not Empty the process is repeated.
when QUEUE is deleted, the node obtained is 'B'. It is added to the traversed array. So, the traversed array is:
Breadth First Traversal in Graph

The marked adjacent nodes of deleted node 'B' is D. Insert the node D in the QUEUE so, the QUEUE is:
Breadth First Traversal in Graph


QUEUE is not empty the process is repeated.
When QUEUE is deleted, the node obtained is 'C'. It is added to the traversed array. So, the traversed array is:
Breadth First Traversal in Graph

The marked adjacent node of deleted node 'C' are none. So the QUEUE is:
Breadth First Traversal in Graph

QUEUE is not empty the process is repeated.
When QUEUE is deleted, the node obtained is 'E'. It is added to the traversed array. So, the traversed array is:
Breadth First Traversal in Graph

The marked adjacent node of deleted node 'E' are none. So, the QUEUE is:
Breadth First Traversal in Graph

QUEUE is not empty the process is repeated.
When QUEUE is deleted, the node obtained is 'D'. It is added to the traversed array. So, the traversed array is:
Breadth First Traversal in Graph

The marked adjacent nodes of deleted node 'E' are none. So, the QUEUE is:
Breadth First Traversal in Graph

The QUEUE is empty, stop the process.
When the array is printed we get the Breadth First Traversal as:
A     B     C     E     D

Tuesday, September 23, 2014

Handling Errors and Exceptions using Try-Catch: SQL

When you execute a query, it is parsed for syntactical errors before execution. If the syntax is correct, it is compiled and executed. Sometimes, due to factors, such as incorrect data, an error can occur during execution even if the query is syntactically correct. The errors that occur at run time are known as exceptions.

Consider an example. There is a primary key constraint applied on the EmployeeID attribute of the Employee table. When you try to insert an employee ID that already exists in the table, an error occurs while executing the INSERT statement.

When a database server provides database support to a business application, errors generated while executing the SQL statements can be handled in two ways:

  • By adding error-handling code to the batch by using the TRY-CATCH construct.
  • By returning the error to the business application by using the RAISERROR statement and handling the error in the application.

Using TRY-CATCH

A TRY-CATCH construct includes a TRY block followed by a CATCH block. A TRY block is a group of SQL statements enclosed in a batch, stored procedure, trigger, or function. If an error occurs in any statement of the TRY block, the control is passed to another group of statements that is enclosed in a CATCH block.

A CATCH block contains SQL statements that perform some operations when an error occurs. Therefore, an associated CATCH block must immediately follow a TRY block, as shown in the following syntax:

TRY
<SQL statements>

CATCH
<SQL statements>

END CATCH

If there are no errors in the code that is enclosed in a TRY block, the control is passed to the statement immediately after the associated END CATCH statement. In this case, statements enclosed in the CATCH block are not executed.

The TRY ……..CATCH constructs can be nested. Either a TRY block or a CTCH block can contain nested TRY…. CATCH constructs. A CATCH block can contain an embedded TRY… CATCH construct to handle errors encountered by the CATCH code.

In the CATCH block, you can use the following system functions to determine information about the errors:
ERROR_LINE0: returns the line number at which the error occurred.

  • ERROR_MESSAGE0: specifies the text of the message that would be returned to the application. The text includes the values supplied for any substitutable parameters, such as lengths, object names, or times.
  • ERROR_NUMBER0: returns the error number.
  • ERROR_PROCEDURE0: returns the name of the stored procedure or trigger in which the error occurred. This function returns NULL if the error did not occur within a stored procedure or trigger.
  • ERROR_SEVERITY0: returns the severity.
  • ERROR_STATE0: returns the state of the error.

Consider an example. The EmployeeID attribute of the Employee table in the Adventure Works database is an IDENTITY column and its value cannot be specified while inserting a new record. In this case, if you specify the value for the EmployeeID in the INSERT statement, an error will be generated.

To handle such run-time errors, you can include the insert statement in a TRY block and send the control to the following CATCH block where the error information is displayed, as shown in the following statements:

BEGIN TRY
INSERT INTO [AdventureWorks] . [Person] . [Contact]
VALUES (0, null, ‘Robert’, ‘J’ , ‘Langdon’, NULL, ‘rbl@adventure-works.com’, 0, ‘1 (11) 500 555-0172’, ‘9E685955-ACD0-4218-AD7F-60DDF224C452’, ‘2a31OEw=’, NULL, newid( ), getdate ( ))

INSERT INTO [AdventureWorks] . [HumanREsources] . [Employee]
VALUES (‘AS01AS25R2E365W’, 19979, ‘robert1’, 16, ‘Tool Designer’, ‘1972-05-15’, ‘S’, ‘M’, ‘1996+-07-31’, 0, 16, 20, 1, newid( ), getdate ( ))

Adjacency List Representation in Graph

In case of adjacency list representation 'n' number of singly linked lists are used to represent a graph of 'n' number of nodes. The adjacent nodes are represented as nodes of the individual linked lists representing each node (vertex). If there are no adjacent nodes then the linked list of the respective vertex point to NULL. Consider the following undirected graph:

 undirected graph

The adjacency list representation is:
The adjacency list representation is


In the above adjacency list representation the external pointer '1' contains the address of the first adjacent node of node 1 of graph. The linked list is the adjacency list of node 1. The first node of the list contains the address of second adjacent node 4. Similarly the node 4 contains the address of the last adjacent node of node 1 i.e. node 6. The link of the last node points to NULL. In this way the linked lists are created for all the vertices (nodes) of the graph. Consider the following digraph:
Adjacency List Representation in Graph


The adjacency list of the above digraph is:
The adjacency list of the above digraph

Consider the following weighted graph:

Adjacency List Representation in Graph

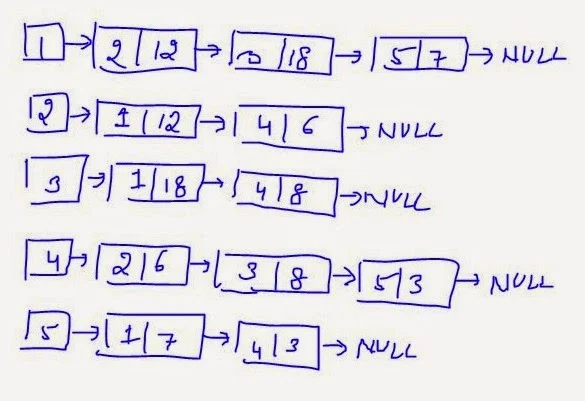
The adjacency list of above weighted graph is:
Adjacency List Representation in Graph

In the above adjacency lists one extra part of the node is used to store the weight of the connecting edge. The other parts are used as usual one for node number or label and the other for the address of next node.

Adjacency matrix representation in Graph

Pictorially it is very the graph can be represented very easily and analysis can be done quite normally. But there is no direct pictorial data structure available to represent the graph. The basic data structure serve the purpose to store the graph in the memory. The data structures two-dimensional array and linked list most commonly used to represent the graphs. If the graph is represented using two dimensional array then the representational is called as "adjacency matrix representation" and if the linked list is used to represent the graph then the representation is called as "adjacency list representation".

Adjacency Matrix Representation:

A two dimensional array of size nxn can be used to represent the graph where 'n' is the number of vertices of the graph. 'n' number of rows are used to represent the vertices and 'n' number of columns are used for each vertex. The matrix entries depend on the type of graph. If the graph is undirected or directed then each row for the respective vertex contains the number of direct paths to each vertex is entered in the matrix. If the graph is weighted graph then the matrix entries for each row will be the weight of the edge to other vertices is entered as matrix entry. Consider the following undirected graph:

Adjacency matrix representation in Graph


In the given graph, the node 2, 4 and 6 are adjacent to 1(there exist a direct path). So, in the adjacency matrix the row entry for vertex 1 contains '1' for each column representing vertices 2, 4 and 6 and rest of the entries will be 0 for that row. Similarly the row for vertex 2 contains entry '1' for column 1 and 5, '0' for 2, 4 and 6. You can note that 1 and 5 are adjacent nodes of vertex 2. In our all discussions node and vertex are synonyms. The complete adjacency matrix is:

Adjacency matrix representation in Graph


In the above adjacency matrix each row is used for each node and each column is used for each node. Adj ij entry will be 1 if node 'i' is adjacent to 'j' otherwise it is 0 where 'Adj' is adjacency matrix, 'i' represents rows for nodes 1,2,3,4,5,6 and 'j' represents columns for nodes 1,2,4,5,6.

Consider the following digraph:

directed graph with adjacency

Nodes 2 and 6 are adjacent nodes of 1. Node 5 is the only adjacent node of 2. Nodes 1 and 5 are adjacent node 4. Node 6 is the adjacent node of 5. There are no adjacent nodes of node 6 it means it is not possible to move from node 6 to any other nodes of the graph (no direct path). So, the adjacency matrix is:

Adjacency matrix representation in Graph


The adjacency matrix of a directed graph is not always symmetric whereas the adjacency matrix of an undirected graph is always symmetric. So, determination of only upper triangle of the adjacency matrix is more than enough for an undirected graph.

Consider the following weighted graph:

Consider the following weighted graph

In the adjacency matrix of the above weighted graph the entries are the respective weight of the edges of the adjacent nodes if any exists otherwise it will be '∞' (unknown weight). So, the adjacency matrix is:
Adjacency matrix representation in Graph

Monday, September 22, 2014

How to use Case and While statement in Batches: SQL

Database developer can use the CASE as well as While statement in situation where several conditions need to be evaluated.

Using CASE statement

The CASE statement evaluates a list of conditions and returns one of the possible results. You can use the IF statement to do the same task. However, you can use a CASE statement when there are more than two conditions that check a common variable for different values. The syntax of the CASE statement is:

CASE
WHEN Boolean_expression THEN expression
[ [WHEN Boolean_expression THEN expression] […..] ]
[ELSE expression]
END
Where,
  • Boolean_expression specifies a bollean expression that is evaluated when using the CASE construct.
  • Expression is the resultant expression that is executed when the Boolean expression evaluates to TRUE. This can be a constant, a column name, a function, a query, or any combination of arithmetic, bit-wise, and string operators.

In a simple CASE construct, a variable or an expression is compared with the Boolean expression in each WHEN clause. If any of these expressions evaluate to TRUE, then the expression specified with the THEN clause is executed. If the expression does not evaluate to TRUE, the expression with the ELSE statement is executed.

Consider the following example where a case construct is included in the SELECT statement to display the marital status as ‘Married’ or Single’:

SELECT EmployeeID, ‘Marital status’ =
CASE MaritalStatus
WHEN ‘M’ THEN ‘Married’
WHEN ‘S’ THEN ‘Single’
ELSE ‘Not specified’
END
FROM HumanResources.Employee
GO

Using the While Statement

You can use the WHILE statement in a batch to allow a set of T-SQL statement to execute repeatedly as long as the given condition holds true. The syntax of the WHILE statement is:

WHILE Boolean_expression
{sql_statement | statement_block}
[BREAK]
{sql_statement | statement_block}
[CONTINUE]
Where,

  • Boolean_expression is an expression that evaluates to TRUE or FALSE.
  • Sql_statement is any SQL statement.
  • Statement_block is a group of SQL statements.
  • BREAK causes the control to exit from the WHILE loop.
  • CONTINUE causes the WHILE loop to restart, skipping all the statements after the CONTINUE keyword.

The SQL Server provides the BREAK and CONTINUE statements to control the statement within the WHILE loop. The BREAK statement causes an exit from the WHILE loop. Any statements that appear after the END keyword, which marks the end of the loop, are executed after the BREAK statement is executed. The CONTINUE statement causes the WHILE loop to restart, skipping any statements after this statement inside the loop.

Consider the following example where the HR department of AdventureWorks, Inc. has decided to review the salary of all the employees. As per the current HR policy, the average hourly salary rate of all the employees should be approximately $20. You need to increase the hourly salary of all the employees until the average hourly salary reaches near $20. In addition, you need to ensure that the maximum hourly salary should not exceed $127.

WHILE (SELECT AVG(Rate) +1 FROM HumanResources.EmployeePayHistory) <20
BEGIN
UPDATE HumanResources.EmployeePayHIstory
SET Rate = Rate +1
FROM HumanResources.EmployeePayHistory
IF (SELECT max (Rate) +1 FROM
HumanResources.EmployeePayHistory)>127
BREAK
ELSE
CONTINUE
END

How to use Constructs in Batches for Conditional Execution: SQL

SQL Server allows you to use programming constructs in the batches for conditional execution of statements. For example, you need to retrieve data based on a condition. If the condition is not satisfied, a message should be displayed.

The SQL Server allows you to use the following constructs to control the flow of statements:

  • IF…..ELSE statement
  • CASE statement
  • WHILE statement

Using the IF….ELSE Statement

You can use the IF…..ELSE statement for conditional execution of SQL statements. A particular action is performed when the given condition on evaluates to TRUE and another action is performed when the given condition evaluates to FALSE.
The syntax of IF….ELSE statement is:

IF Boolean_expression
{sql_statement | statement_block}
ELSE
{sql_statement | statement_block}]
Where,

  • Boolean_expression specifies the condition that evaluates to either TRUE or FALSE. Sql_statement specifies a T-SQL statement.
  • Statement_block is a collection of T-SQL statements.

The following example retrieves the pay rate of an employee from the EmployeePayHistory table to a variable, @Rate. The value of the @Rate variable is compared with the value 15 by using the <(less than) comparison operator. Based on the condition, different messages are displayed.

DECLARE @Rate money
SELECT @Rate = Rate FROM HumanResources.EmployeeHistory
WHERE EmployeeID = 23
IF @Rate < 15
PRINT ‘Review of the rate is required’
ELSE
BEGIN
PRINT ‘Review of the rate is not required’
PRINT ‘Rate =’
PRINT @Rate
END
GO

In the preceding example, the IF statement checks if the rate variable is storing a value less than 15. If the result is true, the PRINT statement displays “Review of the rate is required” else it displays “Review of the rate is not required”. Further, the next PRN statement displays the value of the rate.

Consider another example, where a check is performed to see the existence of the sales department. If the Sales department exists, all the details are displayed otherwise, a user-defined message is displayed.

IF EXISTS (SELECT * FROM HumanResources.Department WHERE Name = ‘Sales’)
BEGIN
SELECT * FROM HumanResources.Department WHERE Name = ‘Sales’
END
ELSE
PRINT ‘Department details not available’
GO

How to Change Default Behaviour of element in jQuery

Earlier article was about installing and embedding jQuery on our web-pages, and then using jQuery selectors to perform some events. These events can be easily written on the same page or may be in another javascript file having extension (js).

jQuery provides simple function to prevent the default behavior of any event on the web page. I have an anchor tag on the page and on the click on that tag I am redirecting the user on the jQuery.com website.

Now to cancel this redirection programmer can use:

$( document ).ready(function() {
    $( "a" ).click(function( event ) {
               event.preventDefault();
    });
});

The above code will can cancel all the redirection of all the anchor tag on the page. If you want to prevent the behavior for some specific element then use their id or may be class selector. Selectors have discussed in earlier article, you can get more help out there.

Let’s suppose we have a form filling out all the details by the user and at the last there is a submit button to post the form data to controller. Now we don’t want to post data then we can use this simple jQuery code:

$( document ).ready(function() {
    $( "#btnSubmit" ).click(function( event ) {
               event.preventDefault();
    });
});

Now we have some more buttons or may be anchor tag to be used on the form but don’t want their click event or redirection on their click. Add any class for each of the anchor element whichever click event you want to cancel and write the following code:

$( document ).ready(function() {
    $( ".className" ).click(function( event ) {
               event.preventDefault();
    });
});

Saturday, September 20, 2014

Implementing Batches in SQL Server and Guidelines

As a database developer, you might need to execute more than one SQL statement to perform a task. For example, when a new employee joins AdventureWorks, Inc., you need to insert the employee details in the database. The details of the employees are stored in more than one table. Therefore, you need to execute an insert statement into store the details in each table. In such a case, you can send all the SQL statements together to the SQL Server to be executed as a unit. This helps in reducing the network traffic.

Creating Batches

A batch is a group of SQL statements submitted together to the SQL Server for execution. While executing batches, the SQL Server compiles the statements of a batch into a single executable unit called an execution plan. This helps in saving execution time.

Consider an example. You have to execute 10 statements and you are executing them one by one by sending 10 requests. This process takes time if your queries are in queue. All statements together in a batch, then the execution process becomes faster as all the statements are sent to the server together.

To create a batch, you can write multiple SQL statements followed by the keyword GO at the end, as shown in the following listing:
<T-SQL Statement1>
<T-SQL Statement2>
<T-SQL Statement3>
…. . .
GO

GO is a command that specifies the end of the batch and sends the SQL statements to an instance of the SQL Server.

Consider an example. If you want to store the details of new employees in the Adventure Works database, you can create the following batch:

INSERT INTO [AdventureWorks]. [Person]. [Contact]
VALUES (0, null, ‘Robert’, ‘J’ ‘Langdon’, NULL
,’rbl@adventure-works.com’, 0, ‘1 (11) 500 555-0172’
,’9E685955-ACD0-4218-AD7F-60DDF224C452’, ‘2a31OEw=’ , NULL
, newid( ), GETDATE ( ) )
INSERT INTO [AdventureWorks]. [HumanResources] . [Employee]
VALUES (‘AS01AS25R2E365W’, 19978, ‘robert1’, 16, ‘Tool Designer’,
‘1972-05-15’, ‘S’, ‘M’, ‘1996-07-31’, 0, 16, 20, 1, newid ( ) ,

When a batch is submitted to the SQL Server, it is compiled to create an execution plan. If any compilation error occurs, such as a syntax error, the execution plan is not created. Therefore, none of the statements in the batch is executed. However, after the execution plan is created, if a run-time error occurs, the execution of the batch stops. In such a case, the statements executed before the statement that encountered the run-time error are not affected.

Using Variables

While creating batches, you might need to save some values temporarily during the execution time. For example, you might need to store some intermediate values of calculations. To store the intermediate values, you can declare variables and assign values to them. You can declare a variable by using the DECLARE statement. The syntax of the DECLARE statement is:

DECLARE @variable_name data_type

Variables that are declare in a batch and can be used in any statement inside the batch are called local variables.
The following code declares a variable, @Rate, and assigns the maximum value of the Rate column from the EmployeePayHistory table to the variable:

DECLARE @Rate int
SELECT @Rate = max (Rate)
FROM HumanResources.EmployeePayHistory
GO
In the preceding example, the @Rate variable is declardd and used to store the maximum value of the Rate column. The max aggregate function is used to retrieve the maximum pay rate from the EmployeePayHistory table. The GO keyword is used to send all the statements together to the SQL Server.

Displaying User-Defined Messages

At times, you need to display user-defined messages or values of variables when the batch is executed. For this, you can use the PRINT statement, as shown in the following batch.
The following code displays the value of the rate variable by using the PRINT statement.

DECLARE @Rate int
SELECT @Rate = max (Rate)
FROM HumanResources.EmployeePayHistory
PRINT @Rate
GO
You can also use comment entries in batches to write a description of the code. This will help understand the purpose of the code. A comment entry can be written in two ways:

  • Multiple line comment entries enclosed within /* and */
  • Single line comment entry starting with – (double hyphens).

Guidelines to Create Batches

While crating batches, you need to consider the following guidelines:

  • You cannot combine statements, such as CREATE DEFAULT, CRATE FUNCTION, CREATE PROCEDURE, CREATE RULE, CREATE TRIGGER, and CREATE VIEW with other statements while creating a batch. Any statement that follows the create statement is interpreted as part of the definition.
  • You can use the EXECUTE statement in a batch when it is not the first statement of the batch, otherwise the EXECUTE statement works implicitly.
In addition, you need to consider the following restrictions:
  • You cannot bind rules and defaults to columns and use them in the same batch.
  • You cannot define and use the CHECK constraint in the same batch.
  • You cannot drop objects and recreate them in the same batch.
  • You cannot alter a table by adding a column and then refer to the new columns in the batch created earlier.


How to add jQuery to Web Pages: MVC

Programmer must include jQuery library on the web pages (views in case of MVC) to be execute all the functions/event/triggers written for that page in jQuery.  This article will lists all the options may be used to use jQuery on the pages.

To include jQuery there are two options which are basically used:
  • Include jQuery from google
  • Download and then add a reference on your page. (www.jQuery.com)

All the js files have two versions and can be downloaded through the website given above:
  • Development version:  uncompressed and readable, used for testing purpose
  • Production version: compressed and not readable, used on live sites.

@Scripts.Render(“http://ajax.googleapis.com/ajax/libs/jquery/1.11.1/jquery.min.js”)

In earlier article, we have studied about layout files and a simple view file that is used to render styles/scripts on the pages in MVC. So to include jQuery or any other file on the page we have two ways i.e.
  • Add reference on view: adding a reference on the view individually will only enable jQuery for that page. If you want to use it on another page then you have to add it on that page also.
  • Add reference on layout: as we all know, layout file is the basic structure for all the pages including that layout. So adding a reference on layout can be used for all the pages following that layout.

Earlier article was about to use selectors on the page but without adding this reference, you can’t use those. In next article we will discuss about jQuery syntaxes.

Graph Introduction

Graph is a non-linear data structure which is a collection of nodes also called as vertices and edges also called as arcs. So, if 'G' is a Graph mathematically it is represented as, G=(V,E) where 'V' is the non empty set of vertices 'E' is the set of edges. The edge if it exists in the graph connects any two nodes only. There may be more than one edge connecting the same nodes. If the edges in a graph show direction then such edges are called as directed edges and the graphs containing such directed edges are called as directed graphs or simply digraphs. If the graph contains undirected edges (represented by straight lines) then it is called as undirected graph or simply graph.

 undirected graph

Set of vertices, V={A,B,C,D,E,F,G}
Set of edges, E={AB,AD,AF,BC, CE, DE, EG, FG}

In undirected graph the edge AB is similar to BA. Only one representation is considered. But in a directed graph the edge AB means, the edge starts from A and ends in B.
Directed Graph or digraph:
Directed Graph or digraph

Set of vertices, V={A,B,C,D,E,F,G}
Set of edges, E={AB,AD,CB,DE,EC,EG,FG,FA}
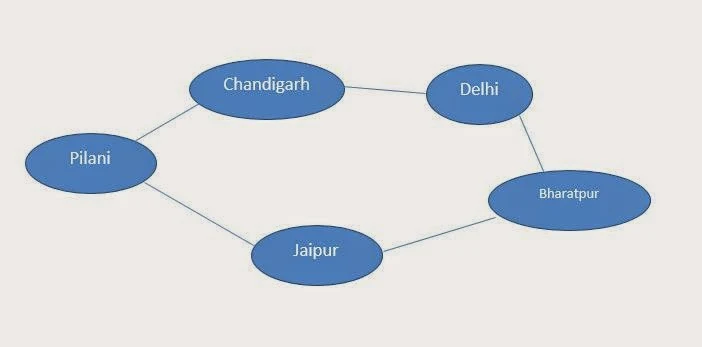
Scenario: A person moves from pilani to Jaipur by road. From Jaipur he reaches Delhi via Bharatpur. The person comes back to pilani via chandigrah.
How many places the person has visited? How much distance he has covered? How much time he takes to make a tip?
To answer all these questions it is necessary to go through the scenario many a times. If the same scenario is represented pictorially then answering the questions will be very easy. That is what the major benefit of graph is. See the following representation.

The above representation is a graph from which we can instantly say the person visited 4 places from pilani. If we mark the edges by means of either distance or time required to reach then the graph becomes weighted graph. See the following graph where the edges are marked with distances in kilometers.
weighted digraph

 From the above weighted graph we can easily say that the person has traveled 710 kilometers. If the edges are labeled with time as weight we can easily calculate the time required to cover the places. In the above graph there exists route from Pilani to Jaipur then vice-versa is also true. So, in undirected graph an edge is a two-way edge. But in case of digraph the edge if exists represents one-way.
Consider the following undirected graph:

Set of vertices, V={1,2,3,4,5,6}
Set of edges, E={12,14,16,23,35,45,56}, Number of edges=7
Degree of any vertex is total number of incident edges. So, in the graph degree of vertex 1 is 3, 2 is 2, 3 is 2, 4 is 2, 5 is 3 and vertex 6 is 2. Sum of degree of all vertices of graph is 14. The sum is always even. Number of edges in the graph is equal to 7. Therefore we can derive a relation between number of edges in a graph and sum of degree of vertices of graph. The relation is:
Number of edges in graph = 1/2 (Sum of degree of vertices)

      
Number of edges in graph


where m is number of edges of a graph, d(V)The same relation holds true for digraph also. In a digraph degree of a vertex is equal to sum of in degree and out degree.
In degree of a vertex is equal total number of edges entering into the vertex and out degree is equal to total number of edges going out of the vertex.
In the above graph there exists an edge from vertex 1 to 2. There is no direct edge existing from 1 to 3. But it is possible to move to 3 from 1 via 2. It is called as path. In a directed graph if the path terminates in a start node then it is cycle. There are 3 paths from node 1 to node 5. They are 1-2-3-5, 1-4-5 and 1-6-5. The path 1-2-3-5 is a collection of paths 1-2, 2-3 and 3-5. In a graph if two nodes are directly connected then there exists a direct path. If there exists an edge from one vertex 'i' to other vertex 'j' then node 'i' and 'j' are called as adjacent nodes. From the above graph we can list the adjacent nodes of each vertex as:
Graph Introduction

Wednesday, September 17, 2014

Types of Java Programs

Java is a programming language, by which we can design a new program or a software. It have many features, such as

  • Object Oriented Language
  • Support Cross Platform
  • Platform independent
  • Strongly typed language
  • Machine Dependent(JVM- Java Virtual Machine)
  • Use Reference in place of pointer
So you can make a new application in it. Java Support four types of application such as
  1. Console Based Application(Core Java)
  2. Client Based Application (Applet, Swings)
  3. Web Based Application (Applet, Servlet, JSP)
  4. Mobile Based Application (Android)
1. Console Application- It also known as command based application. In which we can work only with non-GUI application. Suppose we want to create a new folder in system then what to do in DOS(console based). First of all we write a command for this, like mkdir. If you solve same problem in window(GUI) then do not need to write command for this, simply use mouse pointer and make a new folder.

Diagrammatic view of console window

Diagrammatic view of console window


2. Client based application : That application, which is install on client machine. That application create for single person or a organization. Also known as off line application. Client application design in java is very easy through applet and swings. Through the client application user use pointing device rather then command. In the client application user can put any input by the user interface. 

Diagrammatic view of client based application(GUI)

Diagrammatic view of client based application(GUI)

3. Web Based Application:  These application run on web browser. For this types of application we create a web pages, you can select any language for making web pages like jsp, html, asp, php etc. Here we select servlet and JSP for designing the web pages. Servlet is a class file which is compiled by the servlet engine and JSP is a extension of servlet. For making easier we use JSP for dynamic web pages.

Diagrammatic view of web based application(GUI)

Diagrammatic view of web based application(GUI)
4. Mobile Based Application : These application run on mobile platform, in current market java has already launched android platform for mobile application. In the later article i will discussed more about java-mobile(android ).

Diagrammatic view of Mobile based application(GUI)

Diagrammatic view of Mobile based application(GUI)


Wednesday, September 10, 2014

How to Bind DropDownList with Enum MVC

Earlier article was about to bind DropDownList with simple select list of type selectlistitems. These select list may by any type of list either from database or temporary for that view only. In this article we will create an enum, then create a select list through that enum and finally will bind that to drop-down list.

Create an Enum like I have, named OptionType

enum OptionTypes
{
value1,
value2,
value3,
value4
}

After creating enum, write a class that will work like a helper to create select list for that enum:

public static class EnumHelper
{
// Get the value of the description attribute if the   
// enum has one, otherwise use the value.  
public static string GetDescription<TEnum>(this TEnum value)
{
var fleid = value.GetType().GetField(value.ToString());

if (fleid != null)
{
var attributes = (DescriptionAttribute[])fleid.GetCustomAttributes(typeof(DescriptionAttribute), false);

if (attributes.Length > 0)
{
return attributes[0].Description;
}
}

return value.ToString();
}

/// <summary>
/// Build a select list for an enum
/// </summary>
public static SelectList SelectListFor<T>() where T : struct
{
Type t = typeof(T);
return !t.IsEnum ? null
: new SelectList(CreateSelectList(t), "Value", "Text");
}

/// <summary>
/// Build a select list for an enum with a particular value selected 
/// </summary>
public static SelectList SelectListFor<T>(T selected) where T : struct
{
Type t = typeof(T);
return !t.IsEnum ? null
: new SelectList(CreateSelectList(t), "Text", "Value", selected.ToString());
}

private static IEnumerable<SelectListItem> CreateSelectList(Type t)
{
return Enum.GetValues(t)
  .Cast<Enum>()
  .Select(e => new SelectListItem { Value = e.ToString(), Text = e.GetDescription()                            });
}
}

Go to your controller and write the line as I have:

ViewBag.values = EnumHelper.SelectListFor<OptionTypes>();

Open your view page and write

@Html.DropDownList("values");

Run this view in browser and check, your drop-down list has been bind. This will create a simple list named “values” as specified as parameter. If we want to create a drop-down list for a model then:

@Html.DropDownListFor(model => model.property, (IEnumerable<SelectListItem>)ViewBag.values, new { html parameters })

This will bind this drop-down list as strongly with the property of the model.

© Copyright 2013 Computer Programming | All Right Reserved