-->

Thursday, March 22, 2018

Save and Display Binary Images from Database in DataGridView in Windows Forms

In this article, I am going to show you, How to show images in DataGridView in Windows forms c#. Its easy to bind the DataGridView with the database table which is contain binary image. You can check this code to bind the DataGridView with the image using Entity Framework.


using System;
using System.IO;
using System.Linq;
using System.Windows.Forms;

namespace BankingApplication_Tutorial
{
    public partial class Form4 : Form
    {
        public Form4()
        {
            InitializeComponent();
        }

        private void Form4_Load(object sender, EventArgs e)
        {
            dataGridView1.AutoGenerateColumns = false;
            dataGridView1.ColumnCount = 2;
            dataGridView1.Columns[0].Name = "Id";
            dataGridView1.Columns[0].HeaderText = "Image Id";
            dataGridView1.Columns[0].DataPropertyName = "Id";

            dataGridView1.Columns[1].Name = "Name";
            dataGridView1.Columns[1].HeaderText = "Name";
            dataGridView1.Columns[1].DataPropertyName = "Name";

            DataGridViewImageColumn Imagecolumn = new DataGridViewImageColumn();
            Imagecolumn.Name = "Data Image";
            Imagecolumn.DataPropertyName = "Data";
            Imagecolumn.HeaderText = "Image Show";
            Imagecolumn.ImageLayout = DataGridViewImageCellLayout.Normal;
            dataGridView1.Columns.Insert(2, Imagecolumn);
            dataGridView1.RowTemplate.Height = 100;
            dataGridView1.Columns[2].Width = 100;
            this.bindDataGridView();


        }

        private void bindDataGridView()
        {
            // throw new NotImplementedException();
            banking_dbEntities1 dbe = new banking_dbEntities1();
            var items = dbe.DataGridImages.ToList();
            dataGridView1.DataSource = items;
        }

        private void button1_Click(object sender, EventArgs e)
        {
            banking_dbEntities1 dbe = new banking_dbEntities1();
            using (OpenFileDialog dialog =  new OpenFileDialog())
            {
                if (dialog.ShowDialog() == DialogResult.OK)
                {
                    string filename = dialog.FileName;
                    byte[] bytes = File.ReadAllBytes(filename);
                 
           
            DataGridImage img = new DataGridImage();
                    img.Name = Path.GetFileName(filename);
                    img.Data = bytes;
                    dbe.DataGridImages.Add(img);
                    dbe.SaveChanges();


                        }

            }
            bindDataGridView();
        }
    }
}

Saturday, May 14, 2016

Windows Forms Events

An event is generated when a user performs an action, such as clicking the mouse or pressing a key. When a user clicks a form, the clicks event is generated for the form.
Each form and control has a predefined set of events associated with it. You can instruct an application to perform a specific action when an event takes place. For example, you can write code for adding items to a list as soon as a form is loaded.

Click : Occurs when a user clicks anywhere on a form.
DoubleClick : Occurs when the component is double-clicked.
FormClosed : Occurs when a form is closed.
Deactivate : Occurs when a form losses focus and is no longer active.
Load : Occurs when a form is loaded in the memory for the first time. This event can be used to initialize variables used in a form. This event can also be used to specify the initial values to be displayed in various controls in a form.
MouseMove : Occurs when a mouse is moved over a form.
MouseDown : Occurs when the left mouse button is pressed on a form.
MouseUp : Occurs when the mouse button is released.

You can specify the action to be performed on the occurrence of an event within a special method called, event handler. You can add code for an event handler by using the code Editor window.

To write code for an event corresponding to an object, open the properties window for that object.

Friday, April 15, 2016

Windows Forms Methods

Windows Forms methods enable you to perform various tasks, such as opening, activating and closing the form.

The commonly used methods are explained in the following:
1. Show ( ) 
Description : Is used to display a form.
Example: Form2 frmobj = new Form2();
frmobj.Show();

Explanation : This code creates a new instance of the Form2 form by using the new keyword. The Show() method display the instance of Form2 form.

2. Hide( )
Description: Is used to hide a form.
Example: Form1 frmobj = new Form1();
frmobj.Hide();
//you can use
this.Hide( ); // for current Form1

Explanation: This code creates a new instance of the Form1 form by using the new keyword. The Hide() method hides the instance of Form1 form.

3. Activate ( )
Description: Is used to activate a form and set the focus on it. When you use this method. It brings the form to the front(if it is the current application) or flashes the form caption(if it is not the current application) on the task bar.
Example: Form1 frmobj = new Form1();
frmobj.Activate();
Explanation : This code sets focus on a form named Form1.

4. Close ( )
Description: Is used to close a form.
Example: Form1 frmobj = new Form1();
frmobj.Close();
Explanation: This code closes the form named Form1.

5. SetDesktopLocation()
Description: Is used to set the desktop location of a form at runtime. This method takes the X and Y coordinates of the desktop as its parameters.
Example: Form1 frmobj = new Form1();
frmobj.SetDesktopLocation(200,200);
Explanation : This code displays the form named Form1 at the specified location.

Thursday, April 7, 2016

Types of Dialog Boxes in Windows Form C#

Windows provides the following type of dialog boxes:
1. Modal
2. System Modal
3. Modeless

Modal Dialog Box : A modal dialog box does not allow you to switch focus to another area of the application, which has invokes the dialog box. However, you can switch to other windows application while the modal dialog box is being displayed on the screen.
For example, the Save as dialog box of Microsoft word is a modal dialog box. If you are trying to save a word file by using the Save As dialog box, you cannot make any changes in the word document until it is saved. The following figure shows the save as dialog box.


Modal Dialog Box


System Modal Dialog Box
The System modal dialog box takes control of the entire Windows environment. For example, the Windows Log On dialog box is a system modal dialog box.
The following figure displays the Log On to Windows dialog box.
Sometimes, error messages are displayed by using a system modal dialog box. When such messages appear on the screen, the user is not allowed to switch to, or interact with, any other Windows application until the system modal dialog box is closed.

System Modal Dialog Box


Modeless Dialog Box

Types of Dialog Boxes in Windows Form C#

The modeless dialog box stays on the screen and is available for use at any time. For example, the Find and Replace dialog box of Microsoft Word is a modeless dialog box. This modeless dialog box allows you to switch to another area of the application, which has invoked the dialog box, or to another windows application.

Wednesday, February 10, 2016

By using Single LINQ Query retrieve foriegn key table column

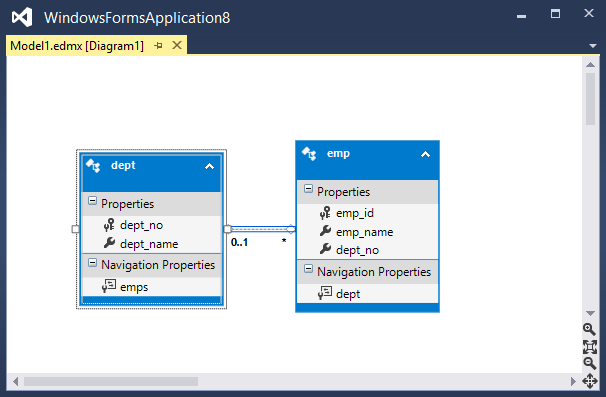
In this article, I will explain you, How to retrieve data from two joined table using single LINQ Query. Here we have two joined table in mentioned diagram. Both tables are joined from dept_no, so if you want to retrieve record from both table like:
Retrieve emp_id and emp_name who belongs to IT department.


employeeEntities empl = new employeeEntities();

            var query = from g in empl.emps
                        join m in empl.depts on g.dept_no equals m.dept_no
                        where m.dept_name == "IT"
                        select new
                        {
                            Emp_Name = g.emp_name,
                            Emp_ID = g.emp_id
                        };
               
            dataGridView1.DataSource = query.ToList();
In this code, empl is the context object through which we can access columns of both tables. emp is the foreign key table map with dept table using dept_no column. Emp_Name and Emp_ID is the reference name , which are displayed on table. Bind the query result with the dataGridView. 

Tuesday, February 9, 2016

[Solved] Rows cannot be programmatically removed unless the DataGridView is data-bound to an IBindingList that supports change notification and allows deletion.

[Solved] Rows cannot be programmatically removed unless the DataGridView is data-bound to an IBindingList that supports change notification and allows deletion. When you bind the Datagridview with List in windows form. You get error when you delete row from it. According to article title, first to implement your List from IBindingList interface, if you want to solve this issue. Suppose, you want to bind your DataGridView with this class, which is mentioned below:

public partial class userAccount
    {
        public decimal Account_No { get; set; }
        public string Name { get; set; }
         }
    }

Then you write simple code for this :

List<userAccount> ua= new List<userAccount>();
ua.Add(new userAccount(){Account_No=1000000008, Name ="Jacob"});
dataGridView1.DataSource = ua;

After binding the DataGridview, you will write the code for remove row from dataGridview.

dataGridView1.Rows.RemoveAt(dataGridView1.SelectedRows[0].Index);

After that you got error, which is mentioned below:

[Solution]

Bind DataGridView with IBindingList<userAccount> . Now the code is:

BindingList<userAccount>  bi = new BindingList<userAccount> ();
bi.Add(new userAccount(){Account_No=1000000008, Name ="Jacob"});
dataGridView1.DataSource = bi;

After binding the DataGridview, you will write the code for remove row from dataGridview.

bi.RemoveAt(dataGridView1.SelectedRows[0].Index);

Friday, January 1, 2016

Example of NotifyIcon system tray in windows form c#

If you want to show your windows form application in NotifyIcon toolBar then you can use this example. When you press minimize button of windows form then your application should minimized in system tray. 
Try these steps to minimized your application as System Tray:
Step-1 : Add a new  windows form into your project
Step-2 : Add a NotifyIcon control in currently added form.
Step-3 : Select Show smart tag, add icon file in NotifyIcon control.


Step-4 : Add the following code in code file with respective events

using System;
using System.Collections.Generic;
using System.ComponentModel;
using System.Data;
using System.Drawing;
using System.Linq;
using System.Text;
using System.Threading.Tasks;
using System.Windows.Forms;

namespace WindowsFormsApplication5
{
    public partial class Form3 : Form
    {
        public Form3()
        {
            InitializeComponent();
        }

        private void Form3_Resize(object sender, EventArgs e)
        {
            if (WindowState==FormWindowState.Minimized)
            {

                ShowIcon = false;
                notifyIcon1.Visible = true;
                notifyIcon1.ShowBalloonTip(1000);
            }
        }

        private void notifyIcon1_MouseDoubleClick(object sender, MouseEventArgs e)
        {
            ShowInTaskbar = true;
            notifyIcon1.Visible = false;
            WindowState = FormWindowState.Normal;
        }

        private void Form3_Load(object sender, EventArgs e)
        {
            notifyIcon1.BalloonTipText = "Application minimized";
            notifyIcon1.BalloonTipTitle = "dotprogramming.blogspot.com";
        }
    }
}

Code generates the following output
Example of NotifyIcon system tray in windows form c#

Friday, December 25, 2015

Solve Application not responding problem

In this article, I will show you how to fix computer hanging problems. Generally, we all know about "Not Responding" problem. When processor takes time to execute the process then thats type of problem occurs. By using this article, I will resolve this issue.


Windows Form Design:

Solve Application not responding problem
using System;
using System.Collections.Generic;
using System.ComponentModel;
using System.Data;
using System.Drawing;
using System.Linq;
using System.Text;
using System.Threading;
using System.Threading.Tasks;
using System.Windows.Forms;

namespace WindowsFormsApplication5
{
    public partial class Form1 : Form
    {
        private readonly SynchronizationContext synchronizationContext;
        private DateTime previousTime = DateTime.Now;
        public Form1()
        {
            InitializeComponent();
            synchronizationContext = SynchronizationContext.Current;
        }

        private void button1_Click(object sender, EventArgs e)
        {
            for (var i = 0; i <= 1000000; i++)
            {
                label1.Text = @"Count : " + i;
            }
        }

        private async void button2_Click(object sender, EventArgs e)
        {
            button1.Enabled = false;
            button2.Enabled = false;
            var count = 0;

            await Task.Run(() =>
            {
                for (var i = 0; i <= 1000000; i++)
                {
                    UpdateUI(i);
                    count = i;
                }
            });
            label1.Text = @"Count : " + count;
            button1.Enabled = true;
            button1.Enabled = false;
        }
        public void UpdateUI(int value)
        {
            var timeNow = DateTime.Now;

            //Here we only refresh our UI each 50 ms
            if ((DateTime.Now - previousTime).Milliseconds <= 50) return;

            //Send the update to our UI thread
            synchronizationContext.Post(new SendOrPostCallback(o =>
            {
                label1.Text = @"Count : " + (int)o;
            }), value);

            previousTime = timeNow;
        }
    }
}

Tuesday, November 10, 2015

Example domainUpDown control in windows form c#

Introduction
In this article, we will see, How to use domainUpDown control in windows form c#. This control is used to choose single item at time, In this we have multiple options. If you see this control then you notice that this control is similar to Numeric UpDown control. But NumericUpDown control display numbers only. domainUpDown control display string like display month's name and many more things. In this article we will see many more interesting things which are related to domainUpDownControl.
Example domainUpDown control in windows form c#

How to use doaminUpDown Control
  1. First of all add domainUpDown control from ToolBox
  2. Copy this code paste into your code file

    private void Form2_Load(object sender, EventArgs e)
        {
            DomainUpDown.DomainUpDownItemCollection collection = this.domainUpDown1.Items;
            collection.Add("Jan");
            collection.Add("Feb");
            collection.Add("Mar");
            collection.Add("Apr");

            //How to set the text default in DomainUpDown

            this.domainUpDown1.Text = "Jan";

        }


The Last line of code explain the default value of domainUpDown Control. 
In the Second example, I will explain you how to retrieve value from domainUpDown Control using SelectedItemChanged.

        private void domainUpDown1_SelectedItemChanged(object sender, EventArgs e)
        {
            MessageBox.Show(domainUpDown1.Text);
        }

When, first time the page is load then appear message box on your screen with the text message of selected item of domainUpDown Control.

Now, Learn how to add domainUpDown control using code file. Also learn how to fire SelectedItemChanged event using code file.

using System;
using System.Collections.Generic;
using System.ComponentModel;
using System.Data;
using System.Drawing;
using System.Linq;
using System.Text;
using System.Threading.Tasks;
using System.Windows.Forms;

namespace WindowsFormsApplication3
{
    public partial class Form3 : Form
    {
        public Form3()
        {
            InitializeComponent();
        }

        private void Form3_Load(object sender, EventArgs e)
        {
            DomainUpDown dynamicallyadd = new DomainUpDown();
            dynamicallyadd.Location = new System.Drawing.Point(12, 50);
            dynamicallyadd.Name = "domainupdown";
            dynamicallyadd.Width = 250;
            dynamicallyadd.Height = 100;
            dynamicallyadd.Items.Add("Apple");
            dynamicallyadd.Items.Add("mango");
            dynamicallyadd.Items.Add("Grapes");
            dynamicallyadd.Text = "Apple";
            this.Controls.Add(dynamicallyadd);
            dynamicallyadd.SelectedItemChanged += new System.EventHandler(Itemchanged);
        }

        private void Itemchanged(object sender, EventArgs e)
        {
           // throw new NotImplementedException();
            DomainUpDown item = sender as DomainUpDown;
            MessageBox.Show(item.Text);
        }
    }
}


Now, In this last section of the domainUpDown Control, we will learn how to bind it with Database table. If you bind it with SQL server then  first to add EDMX file in the project.

      private void Form1_Load(object sender, EventArgs e)
        {
            BankingSystemEntities bs = new BankingSystemEntities();
            var item = bs.userAccounts.ToArray();
            foreach (var item1 in item)
            {
                domainUpDown1.Items.Add(item1.Account_No.ToString());
            }


Monday, November 9, 2015

How to get cell value from dataGridView in windows form c#

In this article, I will teach you, How to get cell value from dataGridView in windows form c#. First of all bind the dataGridView with any Data Source then you can access cell value from it. I bind it with many data source, check this link. In previous article, I get the cell value from selected row of  dataGrid but on this time, we set the default row. In this article, I will give an example of cell click event.


private void dataGridView1_CellClick(object sender, DataGridViewCellEventArgs e)
        {
     
            decimal accno = Convert.ToDecimal(dataGridView1.Rows[e.RowIndex].Cells[0].Value);
            MessageBox.Show(accno.ToString());
}

Here, Cells[0] return the first column's cell value from dataGridView.

Saturday, October 3, 2015

How to get information about drive and their properties using windows form

Using The DriveInfo Class

The DriveInfo class provides access to information related to a drive, such as space availabe on a drive, total storage space of the drive and drive name. The DriveInfo class can also be used to query the format of a drive, such as NTFS or FAT and type of the drive, such as fixed, CD-ROM, or removable. This class throws an exception if a drive is currently not ready. For example, if we want to get information of a CD-ROM that does not contain a CD in it, The DriveInfo class will throw an exception. We can avoid such exceptions by using the IsReady property of the DriveInfo class. If the DriveInfo property returns true, we can access a drive without an exception.
In previous example we have been accessed Logical drives of the system. See previous image

How to access drive of the system

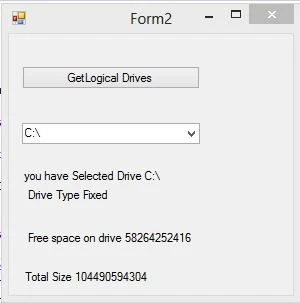
Now in this example we will access Logic drive information such as drive type , drive size and free space of the drive. So first we take four label control to the design window after that handle comboBox1_SelectedIndexChanged event in the program.

Complete code


using System;
using System.Collections.Generic;
using System.ComponentModel;
using System.Data;
using System.Drawing;
using System.IO;
using System.Linq;
using System.Text;
using System.Threading.Tasks;
using System.Windows.Forms;

namespace WindowsFormsApplication2
{
    public partial class Form2 : Form
    {
        public Form2()
        {
            InitializeComponent();
        }

        private void button1_Click(object sender, EventArgs e)
        {
            string[] str = Directory.GetLogicalDrives();
            foreach (string item in str)
            {
                comboBox1.Items.Add(item);

            }

        }

        private void comboBox1_SelectedIndexChanged(object sender, EventArgs e)
        {
            try
            {
                string drive = comboBox1.SelectedItem.ToString();
                label1.Text = "you have Selected Drive " + drive;
                DriveInfo info = new DriveInfo(drive);
                label2.Text = "Drive Type " + info.DriveType.ToString();
                label3.Text = "Free space on drive " + info.AvailableFreeSpace.ToString();
                label4.Text = "Total Size " + info.TotalSize.ToString();


            }
            catch (Exception exp)
            {

                label1.Text = exp.Message;

            }
        }
    }
}


Output
How to Access drive information in c#

Wednesday, September 23, 2015

Example to create tooltip using code in windows form c#

Introduction
In this article i will show you , how to generate tooltip on controls using c# code. By using tooltip we can put some hints about task. I will give you an example of ToolTip in windows form c#. In this article we will use ToolTip class with their SetToolTip method.


Description

Code

using System;
using System.Collections.Generic;
using System.ComponentModel;
using System.Data;
using System.Drawing;
using System.Linq;
using System.Text;
using System.Threading.Tasks;
using System.Windows.Forms;

namespace WindowsFormsApplication2
{
    public partial class Form6 : Form
    {
        public Form6()
        {
            InitializeComponent();
            settooltip();
        }

        private void settooltip()
        {
            ToolTip tip = new ToolTip();
            tip.SetToolTip(this.button1, "Default Push Button");
            tip.SetToolTip(this.textBox1, "Empty TextBox");
        }
    }
}

Sunday, September 20, 2015

Example to change windows form shape using c#

Introduction
In this article i will show you, how to change the shape of the current form. The default form shape is square and i want to change it in ellipse form. Copy this code and paste into your code file.

Code

using System;
using System.Collections.Generic;
using System.ComponentModel;
using System.Data;
using System.Drawing;
using System.Linq;
using System.Text;
using System.Threading.Tasks;
using System.Windows.Forms;

namespace WindowsFormsApplication2
{
    public partial class Form3 : Form
    {
        public Form3()
        {
            InitializeComponent();
        }
        protected override void OnPaint(PaintEventArgs e)
        {
            System.Drawing.Drawing2D.GraphicsPath shape1 = new System.Drawing.Drawing2D.GraphicsPath();
            shape1.AddEllipse(0, 0,this.Width, this.Height);
            this.Region = new System.Drawing.Region(shape1);
        }
    }
}
Code generate  the following output

Example to change windows form shape using c#

Thursday, September 17, 2015

Edit menu bar with cut copy and paste operations in Windows Form C#

Introduction

In this article i will show you how to do cut copy and paste operation on text which is entered in the TextBox. I will give you an example of it. It is impossible for one, specially a Programmer, to imagine his/her life without editing. Editing operations (Cut/Copy and paste etc.) are performed using clipboard, so these are also called Clipboard operation.


Invention

Larry Tesler, who invented Cut/Copy and paste in 1973. He is a computer scientist, working in the field of human-computer interaction. Tesler has worked at Xerox PARC, Apple Computer, Amazon.com and Yahoo! We can find out more about LarryTesler.

In this article I will show how to perform these operations with our own code. As we are just doing editing operations, it doesn't matter which control we are using. Here I am using two textboxes to perform this operation. I created a simple window form with a menu strip and two textboxes. In the menu strip all the operations are added in Edit menu item as shown in below screenshot.


Generate the click event of above three menu items. 
Copy

We are going to copy the selected text of textbox, so we use SelectedText property of textbox. To copy the data in clipboard there is a method in Clipboard class i.e. SetData(), which will clear the clipboard and then add new data in specified format to clipboard.

private void copyToolStripMenuItem_Click(object sender, EventArgs e)
{
      TextBox txtBox = this.ActiveControl as TextBox;
      if (txtBox.SelectedText != string.Empty)
         Clipboard.SetData(DataFormats.Text, txtBox.SelectedText);
Cut

Actually, cut operation is a combination of copying and removing that text from that location. So we will copy the text and empty that string after that.

private void cutToolStripMenuItem_Click(object sender, EventArgs e)
{
    TextBox txtBox = this.ActiveControl as TextBox;
    if (txtBox.SelectedText != string.Empty)
       Clipboard.SetData(DataFormats.Text, txtBox.SelectedText);
    txtBox.SelectedText = string.Empty;
Paste


To insert clipboard data to current location is called paste. We can perform a paste operation multiple times with a single clipboard data. To paste the data from clipboard there is a method in Clipboard class i.e. GetText(). First we get actual position of cursor in the textbox and then insert the data to that position using Insert() method as in above code.

private void pasteToolStripMenuItem_Click(object sender, EventArgs e)
{
    int position = ((TextBox)this.ActiveControl).SelectionStart;
    this.ActiveControl.Text = this.ActiveControl.Text.Insert(position, Clipboard.GetText());
}

Insert() is a method of string class, which return a string in which a specified string is inserted at a specified position. So that is how we perform editing operations with our own code. The same procedure can be used to perform these operation in other controls of windows forms.

Download source.

Wednesday, September 9, 2015

Login form using entity framework in windows form c#

Introduction
In this article i will give an example of login form using entity framework. We will do login from database table so first of all create database table using entity framework's code first approach. Now, Using linq query we can do this task.

Description
Sometimes anonymous user can harm our application and can change the data stored in our application. That’s why, it is often necessary to permit only authorized users to use our application. There is no predefined method to do this operation in windows forms, so we have to implement it in our way.

If we have username and password in our database then we can implement a better authentication system. So we will create a table in our database named User which will have two columns (Username and Password). Insert some records in that table to check our login control.


In click event of login button write following code:


Here in this code will show a message if user leaves the textboxes empty. First check the username in our database having exactly the same name user entered in textbox. If there is an entry then compare the password.
We can show a message box at each wrong step of user.

Download example.

Monday, September 7, 2015

Create Database in c# using code first approach

Introduction

In this article i will show you how to create database in windows form c# using code first approach. Example of code first approach to create database. Entity Framework is an open source object-relational (ORM) framework for ADO.NET. It allows user to create a model by writing code in EF designer. The releases are improving from entity framework 3.5 and onwards. Entity Framework 5 is the stable version for visual studio 2010 and 2012 and updated soon with the latest features.

The main advantages of using Entity Framework 5 are:
  • Speed - You do not have to worry about creating a DB you just start coding. Good for developers coming from a programming background without much DBA experience.
  • Simple - you do not have a edmx model to update or maintain.
Entity framework 5 released with some advanced features like enum support, table-valued functions and performance improvements. In this article we will create a database using entity framework 5 code first approach.

Steps of Creating Database through Entity Framework
  • Create a Project ClassLibrary in Visual Studio.
  • Install EntityFramework from Package Manager Console (required internet connection) using
    • PM> install-package entityframework 
  • Remove InBuilt Class i.e "Class1".
  • Add a new class “Student”.
  • Add another class DataContext (Name may be change) inherited by DbContext
    • DbContext is in System.Data.Entity Namespace.
  • Write the below code in DataContext class 
j
public DataContext()
          :base("Database Name")
{
    if(!Database.Exists("Database Name"))
        Database.SetInitializer(new DropCreateDatabaseAlways<DataContext>());
}
public DbSet<Student> Student { get; set; }


  •  Add a new project2 (Window Form Application) that will be used to execute constructor of DataContext class.
  • Install Entity Framework 5 in this new project also.
  • Create an object of DataContext class in Form1 Constructor.
  • Now run project2 and your Database has been created.
When we will execute the given command to install entity framework, it will execute the stable version i.e. entity framework 5.

Download code file

Insert foreign key in database

Sunday, August 23, 2015

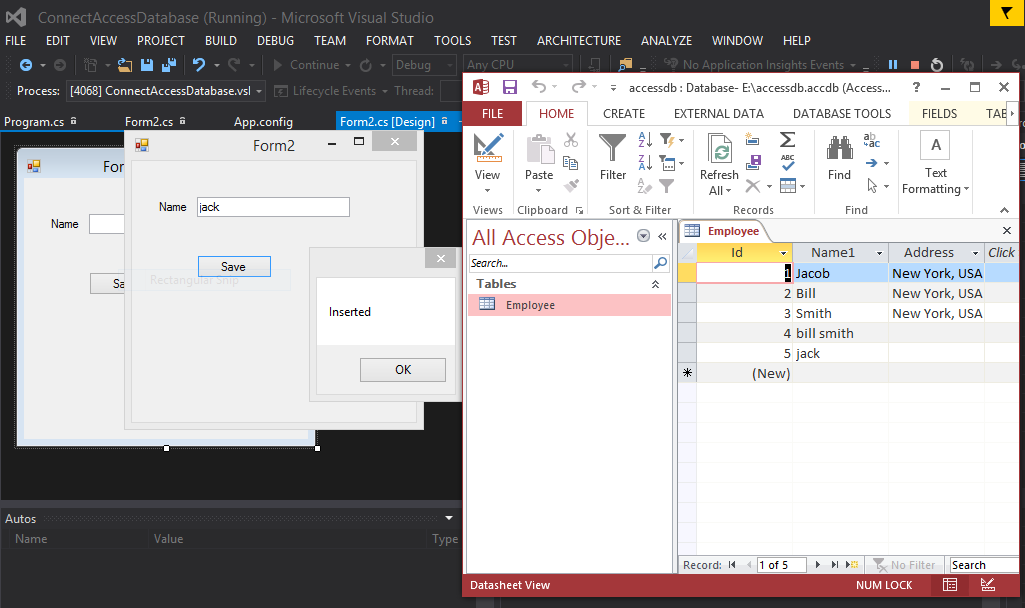
How to insert item into MS-access database using windows form c#

Introduction
In previous article i explained how to create connection with MS-Access database; How to bind DataGrid with access database. In this article i will teach you how to insert item into Access database using windows form. Lets take a simple example of inserting item into access database.


Description
First of all create connection with the access database which is already done in previous article. Now, you will do some changes in code of  datagrid binding. Like replace DQL query with DML query.

Like :
cmd.CommandText = "Insert into [tablename](columnName)Values(Data)";

Also do not required to execute the query, use ExecuteNonQuery() method to insert data by the input box.

using System;
using System.Configuration;
using System.Data.OleDb;
using System.Windows.Forms;

namespace ConnectAccessDatabase
{
    public partial class Form2 : Form
    {
        public Form2()
        {
            InitializeComponent();
        }

        private void button1_Click(object sender, EventArgs e)
        {
            OleDbConnection con = new OleDbConnection();
            con.ConnectionString=ConfigurationManager.ConnectionStrings["Connection"].ToString();
            con.Open();

            OleDbCommand cmd = new OleDbCommand();
            cmd.CommandText = "insert into [Employee](Name1)values(@nm)";
            cmd.Parameters.AddWithValue("@nm", textBox1.Text);
            cmd.Connection = con;
            int a = cmd.ExecuteNonQuery();
            if(a>0)
            {
                MessageBox.Show("Inserted");
            }
        }
    }
}

Code generate the following output

How to insert item into MS-access database using windows form c#


Thursday, August 20, 2015

How to Bind DataGridView with MS-Access in windows form c#

Introduction

In Previous article we have already learn that how to connect MS-Access with windows form. Today we will take a example of binding DataGridView with MS-Access. Also learn how to create connection using OleDbConnection class which is exist in System.Data.OleDb namespace.

Description:

First to read, How to create Database table in Ms-Access and how to create connection with MS-Access using c#.


Now, after creating the database you can create the command using OleDbCommand class which is also available in System.Data.OleDb namespace. Use DataSet Class which is used to load the database table to in-memory. Now, Bind the DataGridView with DataSet Table. Check the below mentioned code as well as video:


using System;
using System.Collections.Generic;
using System.ComponentModel;
using System.Data;
using System.Drawing;
using System.Linq;
using System.Text;
using System.Threading.Tasks;
using System.Windows.Forms;
using System.Data.OleDb;
using System.Configuration;

namespace ConnectAccessDatabase
{
    public partial class Form1 : Form
    {
        public Form1()
        {
            InitializeComponent();
            loadgrid();
        }

        private void loadgrid()
        {
            OleDbConnection con = new OleDbConnection();
            con.ConnectionString = ConfigurationManager.ConnectionStrings["Connection"].ToString();
            con.Open();
            MessageBox.Show("Connection Sucess");
            OleDbCommand cmd = new OleDbCommand();
            cmd.CommandText = "Select * from [Employee]";
            cmd.Connection = con;
            OleDbDataAdapter da = new OleDbDataAdapter(cmd);
            DataSet ds = new DataSet();
            da.Fill(ds);
            dataGridView1.DataSource = ds.Tables[0];

        }
    }
}

How to connect Microsoft Access Database to Windows Form c#

Introduction
In this article we will learn how to connect access database to windows form application. Get the MS Access data in windows form application. Access is a database system or you can its a tool of MS-Office. Through this we can store data permanently in it. If you want to store data in it by the help of windows application then you should connect it with the application.

Description
If you want to connect the database with the windows form application then you must to install the MS- Access in the computer. Also must to install connection drivers properly. Now, follow the instruction to connect ms-access database to windows form c#.

  1. First to prepare a database file in MS-Access.
  2. Add a windows form project Using Visual Studio 2013 or earlier.
  3. Add a Method just after Initializing Component. Like 


using System;
using System.Collections.Generic;
using System.ComponentModel;
using System.Data;
using System.Drawing;
using System.Linq;
using System.Text;
using System.Threading.Tasks;
using System.Windows.Forms;
using System.Data.OleDb;
using System.Configuration;

namespace ConnectAccessDatabase
{
    public partial class Form1 : Form
    {
        public Form1()
        {
            InitializeComponent();
            loadgrid();
        }

        private void loadgrid()
        {
            OleDbConnection con = new OleDbConnection();
            con.ConnectionString = ConfigurationManager.ConnectionStrings["Connection"].ToString();
            con.Open();
            MessageBox.Show("Connection Sucess");
  

        }
    }
}

Sunday, August 16, 2015

Random password generator software free download

Introduction

This software is used to generate random password. Free download random password generator software. Through this password generator you can generator long string password like this

Password: Asdfrte,./7864@3k#
Example of long/strong/good password. If you want to know about this software that how it work?
First to run the executable file and open the software in windows environment and put some number like 15. After entered you get 15 character long string password.
How to design the software:
First to create a new project in visual studio , File-->New-->Project-->Windows form (c# Language). Design a form with one label, one TextBox, one button control. When you press the button then you get long string password. So put this code on Button click.

using System;
using System.Collections.Generic;
using System.ComponentModel;
using System.Data;
using System.Drawing;
using System.Linq;
using System.Text;
using System.Threading.Tasks;
using System.Windows.Forms;

namespace RandomPasswordGenerator
{
    public partial class Form1 : Form
    {
        public Form1()
        {
            InitializeComponent();
        }

        private void button1_Click(object sender, EventArgs e)
        {
            string randomstring = string.Empty;
            char[] array = "0123456789qwertyuiopasdfghjklzxcvbnmQWERTYUIOPASDFGHJKLZXCVBNM[];,.?@#$%^&*()".ToCharArray();
            Random r1 = new Random();
            int getnumber = Convert.ToInt32(textBox1.Text);
            for(int i=0;i<getnumber;i++)
            {
                int point = r1.Next(1, array.Length);
                if (!randomstring.Contains(array.GetValue(point).ToString()))
                    randomstring += array.GetValue(point);
                else
                    i--;
            }
            lblresult.Text = randomstring;
        }
    }
}


Code Generate the following output
Random password generator software download

© Copyright 2013 Computer Programming | All Right Reserved