-->

Monday, August 26, 2013

PrintDialog Box Control in Windows Forms

To print any text or image, print Dialog box is used which is in-built control in windows forms. To invoke the default print dialog box, you need to either add the PrintDialog and PrintDocument control from the toolbox or create an instance of the same classes. The following image shows the default Print Dialog box.

PrintDialog box Control in windows forms

Printing Text

In this topic we will print the text from textbox to the printer attached with the computer. Just add a textbox and a button to the form.

Printing text form preview in windows forms

The click event of button should be look like the following code in C# language:
private void button1_Click(object sender, EventArgs e)
{
printDialog1.Document = printDocument1;
DialogResult res = printDialog1.ShowDialog();
if (res == DialogResult.OK)
printDocument1.Print();
}
Now when we check out the above code, text to be print is not specified there. To specify the text to be print printPage event of print document is used. The print page event will be:
private void printDocument1_PrintPage(object sender, PrintPageEventArgs e)
{
e.Graphics.DrawString(textBox1.Text, new Font("Tahoma", 25), Brushes.Black, 150, 20);
}
Here above the drawstring method draws the specified text at the given location with given properties. If we don’t want to add print dialog and print document from the toolbox then we have to instantiate both of the classes in our code. Just write the following code (C# language) in the click event of button:
PrintDocument pd = new PrintDocument();
pd.PrintPage += pd_PrintPage;

PrintDialog printDialog = new PrintDialog();
printDialog.Document = pd;

DialogResult res = printDialog.ShowDialog();
if (res == DialogResult.OK)
pd.Print();
The second line in above code will be used to generate the printPage event of printDocument. The code of this event will be the same as written first.
Run the project and write something in the textbox e.g. “Print Example”. It will print a page written the above text on the location given above.
There are some properties of the printDocument class, some of which are DefaultPageSettings, PrinterSettings, DocumentName, PrintController and etc.

See also: Print Image using Print Dialog

FolderBrowserDialog Control in Windows Forms

Browse for folder dialog box is used to select a folder to save or open a file. Most often you may need to select a particular folder to open or save a file in windows based application. It enables user to select any folder on system and to retrieve the path of a folder selected by the user.
Following image shows the Browse for Folder dialog box:
This dialog box is similar to open file dialog box except that it enables user to work with folders. To show this type of dialog box just add Folder Browser Dialog box from toolbox or create an object of this class.

Write folderBrowserDialog1.ShowDialog(); in the click event of button.

To open the default browse for dialog box write the following code in the click event of a button:
private void folderBrowse_Click(object sender, EventArgs e)
{
FolderBrowserDialog folderBrowserDialog = new FolderBrowserDialog();
folderBrowserDialog.ShowDialog();
}

See also: OpenFileDialog Box Control

Sunday, August 25, 2013

How to use CheckBox Control in ASP.NET

Introduction
The Checkbox control creates a check box that can be selected by clicking it. The control exists within the System.Web.UI.WebControls namespace. The Checkbox control displays checkmarks that allow the user to toggle between a True or False condition.

Public Properties of the Checkbox Class
AutoPostBack : Obtains a value showing , if the CheckBox state automatically post back to the server when clicked or not.
Checked : Obtains a value showing , if the CheckBox control is checked or not.
Text : Obtains the text label associated with the CheckBox control.

Example of CheckBox control in ASP.NET


<%@ Page Language="C#" AutoEventWireup="true" CodeFile="Default.aspx.cs" Inherits="_Default" %>

<!DOCTYPE html>

<html xmlns="http://www.w3.org/1999/xhtml">
<head runat="server">
    <title></title>
</head>
<body>
    <form id="form1" runat="server">
    <div>
    <h2>CHECKBOX EXAMPLE</h2>
        <br/>
        <asp:CheckBox ID="CheckBox1" runat="server" AutoPostBack="True" OnCheckedChanged="CheckBox1_CheckedChanged" Text="Apple" />

        <br />
        <asp:CheckBox ID="CheckBox2" runat="server" AutoPostBack="True" OnCheckedChanged="CheckBox2_CheckedChanged" Text="Mango" />

    </div>
        <asp:CheckBox ID="CheckBox3" runat="server" AutoPostBack="True" OnCheckedChanged="CheckBox3_CheckedChanged" Text="Orange" />
        <br />
        <br />
        <asp:ListBox ID="ListBox1" runat="server" Height="145px" Width="112px"></asp:ListBox>
    </form>
</body>
</html>

Codebehind Code
using System;
using System.Collections.Generic;
using System.Linq;
using System.Web;
using System.Web.UI;
using System.Web.UI.WebControls;

public partial class _Default : System.Web.UI.Page
{
    protected void Page_Load(object sender, EventArgs e)
    {

    }
    protected void CheckBox1_CheckedChanged(object sender, EventArgs e)
    {
        if (CheckBox1 .Checked==true)
        {
            ListBox1.Items.Add(CheckBox1.Text);

         
        }
        else
        {
            ListBox1.Items.Remove(ListBox1.Items.FindByText(CheckBox1.Text));
        }

    }
    protected void CheckBox2_CheckedChanged(object sender, EventArgs e)
    {
        if (CheckBox2.Checked == true)
        {
            ListBox1.Items.Add(CheckBox2.Text);


        }
        else
        {
            ListBox1.Items.Remove(ListBox1.Items.FindByText(CheckBox2.Text));
        }

    }
    protected void CheckBox3_CheckedChanged(object sender, EventArgs e)
    {
        if (CheckBox3.Checked == true)
        {
            ListBox1.Items.Add(CheckBox3.Text);


        }
        else
        {
            ListBox1.Items.Remove(ListBox1.Items.FindByText(CheckBox3.Text));
        }

    }
}

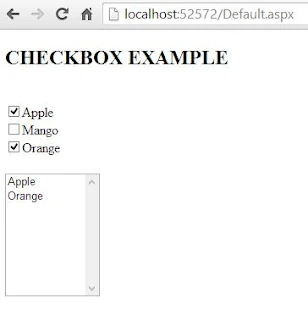
Code Generate the following Output
How to use CheckBox Control in ASP.NET
This example shows when you select any one checkbox which is taken in this example then your checkbox Text add to the ListBox . If you unselect it then remove Text from the list.Because AutoPostBack property is working here.
ListBox1.Items.Remove() : If you want to remove item from list then use remove method of the list.
ListBox1.Items.FindByText() : If you want to search any item from the list then use FindbyText() method.

Saturday, August 24, 2013

XNA : How to show Image in Windows Phone Game

Step-1 : Right below the SpriteBatch spriteBatch ; line , add the following :

GraphicsDeviceManager graphics;
        SpriteBatch spriteBatch;
        Texture2D texture;
        Rectangle current = new Rectangle(40, 40, 100, 75);
These are all the variables you will need for the show image in window Phone game , here is a quick breakdown:
texture : The Texture2D class holds a two dimensional image . We will define a small texture in memory to use when drawing the image.
current : The XNA Framework defines a structure called Rectangle that can be used to represent an area of the display by storing the x and y position of the upper left corner along with a width and height.


Step-2 : Add the following code to the LoadContent( ) method after the spriteBatch initialization:
spriteBatch = new SpriteBatch(GraphicsDevice);
            texture = Content.Load<Texture2D>(@"squ");
Here:
1. Download image from internet
2. Save the image as squ.bmp in a temporary location.
3. Back in visual c# Express , Right-click on WindowsPhoneGame1Content (Content) in solution Explorer (You may need to scroll down to see it) and select Add | Existing item.
Browse to the image you downloaded and click on ok.

Step-3 : Add the following code after the call to clear the display

GraphicsDevice.Clear(Color.CornflowerBlue);

            // TODO: Add your drawing code here
            spriteBatch.Begin();
            spriteBatch.Draw(texture, current, Color.Red);
            spriteBatch.End();


            base.Draw(gameTime);


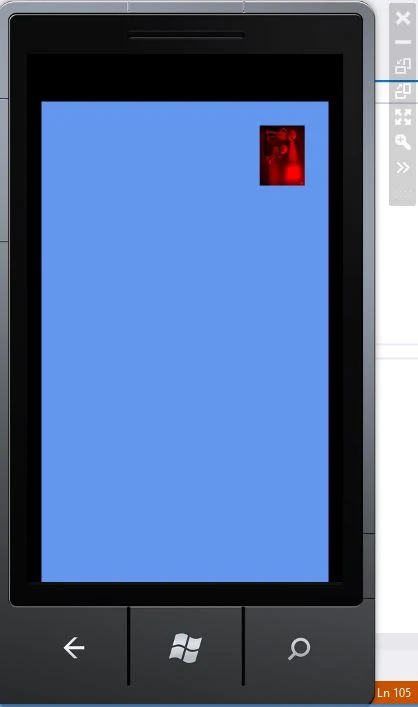
Output

XNA : How to show Image in Windows Phone Game

Source code :


Friday, August 23, 2013

Virtual class room project in ASP.NET

Introduction 
A virtual class can conduct online classes by some tutors.Virtual class is a way of representing logical education.
Project contain facilities
  • Add new students 
  • Online payment
  • Admin panel
  • Tutor panel
  • Add new Tutor with tutor-id
  • Session tracking
  • Feed back System
  • Student Query generation 
Add New Student module: In which we can add new student with student profile such as student name , Student college name , payment detail etc.


Admin panel : In which a administrator can hold all activity such as : Add new tutors , Approve tutors , Approve students detail , monitor work done by tutor etc.
Tutor panel : A tutor can upload files within in current time.Solve queries generated by students using FAQ

Requirement of the application

  • Visual Studio 2010 
  • SqlServer 2008
How to run your Application 
First you need to fulfill requirement which is above mentioned. After that open your website in visual studio 2010 and run your application.
Steps for Executing your application
  • First register in Student panel
  • Second register in Admin panel and approve student which is currently registered
  • Add new tutor
  • Assign tutor-id to tutor
  • Login in tutor panel also login in student panel
  • Add files using upload facilities in tutor panel
  • check files in student panel
Virtual class room project in ASP.NET

If you want to purchase this please contact me on :  narenkumar851@gmail.com

FileDialogBox control in Windows Forms

It is an abstract class, therefore we cannot instantiate it directly. We can use OpenFileDialog or SaveFileDialog to open a file or to save a file respectively. Just run the open or save dialog boxes is not sufficient to open or save a file, we have to use I/O streams to do these simple tasks.

OpenFileDialog

To open an existing file and see the content of that file, OpenFileDialog box is used. It is same in all window application as shown in following image:

OpenFileDialog Box Control in windows forms

To open this dialog box just add an open file dialog control from toolbox and write openFileDialog1.ShowDialog(); in the click event of button.


SaveFileDialog 

To save a file after creating of modifying you have to save that file using SaveFileDialog box at the specified location. Following figure shows the preview of SaveFileDialog box.

SaveFileDialog Box Control in windows forms

To open this dialog box the same procedure will be followed up. Just add a SaveFileDialog and write saveFileDialog1.ShowDialog(); in the click event of button.

To open these type of dialog boxes we have to create an object of respective class and then call its ShowDialog() method:
OpenFileDialog openFileDialog = new OpenFileDialog();
openFileDialog.ShowDialog();


FolderBrowserDialog Box Control

Font Dialog Box Control in Windows Forms

While working on windows-based application, you might have to change the font size, style or related to font. Just like MS-Word there should be a font dialog box to differentiate some text from common text in the file. This can be done using Font Dialog box shown in following image:


To add this box just drag-n-drop font dialog control from the toolbox. Add a textbox and a button on the form with text property “change font”. Button will used to show the font dialog box and then all the changes made in dialog box will appear in the text box.


By default a textbox has Microsoft Sans Serif as font, Regular as font style and 8 as font size. Now change these values as
  • Font = Monotype Corsiva
  • FontStyle = Bold
  • FontSize = 12
from the font dialog box and then click on ok button. We can see the text has been changed in our textbox as in following diagram.


Following code has to be written in the click event of button to perform these simple task:
private void changeFont_Click(object sender, EventArgs e)
{
fontDialog1.ShowDialog();
textBox1.Font = fontDialog1.Font;
}

FileDialogBox Control
© Copyright 2013 Computer Programming | All Right Reserved