-->

Thursday, January 9, 2014

You cannot save changes that would result in one or more tables being re-created

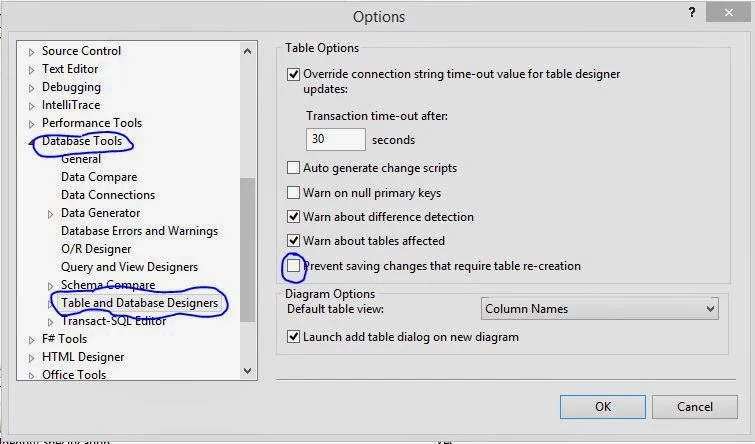
You cannot save changes that would result in one or more tables being re-created. You can override this behavior by changing your configuration options. Open the Tools menu, click Options.

Options link in tool tab , asp.net

 In the Options dialog box, expand the Database Tools node and click Table and Database Designers.

Database designer tools options

You can clear the "prevent saving changes that require table re-creation" check box and then retry the save operation. The save operation might take a long time because the data in the affected tables must be copied to temporary tables.

Your pending changes require the following tables to be dropped and re-created.

Wednesday, January 8, 2014

System Functions used to Query System Tables in Sql Server: SQL Programming

In SQL Programming, system functions are used to query on system tables. Programmer can easily perform all type of system functions to generate sequential numbers for each row based on specific criteria.

The system functions are used to query the system tables. System tables are a set of tables that are used by the SQL Server to store information about users, databases, tables and security. The system functions are used to access the SQL Server databases or user-related information. For example, to view the host ID of the terminal on which you are logged onto, you can use the following query:

SELECT host_id ( )

The following table lists the system function provided by SQL Server

  • host_id (), Returns the current host process ID number of a client process
  • host_name (), Returns the current host computer name of a client process
  • suser_sid ([‘login_name’]), Returns the security identification (SID) number corresponding to the log on name of the user
  • suser_id ([‘login_name’]), Returns the log on identification (ID) number corresponding to the log on name of the user
  • suser_sname ([server_user_id]), Returns the log on name of the user corresponding to the security identification number
  • user_id ([‘name_in_db’]), Returns the database identification number corresponding to the user name
  • user_name ([user_id]), Returns the user name corresponding to the database identification number
  • db_id ([‘db_name’]), Returns the database identification number of the database
  • db_name ([db_id]), Returns the database name
  • object_id (‘objname’), Returns the database object ID number
  • object_name (‘obj_id), Returns the database object name


How to Create and Use of Iterators, yield: CSharp Programming

Programmer often use some type of iterators that are used to iterate steps in the programming language. An iterator often use yield keyword to return individual element, this is possible only if it have the current location in the cache.

C# Programming uses these iterators to execute some steps continuously like returning a value continuously from a method. Following program is creating an iterator in c# language.

public Form()
{
InitializeComponent();
foreach (int number in SomeNumbers())
{
string str = number.ToString() + " ";
}
}
public static System.Collections.IEnumerable SomeNumbers()
{
yield return 1;
yield return 2;
yield return 3;
}

Yield keyword keeps the current position of the currently executing statement, so that the iteration can be performed.

Here Foreach keyword is used for looping statements in c# programming language, but it is also used as iterators. Each time when the SomeNumbers() method is called in this loop, the yield keyword will return the specified number and will back to the current position.

That is why the resulting string in str variable will be "1 2 3". There may be many ways to creating iterators like:

Using Collection Class: As the well-known class collection is used to automatically called GetEnumerator method which returns IEnumerable type of data. The same process can be easily implemented using this collection class.

Using Generic List: As GetEnumerator method returns an array of specified elements. Generic method is inherited from IEnumerable interface. Using this method iterators can easily be implemented as in above program.

Tuesday, January 7, 2014

Create Stored Procedure for accessing data from database in ASP.NET, Example

In my previous post we have discussed about how to design Department table for shopping cart. Now, we will learn, How to create stored procedure for retrieving  information from database table. You need to create the GetDepartments stored procedure, which returns department information from the Department table. This stored procedure is part of the data tier and will be accessed from the business tier. The final goal is to have this data displayed in the user control.

The SQL code that retrieves the necessary data and that you need to save to the database as the GetDepartments stored procedure is the following:

Select DepartmentID, Name, Description From Department

This command returns all the department information

Note: unless you have a specific reason to do so, never ask for all columns (using the * wildcard) when you only need a part of them. This generate more traffic and stress on the database server then necessary and slows down performance. Moreover, even if you do need to ask for all columns in the table, it's safer to mention them explicitly to protect your application in case the number of order of columns changes in future.

Saving the Query As a Stored Procedure

As with data tables, after you know the structure, implementing the stored procedure is a piece of cake. Now that you know the SQL code, the tools will help you save the query as a stored procedure easily.

The Syntax for creating a stored procedure that has no input or output parameters is as follows:

CREATE PROCEDURE <procedure name>
AS
<stored procedure code>

if the procedure already exists and you just want to update its code, use alter PROCEDURE instead of above. Stored procedures can have input or output parameters. Because GetDepartments doesn't have any parameters, you don't have to bother about them right now.

Lets take a simple example of writing the Stored Procedure

Step-1: Make sure the data connection to the database is expanded and selected in server explorer. Choose data->Add New--> Stored Procedure. Alternatively, you can right-click the Stored Procedure node in server explorer and select Add New Stored Procedure.

Step-2: Replace the default text with GetDepartment's stored procedure

CREATE PROCEDURE GetDepartments 

AS
SELECT DepartmentID, Name, Description
From Department

Step-3: Press Ctrl+S to save the stored procedure. Unlike with the tables, you won't be asked for a name because the database already knows that you're talking about the GetDepartment's stored procedure

Note: Saving the Stored Procedure actually executes the SQL code you entered, which creates the stored procedure in the database, after saving the procedure, the CREATE keyword becomes ALTER, which is the SQL command that changes the code of an existing procedure.

Step-4: Now test your first stored procedure to see that it's actually working. Navigate to the GetDepartments stored procedure node in server explorer and select execute.

Computer Programming : How to execute stored procedure


Step-5: After running the stored procedure, you can see the results in the output window.

Computer Programming : Output window of stored Procedure

Monday, January 6, 2014

How to Create a GUI application Showing Details in I-Card Format, NetBeans: Java Programming

NetBeans provides a simple and easy way to create a new project and input some information in sql programming. The article will let the programmer do the same thing.
  • Start NetBeans and create a new project and add four labels and four textfields from the palette tab as explained in earlier article.

  • Set following font properties for all the labels and textfields.
    Type: Comic Sans MS (you may choose any other font if you wish)
    Style:
    Bold
    Size:
    12

  • Adjust the placement of Heading, whose properties you set just now, by dragging it, so that it appears in the middle horizontally. Set name property of the labels respectively:
    jLabel1   to    titlelabel1
    jLabel2   to    firstNameLabel
    jLabel3   to    lastNameLabel
    jLabel4    to   classLabel
    jTextField1    to        firstNameTextField
    jTextField2    to        lastNameTextField
    jTextField3    to        classTextField
    jTextField4    to        sectionTextField

  • Set text property for these labels as given below:
    titleLabel1  to  Title(Mr/Ms)
    firstnameLabel  to  First Name
    lastnameLabel    to    Last Name
    classLabel  to  Class

  • Also set the text property of each of null string i.e. “ “ and resize them as per the screenshot. Now your frame should look like the one shown in below
How to Create a GUI application Showing Details in I-Card Format, NetBeans: Java Programming
  • Add a Button control by dragging it from Palette to frame. Name it as okButton. Set its text property to Generate and its font remain as is.
Before you add text area to frame, you may need to increase the size of the frame. For this drag the boundary of the frame in desired direction to get its desired size.
  • Just as you added other controls, add a text field control to your frame and give it a size according to I-Card. Name it as repTextArea. To name the text area field, you need to click the jScroolPane control in inspector window. A Scroll pane automatically gets added to your frame when you add a text area.

  • Adding Functionality to Frame
    Now double click on the boundary of the push button i.e., the okButton in design space. The code editor window will get opened. In it, without touching the cursor, simply type the following code. For now you won’t understand it. But it will be clear to you later when we’ll be talking about java concepts.
When you use getText() with a control’s name followed by a dot(.). It returns the text stored in the control. So the code will give the text stored in the control whose name is titlenameField.

How to Create a GUI application Showing Details in I-Card Format, NetBeans: Java Programming

Now save your work by pressing Ctrl + S and press F6 to run your project. You may also click Run icon on the toolbar. See your application run. After entering details in text fields, click on Generate. Wow, isn’t it similar to one shown in screenshot?

How to Create a GUI application Showing Details in I-Card Format, NetBeans: Java Programming

Computer Programming: Department table for shopping cart in ASP.NET, Example

In computer Programming, database is the important concept of any one project. In this article we will learn the first step of e-commerce project, which is database (table) design. Follow the steps for designing department table.

Step-1: In server explorer, expand the database node, right-click the Tables node, and select Add New Table from the context menu.
Step-2: A form appears where you can add columns to the new table. Using this form, add three columns, with the properties described in table.

Computer Programming : Design Department table for shopping cart in asp.net

Note : You set a column to be the primary key by right-clicking it and clicking the Set Primary Key item from the context menu. You set a column to be an identity column by expanding the Identity Specification item from its Column Properties window, and setting the (Is Identity) node to yes. You can also access the identity increment and Identity Seed vales, if you should ever want to use values other than the defaults.

Step-3: After adding these fields, the form should look like.

Computer Programming : department table for shopping cart in asp.net


Step-4: Now that everything is in place, you need to save the newly created table. Press Ctrl+S, write table name in appeared popup.
Computer Programming : Save table in sql

Step-5: After creating the table in the database, you can open it to add some data. To open the Department table for editing, right-click it in Server explorer and select Show Table Data from the context menu.
(Alternatively, you can choose Database->Show Table Data after selecting the table in server explorer)

Using the integrated editor, you can start adding rows. Because DepartmentID is an identity column, you cannot manually edit its data--SQL Server automatically fills this field, depending on the identity seed and identity increment values that you specified when creating the table.

Step-6: Add two departments.

Computer Programming : filling data into database table

Sunday, January 5, 2014

Computer Programming:inline code or Code render block in ASP.NET, Example

Code render blocks define the inline code or inline expressions that are executed when a web page is rendered. The inline code is then executed by the server and the output is displayed on the client browser that requested for the page. The code render blocks are capable of displaying information on the client browser without customarily calling the write method. The code render blocks are represented on a page by the <% %> symbols. The code present inside these symbols is executed in the top-down manner. Now, let's put the concept of code render bock into use by creating an application, CodeRenderBlock. This application use a code render block to implement a loop used for changing the text size.

Lets take a simple example, change font size in asp.net using loop

<%@ Page Language="C#" AutoEventWireup="true" CodeFile="Default3.aspx.cs" Inherits="Default3" %>

<!DOCTYPE html PUBLIC "-//W3C//DTD XHTML 1.0 Transitional//EN" "http://www.w3.org/TR/xhtml1/DTD/xhtml1-transitional.dtd">

<html xmlns="http://www.w3.org/1999/xhtml">
<head runat="server">
    <title>Change Font size inline code model</title>
</head>
<body>
    <form id="form1" runat="server">
    <div>
    <% for(int i=0;i<6;i++)
           
       { %>
       <font size="<%=i %>" >Hello World ! </font><br />
       <% } %>

    </div>
    </form>
</body>
</html>

Code generate following output

Computer Programming : code render block

© Copyright 2013 Computer Programming | All Right Reserved