-->

Saturday, February 28, 2015

Insert data into database table using edmx file in windows form c#

Introduction

In my previous article i have already explained about login control, in which i was add edmx file. Now, today we will learn about register control or you can say how to insert data into database.
Steps

  1. First to prepare database table with some fields.
  2. Create a new project in the windows form.
  3. Add edmx file in the solution.
  4. If you want to add data using input control in the database table then take some text boxes and other control in the form. Otherwise you can do this without input field--see the example, which is explained below.


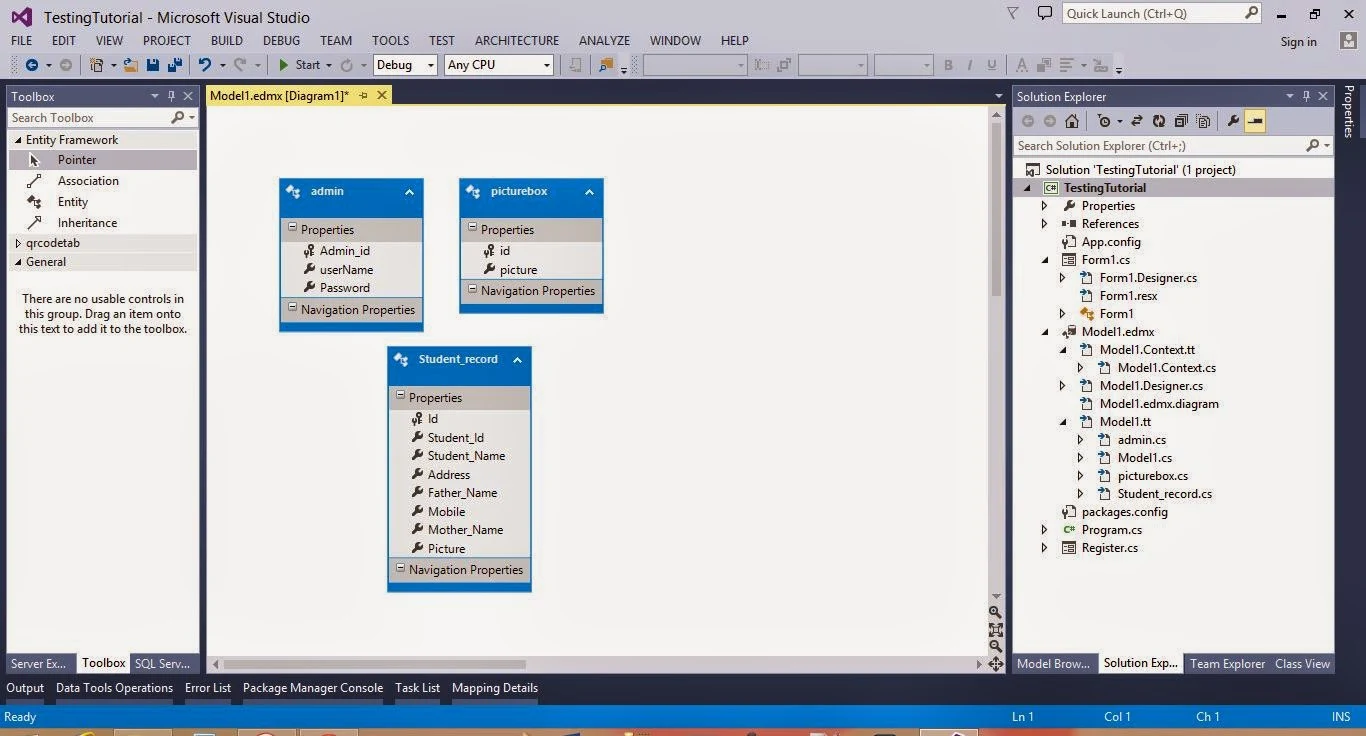
Now, the model class in the entity framework is: (check your solution explorer after add edmx file in the project)


namespace WindowsFormsApplication4
{
    using System;
    using System.Collections.Generic;
    
    public partial class Student_record
    {
        public int Id { get; set; }
        public string Student_Id { get; set; }
        public string Student_Name { get; set; }
        public string Address { get; set; }
        public string Father_Name { get; set; }
        public string Mobile { get; set; }
        public string Mother_Name { get; set; }
        public string Picture { get; set; }
    }
}

Similarly you have to check the Context class which is also add with the model class in the entity data model.

Student_DBEntities sd = new Student_DBEntities();
             Student_record student_recod = new Student_record();
             student_recod.Student_Name = "jacob";
             student_recod.Mobile = "+123 123654 89";
             student_recod.Father_Name = "Bill Smith";
             student_recod.Address = "USA";
             student_recod.Mother_Name = "Ammey";
             sd.Student_record.Add(student_recod);
             sd.SaveChanges();

Here,


  1. Student_DBEntitties is a context class, through which we can access all the record from the database table.
  2. Student_record is the model class which is defined above already.
  3. Add record by the object of the class.
  4. sd.Student_record is a public property.
  5. Update record by the SaveChanges() method.

Thursday, February 26, 2015

Custom login control using edmx file in windows forms application C#

Introduction

Login contol provide some privilege to the project or you can say its a entry point of the project. Though this form we can move to the next form. If your input text is valid then move to the next but if your input is wrong then move failed. So, the main function of the project is check each entry of the table with the TextBox.

Design login control in windows form


  1. Add Two TextBox with the label control.
  2. Add one button control with click event , Look like
login control in windows form

Add EDMX file with the help of following steps:

  1. Add ADO.NET Entity Data Model by the add new item component.
  2. Add ADO.NET Entity Data Model
  3. Now, select EF designer from database in the entity data model wizard.
  4. select EF designer from database
  5. Now create the connection by pressing the 'new connection' button , also select the check box where your connection string save into your application configuration file. Now, press to next button.
  6. Now create the connection by pressing the 'new connection' button
  7. Select entity framework version , i select 5.0 in the project.
  8. Select entity framework version , i select 5.0 in the project.
  9. Select table, views , stored procedure in the appeared window.
  10. Select table, views , stored procedure in the appeared window.
  11.  Now, your model look likeentity data model

Copy and paste the below code inside the button click event.


private void button1_Click(object sender, EventArgs e)
        {
            Student_DBEntities dc = new Student_DBEntities();
            if (usrBox.Text != string.Empty && pwdBox.Text != string.Empty)

            {
                var existuser = dc.admins.FirstOrDefault(a => a.userName.Equals(usrBox.Text));
                if(existuser!=null)
                {
                    if (existuser.Password.Equals(pwdBox.Text))
                        MessageBox.Show("Login Sucess");
                    else
                        MessageBox.Show("try again later");
                }

            }
        }

Here,
  1. Student_DBEntities is a DataContext , which is take connection string in the constructor. Also take public property of the model class, through this we can access all the data from database table.
  2. admins is the public property of data context class.
Code generate the following output - please see the video:

Sunday, February 22, 2015

C language: Searching in graph

Similar to traversal of graph two searching techniques of the graph are used which are Breadth First Search and Depth First Search. Both the techniques are same as respective traversal techniques. In case of breadth first search the traversal algorithm for breadth first is used. The algorithm is terminated with a message search successful whenever the deleted item from QUEUE is the node to be searched otherwise the algorithm is terminated with a message search unsuccessful when the QUEUE is empty. The formal algorithm for BFS is:

GRAPHBFS
[goal node is the node to be searched]
Mark the start node and insert it in the QUEUE
If the start node is the goal node Then:
Write: 'Search Successful' ; Exit
[End of If]
Repeat While QUEUE is not empty
Delete QUEUE
If deleted node is the goal node Then:
Write: ' Search successful;; Exit.
Else
Mark the unmarked adjacent nodes of the deleted node.
Insert the marked nodes(if any) of the deleted node in the QUEUE.
[End of If]
[End of While]
Write: 'Search unsuccessful'
Exit.

In case of depth first search the traversal algorithm for depth first is used. The algorithm is terminated with a message search successful whenever the popped item from STACK  is the node to be searched otherwise the algorithm is terminated with a message search unsuccessful when the STACK is empty. The formal algorithm for DFS is:

GRAPHDFT
[goal node is the node to be searched]
Mark the start node and push it on to the STACK
If the start node is the goal node Then:
Write: 'Search Successful'; Exit
[End of If]
Repeat While STACK is not empty
POP STACK.
If popped node is the goal node Then:
Write: ' Search successful'; Exit.
Else
Mark the unmarked adjacent nodes of the popped node. 
Push the marked nodes of the deleted node(if any) on to the STACK.
[End of While]
Write: 'Search unsuccessful'
Exit. 

C Language: Depth First Traversal in Graph

This traversal techniques is based on the fact of visiting all the nodes of graph in the depth of it. It means start from the start node of the graph and reach to last node of the graph in its depth (so that no further unexplored adjacent node exist). From the start node explore all the adjacent nodes but visit one of the adjacent nodes. From the visited adjacent node further explore all the adjacent nodes of it and again select one of the adjacent nodes and further explore it. In this way the exploration of the adjacent node carried till to reach the last node. Once the last node is reached then back track from the last node to previous node to visit the next adjacent node of it. The data structure stack is used in this type of traversal. 
Consider the following graph:
Depth First Traversal in Graph
The adjacent nodes of node

The depth first traversal of the above graph, assuming node 'A' as start node is:

A     E      D      C     B

You can observe from the traversal result that the first node visited is the starting node. Then the next node visited is 'E' one of the adjacent nodes of the start node 'A'. Then the adjacent nodes of 'E' that are not marked are explored. The only marked node is 'D'. It is visited. There are no further adjacent nodes of 'D'  that are not marked . So, we have reached the other end of the graph. Now backtrack from 'D' to 'E' no adjacent nodes of 'E' are left to be visited. Again backtrack from 'E' to 'A'. There are two adjacent nodes left that are not visited. So, node 'C' is visited next. There are no adjacent nodes of node 'C' that are left for visiting. Again backtrack from 'C' to 'A' and visited the last node 'B' which is adjacent of 'A' all the nodes of the graph are visited and the traversal is complete. 

As we backtrack in the technique of depth first traversal it is necessary to use the last in first out data structure that is stack to store the nodes that are to be backtracked.
You can again remember that the traversal result may be different to the one given above. It differs because the adjacent nodes of a visited node may be pushed on the stack in any order. So, the other result of depth first traversal of the above graph are:

A        B       D       C        E
A        C       D       B        E     etc.

The formal algorithm of DFT(Depth First Search) is : 
GRAPHDFT
[TA is the one dimensional array of size n where n is is the number of nodes in the given graph] 
Mark the start node and push it on to the stack 
Repeat While STACK is not empty
POP STACK 
Add popped node to TA at the next position. 
Mark the unmarked adjacent adjacent nodes of the popped node.
Push the marked nodes of the deleted node (if any) on to the STACK.
[End of While] 
Print TA from the first position as traversal.
Exit.

The above algorithm works in the following manner. 
Consider the following graph

Let us assuming the start node as node 'A' let us mark and push the node 'A' on to the stack. So, the stack is:
Depth First Traversal in Graph

when pop stack is executed, the node obtained is 'A'. It is added to the traversed array. So, the traversed array is:
Depth First Traversal in Graph


The marked adjacent nodes to popped node 'A' are, 'B', 'C' and 'E'. Mark and push the nodes 'B', 'C' and 'E' on to the stack (in any order). So, the stack is:
Depth First Traversal in Graph

stack is not empty the processes is repeated.
When pop stack is executed, the node obtained is 'E'. It is added to the traversed array. So the traversed array is:
Depth First Traversal in Graph

The marked adjacent node of popped node 'E' is 'D' mark and push it on to the stack. So, the stack is:
Depth First Traversal in Graph

Stack is not empty the processes is repeated. When pop stack is executed, the node obtained is 'D'. It is added to the traversed array. So, the traversed array is :
Depth First Traversal in Graph

The adjacent nodes of poped node 'D' are 'B' and 'C' but they are already marked node. So, no nodes are pushed. So, the stack is:

Depth First Traversal in Graph

Stack is not empty the proceses is repeated. When pop stack is executed, the node obtained is 'C'. It is added to the traversed array. So, the traversed array is:
Depth First Traversal in Graph

The adjacent node of poped node 'C' are 'A' and 'D' but they are already marked nodes. So, no nodes are pushed. So, the stack is
stack is not empty the processes is repeated. When popped stack is executed, the node obtained is 'B'. It is added to the traversed array. So, the traversed array is 
Depth First Traversal in Graph

the adjacent node of popped node 'B' is 'D' but it is already marked. So, no node are pushed. So, the stack is:
Depth First Traversal in Graph

Stack is empty stop the process. When the TA array is printed we get the Depth first traversal as:

Successors of C language

C and even B have several direct descendants, through they do not rival pascal. One side branch developed early. When Steven Johnson visited the University of Waterloo on sabbatical in 1972, he brought B with him. It became popular on the Honeywell machines there, and later spawned Eh and Zed (the Canadian answers to 'what follows B?'). When Johnson returned to Bell Labs in 1973, he was disconcerted to find the language whose seeds he brought to Canada had evolved back home; even his own yacc program had been rewritten in C, by Alan Snyder.

More recent descendants of C proper include Concurrent C, Objective C, C* and especially C++. The language is also widely used as an intermediate representation (essentially, as a portable assembly language) for a wide variety of compilers, both for direct descendants like C++, and independent languages like Modula 3 and Eiffel. 

Saturday, February 21, 2015

C Language standards

C came into existence in between 1969-1973 in parallel with the development of UNIX operating system. The C Programming Language, in the middle of 1980s,was officially standardized by the ANSI X3J11 committee. Until the early 1980s, the language was almost exclusively associated with UNIX. Now, its use has spread much more widely, and today it is among the languages most commonly used in the industry.

BCPL the origination for C language was designed by Martin Richard in the mid-1960s and used during the early 1970s for several projects including OS6 operating system at OXford. The original BCPL compiler was transported both to Multics and to the GE-635 GECOS system by Rudd Canaday and others at Bell Labs. It was the language of choice among the group of people who involved with UNIX.

BCPL, B, and C all fit firmly in the traditional procedural family characterized by Fortan and Algo60. They are particularly oriented towards system programming. They are close to the machine. BCPL, B and C differ syntactically in many details, but broadly they are similar. Programs consist of a sequence of global declarations and function declarations. Several syntactic and lexical mechanism of BCPL are more elegent and regular than those of B and C. In spite of the differences , most of the statements and operators of BCPL map directly into corresponding B and C.

During the 1980s the use of the C language spread widely, and compiler became available on nearly every machine architecture and operating system; in particular it became popular as a programming tool for personal computers, both for manufactures of commercial software for these machine, and for end-users interested in programming.

Features of C Language

Definition: The capabilities and functionality provided by the C language are collectively called features of C Language. The features of C Language have made it popular.

Let us see, "What are the features of C language ?"

The C Language being a middle level language has many important features. It is said to be middle level language because of the following features:


  • The C language has the capabilities of assembly Language (Low Level Language)
  • It provide the functionality of a High Level Language.

As it is near to machine as well as to the user it is called middle level language. The capabilities of the low level language of C help in designing the program
especially required system management. It means the system software can be developed very easily using the C Language.

As It is also near to the user, most general purpose programs can be developed easily. So, the application programs can also be developed using C language.

In addition to the above mentioned features, C Language also has the following features:


  • Implementation of modular programming technique is very easy in case of C language because of the easy designing and handling of modules in the form of functions.
  • Each and every task using C Language is solved by means of function only so, C is called as functional language.
  • Users can define their own tasks in the form of user defined functions.
  • It has large collection of built-in or library functions that makes the programming task easier.
  • More and more user defined functions can be added to the library of the C to make the programs extendable.
  • C language is rich in operators containing very common arithmetic operators to system level bit-wise operators.
  • The programs written using C language are portable and can be executed at different platform.
  • C is a case sensitive language. All the keywords, data type means and built-in function names are written only using lower-case letters.
  • Most importantly the debugging, testing and maintenance activities of programs development can be performed easily on the program developed using C Language.
  • Implementation of structured programming technique is easy here because of the rich availability of the sequential, branching and looping structures.

How to use ComboBox in windows forms application c#

ComboBox in windows forms application -Introduction

A ComboBox display a editable TextBox with ListBox. You can select item from the list also you can search item by using TextBox. The default style of ComboBox is drop-down list. You can change the style of ComboBox with the help of DropDownStyle property. That property contain three enumerated value, If you select Dropdown list box then you can not edit text portion. Now, take a simple example to add items in the Combo Box-please see the video


Video contains different ways to add item in the ComboBox like, using show smart tag, items property, add item at run time using add method.
For adding items at run time in ComboBox:
 comboBox1.Items.Add(String text);
If you want to change the DropdownStyle at design as well as run time- please see the following video:


I you want to access or retrieve selected item from the comboBox then see this video. In this video i have a comboBox with some fruit items and a button control. When we press the button then selected item show in the messageBox.
Note : If you have to press buton without select any item then get the error message. Video also solve this problem with the help of selectedIndex property. So in this video you will see the example of SelectedIndex property.

 Now, come to the DataSource property of comboBox. Bind the combobox with the class and enumeration type. Video contain example of both type.


If you want to add thousand of item without any intrupt then use beginUpdate() and EndUpdate() method of it. This video contain example of both, also contain findString method example.

Friday, February 20, 2015

Pointer values in C language

Suppose, we have the following declaration:

int i=100, j=200, k=300;

This declaration tells the compiler to perform the following activities:

  • Reserve space for three integer values in memory.
  • Associate the variables i,j and k with these memory location.
  • Store 100,200 and 300 at the locations i,j and k respectively as shown as below:

Variable
Address
Memory Locations

0


2


4
100
I
……..
200
J
65534
300
K


variables
address
Values


The address of the variable cannot be accessed directly. The address of the variable can be obtained using address operator (& in C) .

Note : The address operator can be used with any variable that can be placed on the left side of an assignment operator.Since constants, expressions and array names can not be used on the left hand side of the assignment, and hence accessing address is invalid for constants, expressions and array names. The following are invalid:


Usage
Valid/Invalid
Reasons for invalidity
&100
Invalid
Address of a constant cannot be obtained.
&(p+100)
Invalid
Address of an expression cannot be obtained.
&(p+q)

Invalid
Address of an expression cannot be obtained.
Int a[10];
&a;
Invalid
Address of entire array cannot be obtained.
Register a;
&a;
Invalid
Address of a register variable cannot be obtained.

Note : if a is an array , then address of the first location of the array is obtained either using : &a[0] or a.

Assume that the compiler has chosen the address 65530 for the variable i, the address 65532 for the variable j and 65534 for the variable k. These address assigned to variables i,j and k are called pointer values.

Definition : Memory is divided into number of storage cells called locations. All the locations in computer memory are numbered sequentially from 0 to 65535 ( with memory size of 64k) . Out of these address, the system assigns some addresses of the memory locations to the variables. These memory addresses assigned to variables by the system are called pointer values. 

Thursday, February 19, 2015

Array in C language

Introduction

In this chapter, we will discuss a very important data type arrays. Let us see, “Why arrays?’’
We know that in one variable we can store the information of only one  data item. Suppose that a
Student has scored 90 marks. These marks can be stored in a variable as shown below:

int marks=90;

After executing this statement, the value 90 will be stored in the variable marks. Suppose there is
A need to store marks of 10 students. In such case, we are forced to use 10 variables like marksl,
Marks2… marks10. But, if it is required to store the marks of 100 students, definitely it is not
Feasible to use 100 variables marksl ,marks2…marks100, Now, the question is “How to store 100
different marks?” In mathematics, we use sets to group the items of similar kind, For example,
consider the set shown below :

marks = {80,90,45,99,100,36,88,96,67,92}

This is a set of marks of `10 students. Note that every item can be accessed by prefixing marks along
With the position of marks in the set. The first item 80 corresponds to the marks of first student,90
Corresponds to the marks of second student and so on i.e., marks1=80, marks2=90…marks 10=92.
In C language, this is where, the concept of arrays is used. Since all the marks are of the same type,
We can group and refer all the marks  with a common name using arrays.
Note: In general, if more number of data items of same type (kind) are to be accessed or read
or stored, then we use arrays.


The meaning of an array

Definition : An array is defined as an ordered set of similar data items. All the data items of
an array are stored in consecutive memory locations in main memory . The elements of an array
are of same data type and each item can be accessed using the same name. e.g. consider an
array of marks of 5 students as shown below:

80
90
45
99
100
Marks(0)
Marks(1)
Marks(2)
Marks(3)
Marks(4)

To refer an item in the array, we specify the name of the array along with position of the item. The
Position of the item must be written within square brackets ‘ []’.  The position of the item, The item enclosed within square brackets is called ‘subscript’ or ‘index’.

For example, the above figure represents an integer array called marks where marks of 5 students
Are stored. The marks of each student can be accessed as shown below:

       marks[0] i.e. 80 – represent marks of first student
       marks[ 1] i.e. 90- represent marks of second student
       marks[2] i.e. 45- represent marks of third student
      marks [3] i.e. 99- represent marks of fourth student
       marks[4] i.e. 100 – represent marks of fifth student

Thus using marks [0] through marks[4]  we can access the  marks of 5 students.
Note: Using marks [0] through marks [n-1] We can access the marks of n students in general.
In an array it not possible to have a group of items with different data types. Types. For example,

83
94.8
“Delhi”
‘3’
910
a[0]
a[1]
a[2]
a[3]
a[4]

Is invalid way of storing the elements in an array. This is because, it is a collection of int,  float, char
and string datatypes. Once we know the definition of an array. The next question is “How arrays
are classified?” The arrays can be classified based on how the data items are arranged for human
understanding. This is pictorially represented as shown below:


Pointer Declaration and Definition in c language

In C language, we know that all the variables should be declared before they are used. Pointer variable should also be declared before their use. The syntax to declare a pointer variable is shown below.

type *  identifier;

Type : type can be any datatype such as int, float , char etc. It may be derived or user defined data type also.
*       : The asterisk (*) in between type and identifier tells that the identifier is a pointer variable.
Identifier : Name given to the pointer variable. 

Example -1 : Consider the following declaration:
int * p;
The above declaration can be read as "p is pointer to integer variable" and this declaration informs the following points:


  • The variable p is a pointer variable. So, it should contain the address of variable during execution.
  • The type int refer to the type of the variable stored in pointer variable p i.e. the pointer variable p should contain address of an integer variable.

Example-2 : Consider the following declaration:
double *pd;
This declaration informs the compiler that pd is a pointer variable and can hold the address of a variable of type double.


Example-3 : In the declaration, the position of * is immaterial. For example, all the following declaration are same:
int *pa;
int * pa;
int*  pa;
Any of the above declaration informs that the variable pa is a pointer variable and it should contain address of integer variable.


Example-4 : Consider the multiple declaration as shown below:

int* pa,pb,pc;

Note : Here, we may wrongly assume that the variables pa, pb amd pc are pointer variables. This is because * is attached to int. This assumption is wrong. Only pa is a pointer variable, whereas the variables pb and pc are ordinary integer variables. For better readability, the above declaration can be written as shown below:

int *pa, pb, pc;

Now, we can easily say that pa is a pointer variable because of * operator, whereas pb and pc are integer variables and are not pointer variables. It is still better if the variable are declared in separated lines as shown below:
int *pa;
int pb;
int pc;


Initializing a pointer variable in C Language

Initializing a pointer variable

Initialization of a pointer variable is the process of assigning the address of a variable or memory to a pointer variable. The initialization of a pointer variable can be done using following three steps :
Step-1 : Declare a data variable.
Step-2 : Declare a pointer variable.
Step-3: Assign address of a data variable to pointer variable using & operator and assignment operator.
Note that the Step1 and 2 can be interchanged i.e. we can first declare a pointer variable, then declare a data variable and then initialize the pointer variable.

Example : Consider the following three statements:
int x; /* Step-1 : x is declared as a data variable */
int *px ; /* Step-2: px is declared as a pointer variable */
px= &x; /* Step-3 : copy address of data variable to pointer variable */
....
.....
Here , the variable x is declared as integer data variable. Since px is pointer variable of type integer, it should contain address of integer variable. So, using the statement : px = & x;
the valid address is stored in the pointer variable and hence the pointer variable px is initialized.

Example: Consider the following three statements:
int x ;  int *px; px=&x;
The above three statements can also be written as shown below:
int x;    int *px=&x;
Note : It is also possible to combine the declaration of data variable, pointer variable and initialization of pointer variable in one step as: int x, *px=&x;
Here, x is declared as a data variable, px is declared as pointer variable and px is initialized to address of data variable x.

Example : Consider the following statements:
int p, *ip;
float d,f;
ip=&p;  /* Valid Initialization */
..............
ip=&d;   /* Invalid initialization */
Note: First initialization is valid. In the second initialization , ip is a pointer to integer. So , it should contain address of integer variable. But , address of floating point variable d is stored in ip and hence it is invalid.

Example : Pointers are flexible i.e. a pointer can point to different data variables by storing the address of approximate variables. Consider the following declaration:
int x=10, y=20,z=30;
int *p;

p= &x;

.........
p=&y;
.........
p=&z;
..........

Note : It is observed from above example that the pointer variable p points to different memory location by storing the addresses of different variables. Thus, same pointer can be pointed to different data variables.


Initializing a pointer variable in C Language


NULL Pointer in C language

Introduction

Definition : A NULL pointer is defined as the special pointer value that points to nowhere in the memory. If it is too early in the code to assign a value to the pointer, then it is better to assign NULL (i.e., \0 or 0) to the pointer.


For example , consider the following code:

#include<stdio.h>
int *p=NULL;
Here, the pointer variable p is a NULL pointer, this indicates that the pointer variable p does not point to any part of the memory. The value for NULL is defined in the header file "stdio.h". Instead of using NULL, we can also use '\0' or 0. The programmer can access the data using the pointer variable p if and only if it does not contain NULL. The error condition can be checked using the following statement:
if(p==NULL)
printf("p does not point to any memory\n");
else
{
printf("Access the value of p\n");
......................
}
Note : A pointer variable must be initialized. If it is too early to initialize a pointer variable, then it is better to initialize all pointer variables to NULL in the beginning of the code. This avoids unintentional use of an un-initialized pointer variable.

Example :  Consider the following statements:
int *x;
int y;
x=y;   /* Error*/
Note :  The value of data variable can not be assigned to a pointer variable. So, the statement x=y; result in an error . The correct statement is x=&y;

Pointer to Pointer in C language

Introduction

Definition : It is possible to make a pointer to point to another pointer variable. A variable which contains address of a pointer variable is called pointer to a pointer. For example, consider the following declarations:

int a;
int *p1;
int *p2;

  • The first declaration instructs the compiler to allocate the memory for the variable a in which integer data can be stored.
  • The second declaration tells the compiler to allocate a memory for the variable p1 in which address of an integer variable can be stored.
  • The third declaration tells the compiler to allocate a memory for the variable p2 in which address of a pointer variable which points to an integer can be stored. The memory organization for the above three declaration is shown below:
Pointer to Pointer in C programming


Example: Memory organization after executing following assignment statement:
a=10;
p1=&a;
p2=&p1;

The memory organization after executing the statement a=10 is shown below:


The memory organization after executing the statement a=10


The memory organization after executing the statement p1=&a is shown below:

The memory organization after executing the statement p1=&a

The memory organization after executing the statement p2=&p1 is shown below:


The memory organization after executing the statement p2=&p1

The data item 10 can be accessed using three variables a, p1 and p2 as shown below:
a    refers to the data item 10
*p1 Also refers to the data item 10. Here, using p1 and only one indirection operator, the data item 10 can be accessed.
**p2  Also refers to the data item 10. Here, using p2 and two indirection operators the data item 10 can be accessed (i.e., *p2 refers to p1 and **p2 refers to a)


Floating point constant in C language

Floating point constant

Definition: The numeric values having fractional part are called floating point constants. All  negative Numbers should have prefix ‘- ’. A positive number may have a ‘+’ sign that is optional. Other
Character  are not allowed . The floating point constant can be represented using two forms as:

1. Fractional form
2. Exponent notation(Scientific notation)

Fractional from: Now, let us see  ‘‘how to represent floating point numbers using fractional form?  Explain giving examples.’’ A floating point number represented using fractional form has an integer part followed by a decimal point and a fractional part. We can omit the digits before the decimal point or after the decimal point. For example, 0.5, -0.99, -6, -9,+.9 etc all are valid floating point numbers.

Exponent notation (Scientific notation): Now , the question is ‘‘How to represent floating point numbers in scientific notation? Give examples.’’ The floating point number represented using Scientific notation (also called exponential notation) has three parts namely:
                          (part1)             (part2)                 (Part 3)
                         mantissa             e or E                  exponent


  • The mantissa can be an integer or a floating point number represented using fractional Notation.The letter e or should follow mantissa.
  • The exponent should follow e or E. The exponent has to be an integer ‘‘with optional ‘+’
  • Sign’’ or ‘- ’ sign.


The following table shows invalid floating point numbers. The reasons for invalidity are also shown:


Floating point/ Real Constant
Valid / invalid
Reasons for invalidity
22.0/7
Invalid
/ is not allowed.
120
Invalid
There is no decimal point.
6.5e 8
Invalid
White space is not allowed between e and 8.
1.2.3
Invalid
More than one decimal point is not allowed.
2.123,4
Invalid
Comma is not allowed
10.5e-6.9
invalid
Fractional part 6.9 is not allowed in exponent part.
© Copyright 2013 Computer Programming | All Right Reserved