-->

Tuesday, December 24, 2013

How to Delete Multiple Records from DataGridView in Winforms: C#

To remove multiple records from the DataGridView, programmer need to write some line of code, code may be written in a button's click event that is outside of the DataGridView. The article shows about how to select multiple records of DataGridView and the c# code to remove them with a single mouse click.

When a programmer have to remove a single record entry from the DataGridView, then a command button can be added as discussed. Removing a single record can be performed by the index of the record. Through the index programmer can easily get all the unique values about the record which helps to perform the action.


To remove multiple records, follow the steps written below:
  • Drag-n-Drop DataGridView on the form and set its MultiSelect property to True.
  • Create a list of records (Student Class) and bind this DataGridView with that list.
  • Create a button outside of this DataGridView and generate its click event.
  • Write following C# code in the click event of button to remove multiple records:
private void removeButton_Click(object sender, EventArgs e)
{
DataContext dc = new DataContext();
foreach (var item in dataGridView1.Rows)
{
DataGridViewRow dr = item as DataGridViewRow;
if (dr.Selected)
{
string name = dr.Cells["Name"].Value.ToString();
var student = dc.Student.FirstOrDefault(a => a.Name.Equals(name));
if (student != null)
{
dc.Student.Remove(student);
}
}              
}
dataGridView1.DataSource = null;
dataGridView1.DataSource = dc.Student;
}
  • Run the form and select some of the records as in the image:
How to Delete Multiple Records from DataGridView in Winforms: C#

  • Click on the remove button and all these selected records will be deleted. A single record remain safe shown in the image:
How to Delete Multiple Records from DataGridView in Winforms: C#


So all these simple steps are used to delete multiple as well as single record from the DataGridView. Programmer can also use a confirmation message for the surety of the deletion by the user. To do that, just place all the above code in between the below c# code:

if (MessageBox.Show("Are you sure you want to remove all these records?", "Confirm", MessageBoxButtons.YesNo, MessageBoxIcon.Question).ToString() == "Yes")
{
//above code
}

When the programmer will click on the button then a confirmation message will be shown. After clicking on the "Yes" button, all the selected records will be deleted otherwise none of them.

Tuesday, November 5, 2013

How to Provide Search Feature in DataGridView: Windows Forms

We have successfully bind our datagridview with a list of items discussed in earlier post. What if there are many records in our list and datagridview is looking full of records. In this case, user can’t even search any single record, if he/she find, it will be a time consuming process.

So we (The Programmer) have to provide a search feature, through which the user can find some records according to the desired condition. A textbox have its TextChanged event that is triggered when the text value of the textbox is changed. So our task is to write some code in this event, so that when user change the text, the datagridview vary according to the code.

Create a list and bind a datagridview with that list. Add a textbox in the form and generate its TextChanged event and write the following code as it is.
private void searchTextBox_TextChanged(object sender, EventArgs e)
{
if (searchTextBox.Text != string.Empty)
{
var searchResult = stuList.Where(a => a.Name.StartsWith(searchTextBox.Text));
dataGridView1.DataSource = searchResult.ToList();
}
else
dataGridView1.DataSource = stuList;
}

The code will search all the records that’s name will be starts with the given text in the searchTextBox. The following image shows the result after write the character “B” in the textbox. Only a single record will be shown because there is only a single record in the list.

How to provide search feature in DataGridView: Windows Forms

Now if we don’t know the starting characters of the name then there is another function i.e. Contains() that can be used to search all the records that contains the text. Just replace the first line with the below line.

var searchResult = stuList.Where(a => a.Name.Contains(searchTextBox.Text));

Run the project and write the character “o” in the textbox and it will show the result in datagridview as shown:

How to provide search feature in DataGridView: Windows Forms

The datagridview binding will vary with the text changed in the textbox, and if the textbox left empty then it will show all the records of the list.

Friday, November 1, 2013

How to Access Record by DataGridViewButton: Windows Forms

I have created a DataGridViewButton for each particular record of DataGridView, as in my earlier post. Adding a button is not sufficient in programming, it should perform some functions when clicked, so we have to generate its click event.

In simple words, we can’t generate a click event of this DataGridViewButton using double click or from the events section. As this is in datagridview so generate Cell_Click event of this datagridview. Now, I have added this button in first column, so I can check it on the same.
private void dataGridView1_CellClick(object sender, DataGridViewCellEventArgs e)
{
MessageBox.Show("Column: " + e.ColumnIndex + " and Row: " + e.RowIndex);
}

By this simple code, the debugger will execute all your line of code, written in the space provided. ColumnIndex contains the column index and RowIndex contains row index, when this event triggered.

Let suppose, we want to access the record of the clicked row of datagridview. I have bound that datagridview with list of student class, so the following C# lines of code will get the instance of student, which is currently focused by mouse click event.
private void dataGridView1_CellClick(object sender, DataGridViewCellEventArgs e)
{
Student stu = dataGridView1.Rows[e.RowIndex].DataBoundItem as Student;
MessageBox.Show("Name: " + stu.Name + "\r" + "Age: " + stu.Age
+ "\r" + "City" + stu.City + "\r"
+ "Dob: " + stu.Dob);
}

The first line will get the particular record, which is of student type. When we run the project and click on the datagridviewbutton it will show a message box, containing the detail of particular student.

How to access record by Datagridviewbutton in C#: Windows Forms

Thursday, October 31, 2013

How to Add Commands with Binding in DataGridView: Windows Forms

After binding records with DataGridView, there may be some options to edit or to remove those records. To do these simple task we can provide either a button, which gets the selected record and perform operation, or we can provide the button with each particular record.

We will discuss here how to add a button with particular record with the following simple steps. Drag-n-drop a datagridview on the form and a task pop-up menu will automatically open, click on Add Columns link button to add a new column. It will show following Add Column window.

How to Add Commands with Binding in DataGridView: Windows Forms

By default Unbound column radio button have been checked, if not check it and use the following values in respective fields:
  • Type: DataGridViewButtonColumn
  • Header Text: Command (Changeable)
Sure the Visible check box is checked and click on Add button to add this column. Now you have successfully added a command button with empty text as shown in below image:

How to Add Commands with Binding in DataGridView: Windows Forms

To write text on the button generate Cell_Formatting event of dataGridview and set the value of first column as I do in the following c# code:
private void dataGridView1_CellFormatting(object sender, DataGridViewCellFormattingEventArgs e)
{
dataGridView1.Rows[e.RowIndex].Cells[0].Value = "Remove";
}

When you run the project now, it will show “remove” on the button. To check if this code will works for multiple records or not, add some records in data gridview like How to add Records in Datagridview. Run the project now and it will show the Remove button with each record as shown in the following image:

How to Add Commands with Binding in DataGridView: Windows Forms

In the next article I will remove the particular record with this command button.

How to Bind ComboBox with List of Items: C#

A list of items is used to store some temporary records, used in the program and do some operations like sorting, grouping and etc. In the previous post we have created a list and bind that list to the datagridview, using its DataSource property.

A combo box also have DataSource property to bind some data as I have discussed in my earlier article i.e. How to bind combobox with database. Combo Box is used to display a single field at a time and a list can contains multiple fields. I will use the same student class as in my earlier articles.
To show a single field, combo box have a property DisplayMember that will specify the field to display. In the following C# code the student list will bind with the combo box and name field will be shown.

List<Student> stuList = new List<Student>();
cmbBox.DataSource = stuList;
cmbBox.DisplayMember = "Name";

Before running this code, you have to sure that your list have some records to show. It will not throw an exception, but it will also not show any records because the list is empty.

Run the project and combo box will bind the list items and we can select any of them. The image shown the combo box items:

How to bind combobox with list of items: C# Windows forms

Saturday, October 26, 2013

How to Get Selected Fields from List Using LINQ: C#

When we bind a list with a control like datagridview, comboBox or listbox, then it will bind all the fields related to list. I have created a list of student with multiple fields i.e. Name, age, city and DOB. Now in this article I will bind only name and age of this list to a Datagridview.

To get selected fields, syntax of LINQ query will be:
var variable = from tempVar in list
select new
{
   tempVar.Field1,
   tempVar.Field2
};

Now in our case of Student class the records should be selected through the following C# line of code:
var selectedFields = from s in stuList
select new
{
s.Name,
s.Age
};
dataGridView1.DataSource = selectedFields.ToList();

In the last line of code, it will bind the list to gridview and show only name and age of the students like in following image:

Get selected fields in LINQ: C# windows forms
If all the LINQ methods are not showing in your program then sure about the namespace in your code file i.e. System. Linq;
See Also: How to Bind DataGridView with DataSet

How to Bind DataGridView to List Of Items: C#

Datagridview is the common control to bind our records in windows forms. I have bound this datagridview to dataset and in this article I will bind a list of student class’s data. I will use the same student class as in my previous post.

Drag-n-Drop a DataGridView on the form and write the following C# line of code in the constructor of the form.
public Form1()
{
InitializeComponent();
dataGridView1.DataSource = stuList;
}

Before running the project, just sure that you have inserted some items in the stuList. To insert some records we can use an in-built Add function of the list. Write the following code to insert records:
stuList.Add(new Student() { Name = "Jacob", Age = 29, City = "London", Dob = new DateTime(1983, 5, 26) });
stuList.Add(new Student() { Name = "Zulia", Age = 31, City = "London", Dob = new DateTime(1981, 5, 26) });
stuList.Add(new Student() { Name = "Brandon", Age = 35, City = "London", Dob = new DateTime(1978, 5, 26) });

The record insertion should be done before the above binding. Run the project and the datagridview will be shown with these three records. The image shown the records in datagridview:

Friday, October 4, 2013

How to Edit Columns in SQL Server Binding: Windows Froms

When we bind the data grid view with SQL Server database, then it will show all the columns created in the table of database. According to our previous post we have displayed all the records of table, without writing a single line of code.

Now in previous example all the columns are shown even the primary key of table. In this article we will remove those columns by some mouse clicks.

A datagridview tasks pop-up menu appears automatically, as shown in below image, click on Edit Columns link button.

How to Edit Columns in SQL Server Binding: Windows Froms


By clicking on this link button, some column names are shown in left side and on the right side there are some properties of that particular selected column.

How to Edit Columns in SQL Server Binding: Windows Froms


To remove a column, just select that and click on remove button (just below the selected columns panel), and it will be removed. We can easily change the header text of the particular column. Select a column and on the right side edit the value of Header Text.

How to Edit Columns in SQL Server Binding: Windows Froms


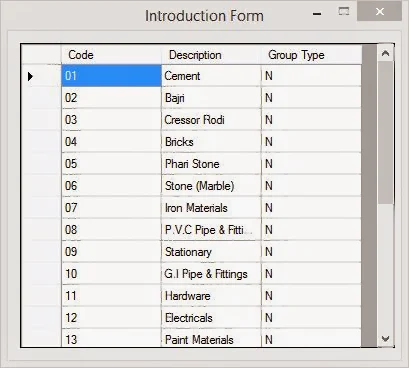
Perform the editing you want and at the last, click on ok button. All the settings you changed has been saved and when you run the project only three columns Code, Description and Type will be shown like:

How to Edit Columns in SQL Server Binding: Windows Froms

Wednesday, September 25, 2013

How to Retrieve Data from SQL Database: Windows Forms

In my previous post, I have created a connection object and then get all the records from the database table. What if we want to bind our datagridview without writing a single line of code? So in this article we will do something like this.


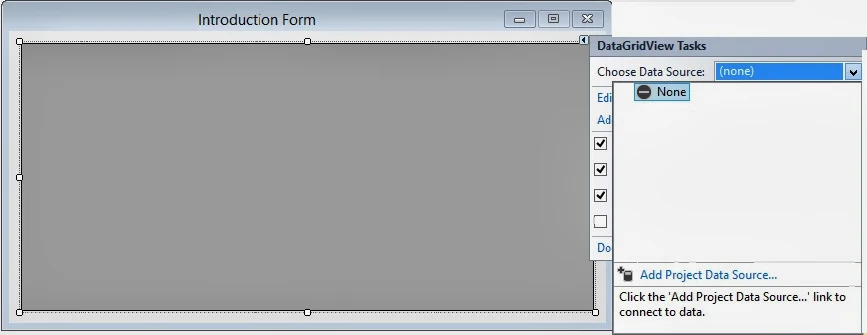
 Just drag-n-drop a datagridview on the form and name it, if you want. A datagridview tasks pop-up menu appears automatically as shown:

How to Retrieve Data From SQL Server Database and bind to DataGridView in Windows Forms

Select the Choose Data Source drop-down list and then Add Project Data Source as shown:

How to Retrieve Data From SQL Server Database and bind to DataGridView in Windows Forms

Now Data Source Configuration wizard will open, select Database as your data source. The wizard will look like:

How to Retrieve Data From SQL Server Database and bind to DataGridView in Windows Forms

By clicking on Next button, It will prompt for the database model you want to use. Select dataset, it will determines the type of data objects our application will use.

How to Retrieve Data From SQL Server Database and bind to DataGridView in Windows Forms

In the next step we have to choose our connection that is used by the application use to connect to the database.

How to Retrieve Data From SQL Server Database and bind to DataGridView in Windows Forms

Click on New Connection and it will prompt for Choose Data Source dialog box having some more options to select.

How to Retrieve Data From SQL Server Database and bind to DataGridView in Windows Forms

Select Microsoft SQL Server which is used to connect to MS SQL Server, and the data provider should be .NET Framework Data Provider for SQL Server. Add Connection dialog box will appear as shown:

How to Retrieve Data From SQL Server Database and bind to DataGridView in Windows Forms

Write the server name as given “(LocalDb)\v11.0”, and select appropriate database name from the drop down list below. I have select StockDb here. Just click on Test Connection to check our connection succeeded or not.

How to Retrieve Data From SQL Server Database and bind to DataGridView in Windows Forms

Press ok and it will show Data Source Configuration wizard again with the specified connection and also connection string.

How to Retrieve Data From SQL Server Database and bind to DataGridView in Windows Forms

Choose the table name from the tree view shown. I have select Groups table because I want to show the records of groups table. Finish now with selecting the data set name. If you will forget the dataset name, it will used the by default name.

How to Retrieve Data From SQL Server Database and bind to DataGridView in Windows Forms

It will show the datagridview binding with the columns names of groups table as shown in the above image. Now run the project and look out the records bind to the datagridview

How to Retrieve Data From SQL Server Database and bind to DataGridView in Windows Forms

As I have said above, we have not wrote a single line of code.

Thursday, September 19, 2013

How to Bind DataGridView with DataSet in Windows Forms: ADO.NET

In our previous post, I have described about the ways to bind datagridview in windows forms. The first way is to bind the datagridview with dataset and show the data of a table in the gridview. Here is the syntax of binding in c#:
dataGridView.DataSource= ”DataSet Name”;
dataGridView.DataMember=”Table Name”;

Now the time is to perform this code with our existing dataset and table. Drag-n-drop a datagridview on the window and write the following c# code in our form’s constructor:
SqlConnection connection = new SqlConnection();
connection.ConnectionString = "Data Source=(LocalDb)\\v11.0; Initial Catalog=StockDb; Integrated Security=True";
connection.Open();

SqlCommand command = new SqlCommand("select * from Groups", connection);

DataSet ds = new DataSet();
SqlDataAdapter da = new SqlDataAdapter(command);
da.Fill(ds);

dataGridView1.DataSource = ds;
dataGridView1.DataMember = ds.Tables[0].ToString();

In the above code, first four lines are same as written in executing sql statements. Fifth line will create a new object of DataSet. Six line will create an object of SqlDataAdapter class which will create an adapter with specified command object.

Next line tell us to fill the dataset with the adapter, which contains all the rows returning by the command object.

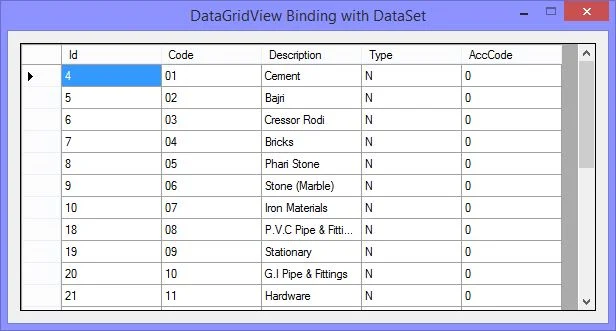
Now the last two lines are used to specify the data source of datagridview and the table which will be bind to. When we run the code a window will show with a datagridview containing all the returning rows as shown in following image:

How to bind DataGridView with dataset in Windows Forms ADO.NET

Monday, September 16, 2013

How to Bind ComboBox with DataTable: WPF

DataTable is an object of ADO.NET library, which is used to store temporary data in tabular form in memory. When we are creating data table in code part, then we have to add some columns and have to add some rows.

We have learnt about the combo box introduction and its binding with the list of string in our earlier posts. In this article we will bind this combo box to a data table. Just add a combo box and write some properties as in below code:
<ComboBox Name="cmbBox" Height="25" Width="200"
ItemsSource="{Binding}"></ComboBox>

Now in code part, create an object of data table and add three columns i.e. Name, Age and Address, like in below c# code:
DataTable dt = new DataTable();
dt.Columns.Add("Name");
dt.Columns.Add("Age");
dt.Columns.Add("City");

After adding columns, now its time to add some rows and insert some records in that. So write the below c# code in code part to add three rows:
DataRow dr = dt.NewRow();
dr["Name"] = "Jacob";
dr["Age"] = 25;
dr["City"] = "France";
dt.Rows.Add(dr);

DataRow dr1 = dt.NewRow();
dr1["Name"] = "Julia Martin";
dr1["Age"] = 26;
dr1["City"] = "France";
dt.Rows.Add(dr1);

DataRow dr2 = dt.NewRow();
dr2["Name"] = "Brandon";
dr2["Age"] = 24;
dr2["City"] = "London";
dt.Rows.Add(dr2);

We have successfully created a data table with three columns and add three rows with some valid data. To bind this data table to above combo box, we have to write these two lines in c# code part:

cmbBox.DataContext = dt;
cmbBox.DisplayMemberPath = dt.Columns[0].ToString();

The first line will assign the data context of combo box to the data table, while the second line will set the column name to be displayed in combo box. Run the project the check the combo box:

How to bind combo box with data table in WPF C#, XAML

Sunday, September 8, 2013

How to Bind ListView with string List: WPF

As we all know the listview is inherited class of listbox and have almost all the properties of listbox. We have learnt listbox binding with string list in our earlier post. In this article we bind the listview with the same string list.

Just place a listview having only name property, because we have to access that listview in our code behind file. We can also use height and width property of the listview, if the data items are of lengthy string.
<ListView>
<ListView.Name>listView</ListView.Name>
</ListView>

Now use the same list of string as in previous post i.e.
List<string> strList = new List<string>();
strList.Add("London");
strList.Add("Italy");
strList.Add("California");
strList.Add("France");
listView.ItemsSource = strList;

Now look out the last statement, it will set the item source of the listview as this string list. When we run the project it will show a listview with four items:

Bind listview with string list in WPF C#


To get selected item the same procedure will follow as in listview bind with grid resource.

Saturday, September 7, 2013

Bind ListView Control with Grid Resource: WPF

Grid resource provides a way to reuse the objects and values by other controllers, as we studied in previous posts. In this article we will bind the listview with Grid resource defined in XAML code:
<Grid.Resources>          
<x:ArrayExtension Type="{ x:Type sys:String}" x:Key="placesSource">
<sys:String>London</sys:String>
<sys:String>Italy</sys:String>
<sys:String>California</sys:String>
<sys:String>France</sys:String>
</x:ArrayExtension>
</Grid.Resources>

This resource is the same in our recent article about listbox binding with grid resource. Write the following code in XAML to bind the above resource:
<ListView Name="listView" ItemsSource="{StaticResource placesSource}">
</ListView>

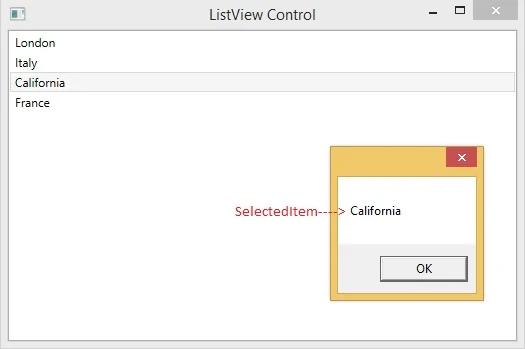
When we run this project then it will bind the above data with listview as shown in following image:


To get selected item from this listview, write following code in the selectionChanged event of the listview:
private void listView_SelectionChanged(object sender, SelectionChangedEventArgs e)
{
string selectedValue = listView.SelectedItem.ToString();
MessageBox.Show(selectedValue);
}

Run the code and change the selection, a message box will display with the selected value.

Friday, September 6, 2013

How to Bind ComboBox with List: WPF

The same procedure will be follow up as in listbox binding. In the XAML define a combobox with some common properties you want as height, width and etc. Don’t forget the name property, because it will be used to assign itemsSource for this control.

<ComboBox Name="comboBox" Width="200"/>

Create a list of type string and add some items with Add() method of list. I have added the same items as in grid resources.
List<string> strList = new List<string>();
strList.Add("London");
strList.Add("Italy");
strList.Add("California");
strList.Add("France");
comboBox.ItemsSource = strList;

Just run the code and the same window will be shown with a combobox containing above four items.

Combobox binding with List control WPF c#

Combobox also have a property selectedIndex which is used to get or set the selected index of the control. To select an item by default we can use this property as:

comboBox.SelectedIndex = 2;

Write the above line of code just below the c# code, and California will be selected.

How to Bind ListBox with List: WPF

According to the previous post we don’t need to define the items first. Means the source having the items to be bind with listbox. In the XAML define a listbox with some common properties you want as height, width and etc. Don’t forget the name property, because it will be used to assign itemsSource for this control.

<ListBox Name="listBox" Width="200"/>

Create a list of type string and add some items with Add() method of list. I have added the same items as in grid resources.
List<string> strList = new List<string>();
strList.Add("London");
strList.Add("Italy");
strList.Add("California");
strList.Add("France");
listBox.ItemsSource = strList;

Just run the code and the same window will be shown with a listbox containing above four items.

Binding of Listbox with C# List: WPF

Listbox have a property selectedIndex which is used to get or set the selected index of the control. To select an item by default we can use this property as:

listBox.SelectedIndex = 2;

Write the above line of code just below the c# code, and California will be selected.

How to Bind ListBox with XAML Grid Resource: WPF

In the previous article, we have learnt about the listbox and some of the properties of listbox. Resources provide a way to reuse the objects and values by other controllers in the code. As we created a grid resource in the combobox binding, that resource can be used here easily.

Just review the grid resource written as below, where type indicates the type of values defined in it, and the key name will be used to bind other control through it.
<Grid.Resources>          
<x:ArrayExtension Type="{ x:Type sys:String}" x:Key="cmbPlacesSource">
<sys:String>London</sys:String>
<sys:String>Italy</sys:String>
<sys:String>California</sys:String>
<sys:String>France</sys:String>
</x:ArrayExtension>
</Grid.Resources>

Now add a listbox and use its itemsSource property. This property is used to get or set a collection used to generate the content of itemscontrol.
<ListBox Name=”listBox” Width="200"
ItemsSource="{StaticResource cmbPlacesSource}">
</ListBox>

This will show the above items in this listbox as shown in following diagram.

Listbox binding with grid resource: wpf

As the items increases or height decreases, this control will use scroller to view the extra items. Let me set height of above listbox to 30 and lookout the output.

Listbox binding with grid resource plus scrolling: WPF

We can get the selected item’s value from the selection changed event of this control. Write the following code in selection Changed event of listbox
private void listBox_SelectionChanged(object sender, SelectionChangedEventArgs e)
{
string selectedValue = listBox.SelectedItem.ToString();
MessageBox.Show(selectedValue);
}

It will show a message, containing the selected item, each time when the selection changed of the listbox control.
Select an Item in listbox binding WPF

Tuesday, September 3, 2013

Bind ComboBox Control With Grid Resource: WPF

In my previous post, I have wrote about the combo box control and add some string items. In this article I will add a grid source and then bind that source to combo box control with some easy steps.

By default a grid is placed in the XAML code file of a window. Just add the below code in the grid snippet:
<Grid.Resources>          
<x:ArrayExtension Type="{ x:Type sys:String}" x:Key="cmbPlacesSource">
<sys:String>London</sys:String>
<sys:String>Italy</sys:String>
<sys:String>California</sys:String>
<sys:String>France</sys:String>
</x:ArrayExtension>
</Grid.Resources>

The above code is defining an array extension which will be used as a source of the combo box. Now add a combo box and it should be look like the following code:
<ComboBox Name="cmbPlaces" Height="30" Width="100"
 Text="Select Places-"
 IsEditable="True"
 ItemsSource="{StaticResource cmbPlacesSource}">
</ComboBox>
Here in the above code, it doesn’t matter of height and width, you can provide these as you want. The must thing is ItemsSource of the combobox. As you are looking the code it is the same name of the above array extension. It will show all the data defined in the above source i.e. as in following image:

ComboBox binding with Grid Resource in WPF

In above image by default "Select Places-" is shown, which can be set by the text property with IsEditable property to true. In the selection changed event of combo box, we can get the selected value by using the following code:
private void cmbBox_SelectionChanged(object sender, SelectionChangedEventArgs e)
{
string selectedValue = cmbPlaces.Text;
MessageBox.Show(selectedValue);
}

Each time when the selection index will change, it will show a message box with the selected text. So we can easily get the selected text of the combo box.

Saturday, June 22, 2013

How to change password in windows forms

In context of computer system, once another person acquire your password he/she can use your computer. They can even use your computer to attack another machines. If he/she do this, it will look like you do anything.
The same can be applied to our applications, if one acquire application’s password then he/she can modify or remove something, to harm you. That’s why we should change the password periodically in order to ensure the security of computer/application.

We have to follow some steps to change the password:

Step 1

After creating login control add another form i.e. Change password, and pass the username from login form to this form using constructor.

chnage password

Step 2

Add three textboxes into new form. One for old password, second for new password and third will be used for comparing new password. Add a button and generate click event of that button.

Step 3

Write following code in click event of button

chnage pwd


In above code, check the user is correct and also entered the equal values in confirm password and new password textbox. If both conditions are satisfied then, assign the user a new password that is in new password textbox. And finally save the changes in database.

Download source.

Thursday, June 13, 2013

How to bind TabControl with database in windows forms

TabControl manages and displays a related collection of tabs that can contain controls and components. We can add multiple pages in a single form and each page can contain its individual set of controls that can displayed when that tab is selected.

When we add a TabControl in our form then it will add three Tab Pages as default pages and tabPage1 will be selected tab. We can remove any tabPage from that control or can add a new tabPage.

Create a tab page

To add a tab page we can use Add method of TabPages property. Following line of code will add three tab pages without any control

tabControl1.TabPages.Add("Page1");
tabControl1.TabPages.Add("Page2");
tabControl1.TabPages.Add("Page3");

Inserting a tabPage with a label control:

Label label = new Label();    //New labal control
label.Text = "This is the control which will added to TabPage";    //set text property of label

TabPage tabPage = new TabPage();    // create a new tabpage
tabPage.Text = "Tab Page 1";    // set text property of tabpage
tabPage.Controls.Add(label);    //add label control to above tabpage

tabControl1.TabPages.Add(tabPage);    //finally add tabpage to our tabcontrol

Remove a tab page 

To remove a tab page we can use Remove method of TabPages property. Using following line of code we can remove selected tab from our tabControl:

tabControl1.TabPages.Remove(tabControl1.SelectedTab);

Load tabpages from Database 

In the following example we will add tabPage according to our departments. Each tab contains a list of employees working in that department. For showing list of employees we used a DataGridView in a UserControl. When we add a tabPage then we will load userControl in that tabPage.

Step 1:
Create two tables i.e. Department and Employee (described in previous article) in our database.

Step 2:
Insert some records in both tables (described in previous article).

Step 3:
Add a UserControl to our project and then add a DataGridView that will contain list of employees. Write following code in constructor of UserControl:
  
public EmployeeUserControl(Department dept)
{
       InitializeComponent();
       DataContext dc = new DataContext();
       var employees = from temp in dc.Employee
                                where temp.Department.Name == dept.Name
                                select new
                                {
                                       temp.Name,
                                       temp.Email,
                                       temp.Mobile
                                 };
       empDataGridView.DataSource = employees.ToList();
 }
As in above code datagridview will bind to the list of employees according to department.

Step 4:
Now finally in our form’s constructor write below line of codes to add pages to tabControl
foreach (var item in dc.Department)
{
        TabPage newTab = new TabPage(item.Name);
         newTab.Controls.Add(new EmployeeUserControl(item));
         tabControl1.TabPages.Add(newTab);
}

Download Source

Saturday, June 8, 2013

How to bind CheckedListBox using database In windows forms

CheckedListBox displays a list of items with a checkbox on the left side of each item. The user can select one or more items by simply place a checkmark to one or more items. To access those checked items we can use either CheckedListBox.CheckedItemCollection or CheckedListBox.CheckedIndexCollection in our code behind file.


To add a list of items at run time there is a function i.e. AddRange() that need a parameter of type array. We can add individual items using simple Add() method.
bind CheckedListBox using database
When we run our project it will look like:

bind CheckedListBox using database image

CheckedListBox provides two types of states i.e. Checked and Unchecked. There is one more state i.e. Intermediate that must be set through code If we want to use this.

Now to bind this control using database we must have some entries in our table and I have described this in my previous post. To bind CheckedListBox with our table we have to write following code in our Form’s constructor:
data context class
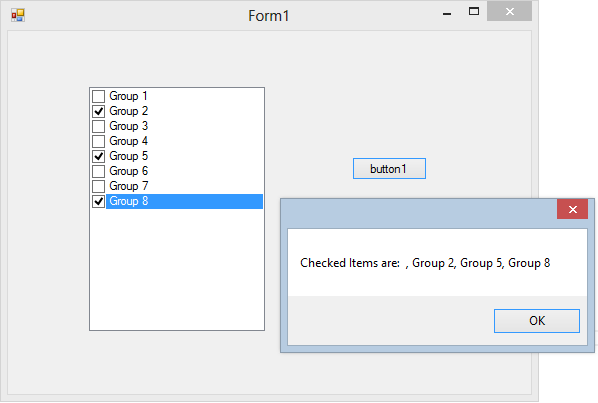
After bind this CheckedListBox  it’s time to get checked items. To get checked items there is a property i.e. CheckedItems type of CheckedItemCollection. So add a button in our form and in the click event of that button we will get checked item one by one and add it to a string variable and finally show this through a message box.
binding listing item
When we will run our project it will show a message box having items that are checked in our CheckedListBox.
binding output

Download Source code
© Copyright 2013 Computer Programming | All Right Reserved