-->

Saturday, November 14, 2015

Getting Started to Build Web Applications: Introduction to MVC

MVC (Model View Controller), most usable framework for latest web programmer, enables programmer to separates their work in these three names. It is a lightweight and standard design pattern which is familiar to many web developers.

According to the name of this framework, the application divides itself in three things i.e. one contains your logic, one contains your pages (may be razor or aspx pages) and the last one will contain some classes which are used to control the pages redirecting per user clicks.

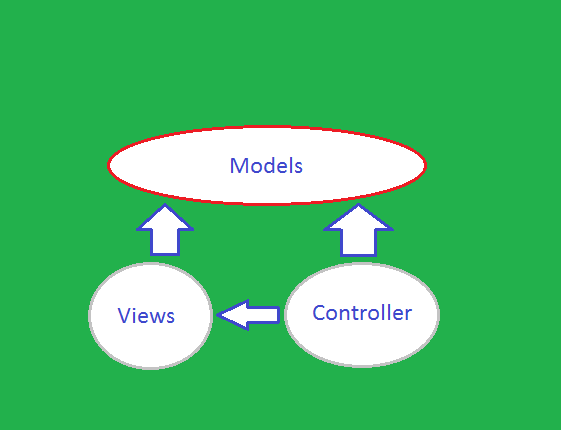
The following diagram shown about the layers of this framework which includes Business layer, display layer and input control.


Getting Started to Build Web Applications: Introduction to MVC

Model, used to represent the core of web application. To interact with database tables there are some classes have to be written. Those classes must be placed in the model folder to follow the MVC framework. It means all the logic, works for the application, falls in this category.

View, used to decide about the display of data on the pages. Mostly views uses the model data, for the validation or may be other features. When we login in to application with invalid credentials, it requires some valid entries.

Controller, used to control the display data on the views by the model. It is the middle layer of the framework, which decides about what data are to be shown from the model and of course on which view.

Microsoft described some advantages of MVC based application:
  • It makes it easier to manage complexity by dividing an application into the model, the view, and the controller.
  • It does not use view state or server-based forms. This makes the MVC framework ideal for developers who want full control over the behavior of an application.
  • It uses a Front Controller pattern that processes Web application requests through a single controller. This enables you to design an application that supports a rich routing infrastructure. For more information, see Front Controller.
  • It provides better support for test-driven development (TDD).
  • It works well for Web applications that are supported by large teams of developers and for Web designers who need a high degree of control over the application behavior.
Create First MVC Application using Visual Studio

Sunday, February 1, 2015

Add New Elements or Content in jQuery

JQuery provides some standard functions through which developer can easily add element/content to an existing element. User can add an element after or before an existing element by using jQuery functions. These element can also be added using callback functions. Just check some value and according to condition, we can add element easily.

Following are jQuery methods that are used to add new content:

Append method

This function insert content or new element at the end of selected html element. For example

$("#lblComment").append("last comments");

This function will add specified text after the existing text of selected label.

prepend()

This function insert content or new element at the beginning of selected html element. For example

$("#lblComment").prepend("start comments");

This function will add specified text before the existing text of selected label. We can use both these methods to add multiple content by using multiple parameters. These functions can easily get multiple parameters as shown below:

$("#lblComment").prepend("one", "two", "three");
$("#lblComment").append("eight", "nine", "ten");

After() and before()

After method inserts content after the selected html element and before method inserts content before the selected html element. More can be explained by following jQuery code fragment:

$("#lblComment").after("after adding text");
$("#lblComment").before("before adding text");

Both these functions will add the specified text after and before the selected label element respectively. Same as append and prepend, these functions can also be used for adding multiple elements to an existing.

In above examples, we have added only texts only but we can add any other element in place of that text. Just write the element’s html code and place as parameter of these functions, that element will add easily. In further article we will remove the added element/content and how to use/append css classes through jQuery code fragment.

Saturday, January 31, 2015

Implementing Callback Functions in JQuery

Callback function reference will execute after the current effect/function/event finished completely. This type of function can be used after any event completion like to set an element’s value after execution of some function finished.

In earlier article we have discussed about callback function execution after finishing effect. These functions executes after current effect have been finished. As the effect completed, the function reference specified as callback will be executed.

Following code block will change the text field of element having id "testComment" as mentioned in the code. This whole process will take place after button (btnComment) click event done.

$("#btnChange").click(function(){
  $("#testComment").text(function(i,origText){
    return "Old text: " + origText + " New text: Changed! on index: " + i;
  });
});

A callback function is one which is passed as an argument in another function and which is invoked after some kind of event. The call back nature of the argument is that, once its parent method completes, the function which this argument represents is then called; that is to say that the parent method calls back and executes the method provided as an argument.

So we can perform anything after any event or any ajax request also e.g. we want to change the html of a div element after clicking on a button, the following code fragment helps us:

$("#btnChange").click(function(){
  $("#testDiv").html(function(i,origText){
    return "Old html: " + origText + " New html: This is new HTML for this div element";
  });
});

Callbacks are so-called due to their usage with pointer languages. If you don't use one of those, just understand that it is just a name to describe a method that's supplied as an argument to other method, such that when the first method is called and its method body completes, the callback method is then invoked, or in other words "called at the back" of the other function.

Saturday, January 3, 2015

Get and Set Attribute’s Value in jQuery

JQuery library functions have more functionality than we can think of. All we want through jQuery can be easily implemented like to get values of any element on the web-page. Whether the value is simple text or whole html of that element.

Earlier article was about to get content of text, html and value field assigned to an element on the web-page. Element on the web-page have many attributes like id, name, title, href etc. and its corresponding value that is specific for that attribute.

JQuery library function have some in-built function that can be used to get those attributes value and developer can set those values by using other provided functions. For example the following code fragment will get href value of an anchor tag with specified selector:

alert($("#anchor").attr("href"));

This alert message can be included wherever we want like in any button’s click event or any function called as per requirement.

Developer can also set particular value for any attribute of any element. Following example will set an anchor tag’s (above code fragment) href attribute’s value:

$("#anchor").attr("href","http://dotprogramming.blogspot.com");

Same as above function we can easily set attribute’s value either one or multiple at once. Following code will assign title and href attribute’s value for the same anchor tag only in one function:

$("#anchor").attr({
    "href" : " http://dotprogramming.blogspot.com",
    "title" : "JQuery Learning Material"
  });

These functions for set an attribute’s value can be used callback functions to be execute further operation after setting the value. In the next article we will show those callback functions with syntax and execute some more operations.

Wednesday, December 31, 2014

Get Content and Attributes in jQuery

Getting and assigning content of elements in jQuery is very simple because of its in-built functions. JQuery provides many in-built functions that can be used to get content of any element and can set html part for any element.

JQuery library contains many DOM related functions that make it easy to use and understand how it is working. Programmer can easily manipulate content of any element or attributes by using existing functions. In rare chances programmer have to write its own functions with collection of JQuery library functions.

To get content of any element on the web-page, programmer can use following three mostly used functions:
  • val(): get or set the value of forms field.
  • text(): get or set the text content of selected elements.
  • html(): get of set the whole content of selected elements including html markup.
Lookout the following example through which we will use all three types of functions and show the values returns by them.

$("#btn").click(function(){
alert($("#lblText1").val());
        alert($("#lblText2").text());
        alert($("#lblText3").html());
});

All the above alert messages will return respective values for selected label. The below code fragment will assign some values to all three labels:

$("#btn").click(function(){
alert($("#lblText1").val("value"));
        alert($("#lblText2").text("text"));
        alert($("#lblText3").html("html"));
});

In the next article we will get and set attribute's value for an element on the web-page.

Callback Functions Execution in jQuery

Callback functions are function which can be invoked under certain conditions. These functions executes after current effect have been finished. As the effect completed, the function reference specified as callback will be executed.

JQuery statements are executed line after line in a sequence and perform action written. In case of effects discussed earlier, next line (whatever you write) will be execute before the effect completes its part. If the next line depends on the effect then it can create errors.

Callback function reference will execute after the current effect finished completely. These functions can easily remove those errors, here is the syntax:

$(selector).show(speed, callback);

Following example will show an alert after div is shown on the button click:

$("#btnShow").click(function(){
$("#divToShow").show("slow", function(){
        alert("Div has been shown");
        });
});

In the above code a callback function have been written that will show an alert message after div will show. If we don’t write any callback function then it will show an alert message without showing the div properly.

$("#btnShow").click(function(){
$("#divToShow").show(2000);
        alert("Div has been shown");
});

This code will not wait for div to show and show an alert message specified. So these type of situations must have callback functions.

Sunday, December 7, 2014

Adding Animation to Web Page Part-2: jQuery Effects

JQuery library have all the effects for adding animation as discussed in earlier article. How to show or hide an element, sliding effects on an element or perform any custom animation on web-page have been discussed in my previous discussion.

Wherever these function didn’t work on the page then there may be some script error or you are defining the function with wrong syntax. Whatever the error be, jQuery library is there for help any type of definition, syntaxes or any example.

User can apply fading on an element, and make that element out of visibility, by using below functions specially created for this functionality. Reading an element’s description and do some practical with them are two different tasks. So just read and perform practical to clarify all these effects.

  • fadeIn(): used to fade in a hidden element on the web-page.
  • fadeOut(): used to fade out a hidden element on the web-page.
  • fadeTo(): allows fading to a given opacity.
  • fadeToggle(): used to toggle between fadeIn() and fadeOut() methods alternatively.

These methods have some parameters like speed, callback and opacity as per their requirements. Below are the examples for above methods:

$(".divEmployee").fadeIn(“slow”); or $(".divEmployee").fadeIn(4500);
$(".divEmployee").fadeOut(“slow”); or $(".divEmployee").fadeOut(4500);
$(".divEmployee"). fadeToggle (“slow”); or $(".divEmployee"). fadeToggle (4500);
$(".divEmployee"). fadeTo("slow",0.5);

Stop()

This method is used to stop all the effects before it is finished and revert back to the previous stage. It can work with all effects function e.g. hide/show, slideDown/slideUp, fadeIn/fadeOut or any custom animation.

$(".divEmployee").stop();

This function will stop the effect applied on specified element and revert back. If the element is hidden and perform a show() function then it will stop and make that hidden back.

Stop() function may take two parameters stopAll (to clear animation queue, default it will only stop the active animation) and goToEnd (to specify whether complete the current animation or not).

We will discuss about callback feature of these functions means what to do after animation has finished.

Friday, December 5, 2014

Adding Animation to Web Page: jQuery Effects

JQuery library have all the effects for adding animation user can imagine/think about like to animate, fade, toggle, show, hide and etc. All these animation have their own functions according to their job.

jQuery methods allow users to easily use these effects with minimum configuration. In other context we can show or hide any element on the page by using these effects to make better UI. These animation can be done in any event of an existing element. I have listed some of these methods including a brief description:

  • hide(): will hide the related element.
  • show(): will show related element.
  • toggle(): show of hide related element. (If element is shown then it will hide)
  • slideDown()/slideUp(): show or hide related element with sliding motion.
  • slideToggle(): show of hide related element with sliding motion.
  • animate(): this method is used for custom animation.

These methods have also some parameter to be used with e.g. speed (represents predefined speed among slow, normal and fast) and callback (optional - represent a function to be executed after animation completion). Whether the parameter is required or optional is function dependent, may be change in other definition.

$(“#button”).hide(1000); will hide the button as per the given speed
$(“#button”).show(1000); will show the button as per the given speed

Consider following code:

$(".divEmployee").toggle('slow', function(){
             $(".txtMessage").text(successfully done');
          });

It will show/hide the whole div tag and after completion given message will show on the element provided. Following are some examples about how to use these animation methods. Write these according to element on you page and look out the effects.

$(".divEmployee").slideDown('slow');
$(".divEmployee").slideUp('slow');
$(".divEmployee").slideToggle('slow');

The custom animation animate() method will require all the specified parameters to complete the animation. Lookout the following example of custom animation:

  $( "#divEmployee" ).animate({
    opacity: .25,
    height: "toggle"
  }, 4500, function() {
  });

Run this jQuery code and check the animation, don’t forget to confirm the element id on your page. This code will shrinks the height of div to hide it. We will learn more about these effects and how this can stop by using jQuery function.

Sunday, November 9, 2014

Commonly used jQuery Event Methods: jQuery

All the DOM events have its equivalent jQuery methods that may be implement by programmer as per the requirement. Anything happens through input devices on the web-page is called an event.

All these events have its unique names e.g. clicking on the page, pressing key, hovering mouse etc. According to jQuery masters, these events have some categories, some of them listed below:

  • Keyboard events: KeyDown, KeyUp and KeyPress etc.
  • Mouse events: Click, double click, mouse hover, mouse enter and mouse leave etc.
  • Form events: submit, focus, blur etc. 
  • Document/window events: Load, UnLoad, scrolling, resizing etc.

All these events have its own method, discussed earlier in changing default behavior. Some of those events have listed below with example:

$(document).ready()

Whenever the document/page is ready, this event have triggered. Anything written in this event have been executed just after the page loaded. All the events except functions must be written in this event to be executed. Some of the selectors have been discussed here.
$(document).ready(function(){
alert(‘document is ready’); // This message will shown just after the page load its contents.
});

click()

This event triggers when user clicks on any html events. Programmer can write particular click method on any html event. The below code will execute when user clicks on any <p> element.
$(“p”).click(function(){
alert(‘p tag clicked’);
});

dblclick()

This event triggers when user double clicks on any html events. Programmer can write particular double click method on any html event. The below code will execute when user clicks two times on any <p> element.
$(“p”).dblclick(function(){
alert(‘p tag double clicked’);
});

mouseenter()

This event triggers when user enters mouse in the area of html events. The below code will execute when user enters into area of any <p> element.
$(“p”).mouseenter(function(){
alert(‘mouse entered in <p> tag’);
});

blur()

whenever an html event losses its focus, this event will triggered. This is just opposite event of focus() event which triggers when an element have focus on it.
$(“p”).blur(function(){
alert(‘losses focus from <p> tag’);
});

There are many events related to each html element, can be read from jQuery official website of through the help option of visual studio. All those events have similar syntax to write method for them. In the next article we will discuss about jQuery effects.

Sunday, September 28, 2014

How to Add or Remove CSS class from element: jQuery

Earlier article was about to using basic jQuery syntaxes and changing default behaviour of html elements in MVC. As html easily provide to include CSS classes to change the design of an element or we can say anything on the web-page. The same operation can easily be performed by using jQuery according to some conditions or on some events triggering.

Add CSS class: To add a class using jQuery, programmer have to use the function addClass() which have some parameters including property name and the value to be assign.
Add below style on the page:
<style>    a.test {        font-weight: bold;    }</style>
This above style will make font-weight: bold for the anchor tag using this css class. To add this CSS class on the anchor tag, write the following line of code:

$( "a" ).addClass( "test" );

Remove Class: On click of this anchor tag or some other element, we can simple remove this class by using the below line of code:

$( "a" ).removeClass( "test" );

This code can be written on the click event of any element on the page or on some other event. Programmer must place all this jQuery code in the below block so that your code executes when the document is ready to be worked on.
$(document).ready(function(){ //write your code here});

Monday, September 22, 2014

How to Change Default Behaviour of element in jQuery

Earlier article was about installing and embedding jQuery on our web-pages, and then using jQuery selectors to perform some events. These events can be easily written on the same page or may be in another javascript file having extension (js).

jQuery provides simple function to prevent the default behavior of any event on the web page. I have an anchor tag on the page and on the click on that tag I am redirecting the user on the jQuery.com website.

Now to cancel this redirection programmer can use:

$( document ).ready(function() {
    $( "a" ).click(function( event ) {
               event.preventDefault();
    });
});

The above code will can cancel all the redirection of all the anchor tag on the page. If you want to prevent the behavior for some specific element then use their id or may be class selector. Selectors have discussed in earlier article, you can get more help out there.

Let’s suppose we have a form filling out all the details by the user and at the last there is a submit button to post the form data to controller. Now we don’t want to post data then we can use this simple jQuery code:

$( document ).ready(function() {
    $( "#btnSubmit" ).click(function( event ) {
               event.preventDefault();
    });
});

Now we have some more buttons or may be anchor tag to be used on the form but don’t want their click event or redirection on their click. Add any class for each of the anchor element whichever click event you want to cancel and write the following code:

$( document ).ready(function() {
    $( ".className" ).click(function( event ) {
               event.preventDefault();
    });
});

Saturday, September 20, 2014

How to add jQuery to Web Pages: MVC

Programmer must include jQuery library on the web pages (views in case of MVC) to be execute all the functions/event/triggers written for that page in jQuery.  This article will lists all the options may be used to use jQuery on the pages.

To include jQuery there are two options which are basically used:
  • Include jQuery from google
  • Download and then add a reference on your page. (www.jQuery.com)

All the js files have two versions and can be downloaded through the website given above:
  • Development version:  uncompressed and readable, used for testing purpose
  • Production version: compressed and not readable, used on live sites.

@Scripts.Render(“http://ajax.googleapis.com/ajax/libs/jquery/1.11.1/jquery.min.js”)

In earlier article, we have studied about layout files and a simple view file that is used to render styles/scripts on the pages in MVC. So to include jQuery or any other file on the page we have two ways i.e.
  • Add reference on view: adding a reference on the view individually will only enable jQuery for that page. If you want to use it on another page then you have to add it on that page also.
  • Add reference on layout: as we all know, layout file is the basic structure for all the pages including that layout. So adding a reference on layout can be used for all the pages following that layout.

Earlier article was about to use selectors on the page but without adding this reference, you can’t use those. In next article we will discuss about jQuery syntaxes.

Wednesday, September 10, 2014

How to Bind DropDownList with Enum MVC

Earlier article was about to bind DropDownList with simple select list of type selectlistitems. These select list may by any type of list either from database or temporary for that view only. In this article we will create an enum, then create a select list through that enum and finally will bind that to drop-down list.

Create an Enum like I have, named OptionType

enum OptionTypes
{
value1,
value2,
value3,
value4
}

After creating enum, write a class that will work like a helper to create select list for that enum:

public static class EnumHelper
{
// Get the value of the description attribute if the   
// enum has one, otherwise use the value.  
public static string GetDescription<TEnum>(this TEnum value)
{
var fleid = value.GetType().GetField(value.ToString());

if (fleid != null)
{
var attributes = (DescriptionAttribute[])fleid.GetCustomAttributes(typeof(DescriptionAttribute), false);

if (attributes.Length > 0)
{
return attributes[0].Description;
}
}

return value.ToString();
}

/// <summary>
/// Build a select list for an enum
/// </summary>
public static SelectList SelectListFor<T>() where T : struct
{
Type t = typeof(T);
return !t.IsEnum ? null
: new SelectList(CreateSelectList(t), "Value", "Text");
}

/// <summary>
/// Build a select list for an enum with a particular value selected 
/// </summary>
public static SelectList SelectListFor<T>(T selected) where T : struct
{
Type t = typeof(T);
return !t.IsEnum ? null
: new SelectList(CreateSelectList(t), "Text", "Value", selected.ToString());
}

private static IEnumerable<SelectListItem> CreateSelectList(Type t)
{
return Enum.GetValues(t)
  .Cast<Enum>()
  .Select(e => new SelectListItem { Value = e.ToString(), Text = e.GetDescription()                            });
}
}

Go to your controller and write the line as I have:

ViewBag.values = EnumHelper.SelectListFor<OptionTypes>();

Open your view page and write

@Html.DropDownList("values");

Run this view in browser and check, your drop-down list has been bind. This will create a simple list named “values” as specified as parameter. If we want to create a drop-down list for a model then:

@Html.DropDownListFor(model => model.property, (IEnumerable<SelectListItem>)ViewBag.values, new { html parameters })

This will bind this drop-down list as strongly with the property of the model.

Saturday, August 30, 2014

How to Create Layout page and set for View: MVC

After creating default MVC application in Visual Studio there is a default layout file has been added in shared folder under views having name _Layout.cshtml. This file is used to provide consistent look on all of the pages having default layout page set. Changes done in this file will set for all the pages/views under this layout.

The above extension ".cshtml" is used only in case of Razor and this will be changed for aspx views. Programmer can even change this layout file as per requirements or can use multiple layout files according to the roles/group  defined. All the scripts, styles and custom files must be included in this layout file if necessary for all views.

If Programmer don't want to use any layout for the view then "Layout = null" must be set in the view page. This feature can only be set for that particular view. Now to create new layout file programmer have to add new item as "MVC Layout Page(Razor)" and change the name if required otherwise default will be used.

MVC set layout null


After adding the layout file create html and use “@RenderBody()” statement wherever you want to render the body of view page which will have this layout. Whatever change we do in this file, will be changed for all the views having this file as a layout.

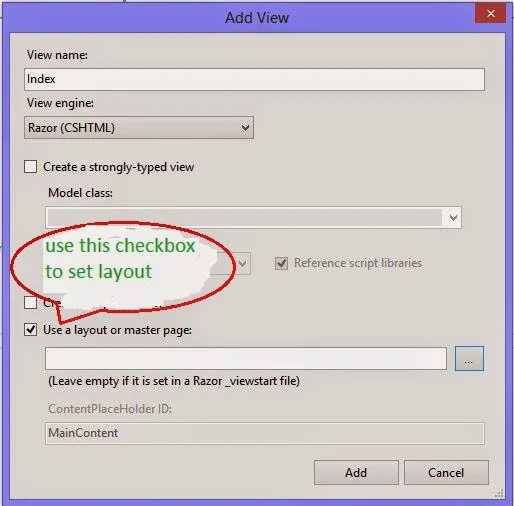
Whenever programmer adds a new view there is an option for using a layout or master file with a checkbox and browse button. Check that checkbox and browse for the layout file created above. This will set that file as a layout for that new view.

MVC set null in new view

Wednesday, July 30, 2014

How to Submit data on DropDown Selection changed in MVC Razor

Submitting the form by button, programmer have to assign only the type of that button and on click this button all the data can be get on the server side. On drop-down change we have manually submit the form by either specifying "OnSelectionChanged" event or some jquery functions.

In earlier article I have created DropDownList in MVC, to submit the form we can simply use only submit function on change event of the list.

@Html.DropDownList("ddlname", "List to bind", "--default title--", new { onchange = "submit();" })

After writing this code on change it will post all the data on the form to server-side but programmer have to use same name in action method as used here “ddlname”. When we use view-model to bind the data then dropdown list’s code will be changed as:

@Html.DropDownListFor(model => model.Property , "List to bind", "--default title--", new { onchange = "submit();" })

This code will contains the value of the property of model as used here. The value will submit on change the selection of this drop-down list. Programmer can change other controls value by using this code.

Suppose we have to select country, state and city on the form in hierarchy manner. On change the country, states drop-down list should change and on change of state, city drop-down list should change. By implement this functionality we can use this submit functionality.

How to Use Multiple Submit Button in MVC Razor

The most common method to get the data on server from client side. Submit button on the form can be used to post all the form data to be used further by programmer. Generally one form only have a single submit because of user want to post data only once.

To submit data in different ways programmer can use more than one submit button. A form can have multiple submit buttons as per the requirement of programmer. We can send the button’s name on the button click.

The action should have the same name of the button to get the value of clicked button. Suppose all the button’s have same name as submit as written below:

<input type = "submit" name = "btnsubmit" value= "submit1" />
<input type = "submit" name = "btnsubmit" value= "submit2" />
<input type = "submit" name = "btnsubmit" value= "submit3" />

Now in controller’s action the variable should be of string type and name as “submit” as below:

[HttpPost]
public ActionResult SubmitData(string btnSubmit)
{
If (btnSubmit == "submit1")
{
//code to execute
}

If (btnSubmit == "submit2")
{
//code to execute
}

If (btnSubmit == "submit3")
{
//code to execute
}
}

According to this code we can implement different functionality on each submit button with all the data posted on the form. These button will only post the data containing as input on the form and also inside the form element.

Saturday, July 19, 2014

How to Implement Custom Membership in Asp.Net MVC

In Asp.Net MVC, default membership works with pre-defined/specified data source where programmer don’t worry about anything related to authentication. To implement authentication with desired data source, programmer must implement custom membership as explained in the article. Using custom membership, programmer can easily authenticate user’s visit through self-written code.

This article will describe some simple steps to complete the task:

  • Create a class named "Custom_Membership" in Models folder in your MVC application.
  • Inherit this from MembershipProvider class exists in “System.Web.Security” namespace.
  • Right click on MembershipProvider and select on “Implement Abstract Class”, it will all the override function need to be implement by us.
  • Just implement ValidateUser() method and replace that function with the following code:

    public override bool ValidateUser(string username, string password)
    {
    if (username == "admin" && password == "password")
    {
    return true;
    }
    return false;
    }

  • Go to AccountController >> Login action and change the login functionality as:

    public ActionResult Login(LoginModel model, string returnUrl)
    {
    if (ModelState.IsValid && Membership.ValidateUser(model.UserName, model.Password))
    {
    FormsAuthentication.SetAuthCookie(model.UserName, model.RememberMe);
    return RedirectToLocal(returnUrl);
    }
    ModelState.AddModelError("", "The user name or password provided is incorrect.");
    return View(model);
    }

  • Open web.config file of the root and add following in system.web tag

    <membership defaultProvider="Custom_Membership">
      <providers>
    <clear/>
    <add name="Custom_Membership"
    type="CustomMembershipP.Models.Custom_Membership"/>
      </providers>
    </membership>
Run the MVC application and open Login page, it provide an error related to membership, to resolve through error just delete “[InitializeSimpleMembership]” attribute from AccountController.

Again run the application and enter username and password as provided above in ValidateUser() function. It will login successfully, now you can override any of the function in your custom membership class.

Saturday, June 28, 2014

Returns Radio Button Input element using Html.RadioButton() handler: MVC

Html.RadioButton() handler, used to return radio button input element to be input true or false value by user. Checked radio button will return true and un-checked will return false, otherwise it returns null to store/use the value.

Html.RadioButton() handler method is used to present mutually exclusive option i.e. true of false. Using this radiobutton method makes it easy to bind to view data or model is so easy in compare to using simple input radio element. This handler provides mostly same features as Html.CheckBox() handler discussed earlier.

Parameters


  • htmlHelper: specify html helper instance that this method extends.
  • name: specify name of input element used to access the value in controller.
  • value: specify value of radio button element. If none is assigned then this attribute is used to access the value.
  • isChecked: to be set true of false for radio button. True to select the element, OW false.
  • htmlAttributes: specify an object that contains html attributes to set for the element.
     e.g Html.RadioButton(“gender”)

Html.RadioButtonFor(…)

Having the same functionality as Html.RadioButton() but it returns radio button element for each property passed via the model from controller’s action. This handler have two types of type parameters i.e. TModel (specify type of model) and TProperty (specify type of value).

Parameters

  • htmlHelper: specify html helper instance that this method extends.
  • expression: used to identifies object containing the property to render.
  • value: specify value of radio button element. If none is assigned then this attribute is used to access the value.
  • htmlAttributes: specify an object that contains html attributes to set for the element.

e.g Html.RadioButtonFor(model=>model.Gender)

Render radio button input for the property gender passed via controller. Submitting form will assign the value of this radio button to model’s gender property to be accessed in the controller’s action.

Returns Password input element using Html.Password() Handler: MVC

Html.Password() handler, used to return password input element to be input password value by user. This article describes about to using password html helper that will make text unreadable by other users in MVC application.

Like all other input elements, using Html.Password() html handler users are not able to read input value. This handler is mostly used in login process of any ASP.Net MVC application because of some special features of this helper.

This helper commonly have following features:

  • Text input in the control is un-readable.
  • Does not allow user to copy the text input in the control.
  • Does not repopulate its value from ModelState object.

Parameters


  • htmlHelper: html helper instance that this method extends.
  • name: used to specify the name of form field that may be used to look up the value.
  • value: specify the value of this element.
  • htmlAttributes: specify html attributes to be set for the element like placeholder, id, any class or other values.
Overall this will generate an input element having the type password on the page:
<input type=”password” runat=”server” id=”password” />

Html.PasswordFor(…)

Provide same functionality but used to render password input element for each property passed via model. Here the model is the class for which the view is to be created. This handler have two type parameter i.e. TModel (specify type of model) and TProperty (specify type of value).

Parameters


  • htmlHelper: html helper instance that this method extends.
  • expression: used to identifies object that contains property to render.

Html.PasswordFor(model=>model.Password)

this line will render an input element of type password having id "Password" passed by the model. After submitting form, the value of this element will assigned to the password field of the model and can be easily accessed for further use.

Monday, June 9, 2014

Returns CheckBox Input element using Html.CheckBox() Handler: MVC

Html.CheckBox() handler, used to return check box input element to be input true or false value by user. Selected checkbox will return true and un-selected will return false, otherwise it returns null for the programmer to store/use the value.

In compare to other input element, this handler is easy to bind to with the data source provided by the programmer for the page. This handler/method have its own parameters list as Html.Label() or Html.TextBox() handlers have.

Parameters

  • Name: specifies the name of form field. It is string type of parameter.
  • isChecked: programmer should pass true to select the checkbox, otherwise false. As the name implies it is Boolean type of parameter.
  • htmlAttributes: specifies an object that contains all the html attributes to set for the element as discussed earlier.
@Html.CheckBox("isMarried", true);

This line will return an check box input element on the page with checked true value, as passed with the method. The name of form field will be isMarried, used to get the value of this element.

@Html.CheckBoxFor(…)

This handler works same as above but for a particular property in the object specified in the expression. This handler is used to return check box input for only the bind to property exists in the mode passed by an action to this view page.

Parameters are almost same except the expression which is a predicate to be bind this element with the specific property.

Let’s suppose this view page is bind to a model of type student having the properties like name, age, isMarried and etc. To bind this check box handler programmer have to write the following line of code:

@Html.CheckBoxFor(model => model.isMarried, false)

This handler now binds to isMarried property of the model and by default it will be un-selected on the page.

© Copyright 2013 Computer Programming | All Right Reserved