-->

Thursday, October 22, 2015

WPF Listview binding with Gridview cell template using EDMX file

Good evening, welcome to WPF programming. I already explained, how to bind WPF listview from string type list also explained binding it with database table using EDMX file. In this article, I will give you an example of cell template of Gridview, which is inside in WPF Listview. You can say, I will update previous WPF listview article. If you want to customize your Gridview cell in WPF Listview control then use cell template.


Note: Before doing this task, read previous

You need to change only XAML file without any changes in code behind code. The previous XAML code is:

<Grid>
<ListView Name="listgrid">
<ListView.View>  
<GridView>  
<GridViewColumn Header="Id" DisplayMemberBinding="{Binding Id}"/>
<GridViewColumn Header="Name" DisplayMemberBinding="{Binding Emp_Name}"/>
</GridView> </ListView.View> </ListView>
</Grid>

Now, replace it with below-mentioned code

<Grid>
<ListView Name="listgrid">
<ListView.View>
 <GridView> 
<GridViewColumn Header="Id" DisplayMemberBinding="{Binding Id}"/>
<GridViewColumn Header="Name">
<GridViewColumn.CellTemplate>
<DataTemplate>
<TextBlock Text="{Binding Emp_Name}" FontWeight="Bold"/>
</DataTemplate> 
</GridViewColumn.CellTemplate> 
</GridViewColumn>
</GridView> </ListView.View>
</Grid>
</ListView>

Now, codes generate the following output:

WPF Listview binding with Gridview cell template using EDMX file

ASP.NET fileupload control change border color Programmatically

Each control in tools of visual studio, treat as a class. Property window shows the behavior of their controls also contains some common property, such as back-color, border color etc. Now in this article, we will take a simple example to change the border color with border style of ASP.NET FILEUPLOAD control. I explained, How to use file upload, enable/disable file upload and many more properties.

Source code


 <%@ Page Language="C#" AutoEventWireup="true" CodeFile="fileupload_backcolor.aspx.cs" Inherits="fileupload_backcolor" %>  
 <!DOCTYPE html>  
 <html xmlns="http://www.w3.org/1999/xhtml">  
 <head runat="server">  
   <title></title>  
 </head>  
 <body>  
   <form id="form1" runat="server">  
   <div>  
     Enter Alpha color :  
     <asp:TextBox ID="TextBox1" runat="server" Width="202px"></asp:TextBox>  
     <br />  
     Enter Red Color :&nbsp;&nbsp;  
     <asp:TextBox ID="TextBox2" runat="server" Width="202px"></asp:TextBox>  
     <br />  
     Enter Green Color:  
     <asp:TextBox ID="TextBox3" runat="server" Width="202px"></asp:TextBox>  
     <br />  
     Enter Blue Color&nbsp;&nbsp; :  
     <asp:TextBox ID="TextBox4" runat="server" Width="202px"></asp:TextBox>  
     <br />  
     <br />  
     <asp:Button ID="Button1" runat="server" OnClick="Button1_Click" Text="Change Fileupload background color" Width="260px" />  
     <br />  
     <br />  
   </div>  
     <asp:FileUpload ID="FileUpload1" runat="server" Height="51px" Width="311px" />  
   </form>  
 </body>  
 </html>  


code behind

 using System;  
 using System.Collections.Generic;  
 using System.Linq;  
 using System.Web;  
 using System.Web.UI;  
 using System.Web.UI.WebControls;  
 public partial class fileupload_backcolor : System.Web.UI.Page  
 {  
   protected void Page_Load(object sender, EventArgs e)  
   {  
   }  
   protected void Button1_Click(object sender, EventArgs e)  
   {  
     int alpha = int.Parse(TextBox1 .Text);  
     int red = int.Parse(TextBox2.Text);  
     int green = int.Parse(TextBox3.Text);  
     int blue = int.Parse(TextBox4.Text);  
     FileUpload1.BorderColor = System.Drawing.Color.FromArgb(alpha, red, green, blue);  
     FileUpload1.BorderStyle = BorderStyle.Solid;  
     FileUpload1.BorderWidth = 2;  
   }  
 }  

Code Generates the following output

Programmatically change border color of fileupload control in ASP.NET

Programmatically change border color of fileupload control in ASP.NET

In this example, we are taking four textboxes, one button, one file upload control. Using text box we can input the color code value, pass these values in the FromArgb ( ) method as an argument. This example is basically designed for users, who want to change the border color of ASP.NET FILEUPLOAD control at run time.

ASP.NET Fileupload control enable/disable programmatically

Enable property defines the working mode of asp.net file upload control. It has two boolean value first one is true and second one is false. If you set true for this then control work properly otherwise control doesn't work, I mean to say that fileupload appear on screen but will not work as input control. If you want to set this property during compile time, must add attribute inside the tag. Like

  <asp:FileUpload ID="FileUpload1" runat="server" Enabled="False" />  

    true is the default value for this. Now take a simple example to change the value at run time.

Source code


 <form id="form1" runat="server">  
  <div>  
     <asp:FileUpload ID="FileUpload1" runat="server" Enabled="False" />  
     <br />  
     <br />  
     <asp:Button ID="Button1" runat="server" Text="Enable/Disable" OnClick="Button1_Click" />  
     <br />  
     <br />  
     <asp:Label ID="Label1" runat="server" Text=""></asp:Label>  
   </div>  
   </form>  

Code Behind 


 <script runat="server">  
   protected void Button1_Click(object sender, EventArgs e)  
   {  
     if (FileUpload1.Enabled == true)  
     {  
Label1.Text = "file upload control is enabled "; 
FileUpload1.Enabled = false; } else { Label1.Text = "file upload control is disabled "; FileUpload1.Enabled = true; } } </script>

Code Generate the following output

Fileupload control  disable programmatically in ASP.NET

Fileupload control enable  programmatically in ASP.NET
When we press the browse button then we know that it is working or not. Above mentioned snap define this. In first, snap you can see that open file dialog doesn't appear but in second snap its appear, so in second, snap it is working.

Default Listing with Insert and Update in MVC 4

MVC 4 provides simple listing procedure through which developer can create CRUD actions for a database table. Awesome thing is developer don’t need to write a single line of code and will complete the task.
We have added new table Category and updated edmx file in earlier article. Now we will create CRUD actions and their views with default MVC 4 structure. We have created empty controller without using any default action but now we will add a controller with all the default actions.
Follow the procedure for creating a controller and in “Add Controller” window name the controller as CategoryController and select the options as selected in the following screenshot and click on Add button:
CategoryController and select the options as selected

This window is prompting for your context class (inherited from DbContext or may be your edmx entities name) file and the model name for which these actions will be created.
After clicking on Add button, it will add a controller with following 5 actions and corresponding views. Those views are not created on the root, but MVC 4 will create those views under new folder with the same name as controller.
  • Create
  • Delete
  • Detail
  • Edit
  • Index
Run your project and go to specified controller/Index page, it will load all the categories your database have. Have a look on the below screenshot, with three records each having three action-link i.e. Edit, Details and Delete. Beside these individual action links this table structure also have Create New action on the top through which it will redirect to another view.

So we have saved lot of time that may waste to write the code for all these actions and also for creating their views. This MVC 4 feature is very simple to use and we can create more control for each table. Developer can customize these actions or their views as per their requirements.
Some developer don’t need all these views or maybe they want to enable all these actions on the single page. In next article we will create listing page for our own and write some line of code for table structure.

WPF LISTVIEW BINDING USING EDMX FILE

In previous WPF listview article, I explained, how to bind listview from List of string type. In this article, I will explain you, how to bind listview using EDMX file. We all know about powerful features of  WPF listview i.e Gridview. Lets, take an example of it.

  <Grid>  
     <ListView Name="listgrid">  
       <ListView.View>  
         <GridView>  
           <GridViewColumn Header="Id" DisplayMemberBinding="{Binding Id}"/>  
           <GridViewColumn Header="Name" DisplayMemberBinding="{Binding Emp_Name}"/>  
         </GridView>          
       </ListView.View>     
     </ListView>  
   </Grid>  

In the mentioned code, Gridview is a view of WPF Listview with two columns that are Id and name. Here, DisplayMemberBinding is the property of GridviewColumn, which is used to bind listview columns from field of model class.

  public partial class MainWindow : Window  
   {  
     public MainWindow()  
     {  
       InitializeComponent();  
       loadlistview();  
     }  
     private void loadlistview()  
     {  
       DatabaseEntities dbe = new DatabaseEntities();  
       listgrid.ItemsSource = dbe.Employees.ToList();  
     }  
   }  

Here, DatabaseEntities, context class in EDMX model, also Employees is the public property in DataContext class. Learn How to add EDMX file with database file.
Now, code generate the following output:

WPF LISTVIEW BINDING USING EDMX FILE

ASP.NET FILEUPLOAD CONTROL INSERT IMAGE INTO DATABASE

Introduction

First of all, I would like to thank all of the readers who have read my previous articles. What a great support I have got from you people. By using ASP.NET File upload control, we can easily insert images into Table or you can say that we can create image gallery projects. With the help of JQuery, we put some dynamic effects like upload multiple files one by one. you can also do by JQuery to create button work as File upload. I really felt great when article Bind GridView was displayed on this blog page. Following are the articles that I have written so far for beginners as well as developers.


Follow some steps for inserting Images into database using asp.net fileupload control.

STEP-1 : Create Database Table

HOW TO INSERT IMAGE INTO DATABASE


STEP-2: Drag asp.net fileupload control from ToolBox and Drop it in Design window.


  <form id="form1" runat="server">  
   <div>  
     <asp:FileUpload ID="FileUpload1" runat="server" /><BR />  
     <asp:Button ID="Button1" runat="server" Text="Submit" />  
     <br />  
     <br />  
     <asp:Label ID="Result" runat="server"></asp:Label>  
   </div>  
   </form>  

fileuploadcontrol
STEP 3: Make a new directory in website folder name as "upload".
STEP 4:  Double click on submit button and raise click event.

 using System;  
 using System.Collections.Generic;  
 using System.Linq;  
 using System.Web;  
 using System.Web.UI;  
 using System.Web.UI.WebControls;  
 using System.Data.SqlClient;  
 using System.Configuration;  
 using System.Data;  
 public partial class FILEUPLOAD : System.Web.UI.Page  
 {  
   protected void Page_Load(object sender, EventArgs e)  
   {  
   }  
   protected void Button1_Click(object sender, EventArgs e)  
   {  
     string imagedata = string.Empty;  
     if (FileUpload1.HasFile)  
     {  
       FileUpload1.SaveAs(Server.MapPath("~/upload/" + FileUpload1.FileName));  
       imagedata = "~/upload/" + FileUpload1.FileName;  
     }  
     using (SqlConnection con = new SqlConnection())  
     {  
       con.ConnectionString =ConfigurationManager .ConnectionStrings ["ConnectionString"].ToString ();  
       con.Open ();  
       using (SqlCommand cmd=new SqlCommand ())  
       {  
         cmd.Parameters.AddWithValue("@ur", imagedata);  
         cmd.CommandText ="insert into imagedata(url) values(@ur)";  
         cmd.Connection =con;  
         if (string.IsNullOrEmpty(imagedata))  
         {  
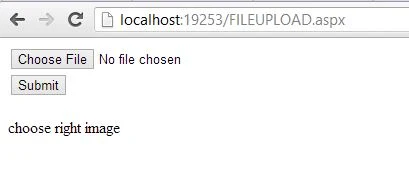
           Result.Text = "choose right image";  
         }  
         else  
         {  
           int a = cmd.ExecuteNonQuery();  
           if (a > 0)  
             Result.Text = "data inserted";  
           else  
             Result.Text = "failed";  
         }  
       }  
     }  
   }  
 }  

Output of the program
How to insert image into database using file upload control

How to insert image into database using file upload control
Here, first to insert images in website folder also get the File path during fileupload. Now, insert the file into Table as like Text. 

Update Edmx When Database Changes in MVC 4

MVC 4: Update Edmx is to make the model as same as the database through which it created. Whatever changes made with the database will not reflect in the Model to perform CURD functions. Suppose we have added a new table with SQL server management studio and want to insert/update some entries with that table using code part. After creating object of database context, notice that we don’t have an instance for that newly added table. To resolve this issue we have to update our edmx using Update Model Wizard as described in this article.

Create new table Category in the same database added earlier and use basic columns like id, name, description, isActive. Open our visual studio project and check that this table have not any existence yet. Open edmx file, right click on the blank space and click on Update Model from Database.

Update Model from Database


  An Update Model wizard will open with options to add tables, views and stored procedures. We have added only a table so expand “Tables” node and select “Categories”. Leave remaining options as they are and click finish.


expand “Tables” node and select “Categories


 After finishing it will reload and will add newly added table, check the edmx file and there are two tables Employee and Categories as shown in below image.

check the edmx file


This update model wizard does following in MVC 4:
  • If a table removed from database, it will remove from the model also and update mapping details.
  • If table has been added, it will insert new object in the existing model and update mapping details.
  • Any modification in the object, this wizard will update the model like to add/remove columns.
© Copyright 2013 Computer Programming | All Right Reserved