-->

Monday, December 30, 2013

Mathematical Functions to Work with Numerical Values in Sql Server: SQL Programming

In SQL Programming, mathematical functions are used to operate with numeric values. Programmer can easily perform all type of scientific functions as well as simple arithmetic operations using these mathematical functions.

Programmer can use mathematical functions to manipulate the numeric values in a result set. You can perform various numeric and arithmetic operations on the numeric values. For example, you can calculate the absolute value of a number or you can calculate the square or square root of a value.

The following table lists the mathematical functions provided by SQL Server 2005.

  • Abs, Returns an absolute value
  • Acos, asin and atan, returns the angle in radians whose cosine, sine, or tangent is a floating-point value
  • Cos, sin, cot and tan, returns the cosine, sine, cotangent, or tangent of the angle in radians
  • Degrees, returns the smallest integer greater than or equal to the specified value
  • Exp, returns the exponential value of the specified value
  • Floor, returns the largest integer less than or equal to the specified volume
  • Log, returns the natural logarithm of the specified value
  • Log10, returns the base-10 logarithm of the specified value
  • Pi, returns the constant value of 3.141592653589793
  • Power, returns the value of numeric_expression to the value of y
  • Radians, converts from degrees to radians
  • Rand, returns a random float number between 0 and 1
  • Round, returns a numeric expression rounded off to the length specified as an integer expression
  • Sign, returns positive, negative, or zero
  • Sqrt, returns the square root of the specified value
For example, to calculate the round off value of any number, you can use the round mathematical function. The round mathematical function calculates and returns the numeric value based on the input values provided as an argument.

The syntax of the round function is:
round (numeric_expression, length)

where

  • numeric_expression is the numeric expression to be rounded off.
  • Length is the precision to which the expression is to be rounded off.
The following SQL query retrieves the EmployeeID and Rate for a specified employee id from the EmployeePayHistory table:

SELECT BusinessEntityID, 'Hourly Pay Rate' = round (Rate, 2)
FROM HumanResources.EmployeePayHistory WHERE BusinessEntityID =3

In the result set, the value of the Rate column is rounded off to two decimal places.

Mathematical Functions to Work with Numerical Values in Sql Server: SQL Programming

While using the round function, if the length is positive, then the expression is rounded to the right of the decimal point. If the length is negative then the expression is rounded to the left of the decimal point. SQL Server provides the following usage of the round function.

  • Round (1234.567, 2) outputs 1234.570
  • Round (1234.567, 1) outputs 1234.600
  • Round (1234.567, 0) outputs 1235.000
  • Round (1234.567, -1) outputs 1230.000
  • Round (1234.567, -2) outputs 1200.000
  • Round (1234.567, -3) outputs 1000.000

Use Date Functions to Operate with Date Values in Sql Server: SQL Programming

In SQL Programming, programmer can use the date functions of the SQL Server to manipulate date-time values. You can either perform arithmetic operations on date values or parse the date values. Date parsing includes extracting components, such as the day, the month, and the year from a date value.

Programmer can also retrieve the system date and use the value in the date manipulation operations. To retrieve the current system date, you can use the getdate function. The following statement displays the current date:

SELECT getdate ( )

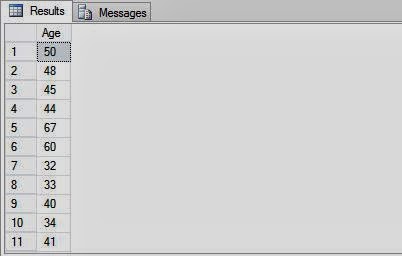
The following SQL query uses the datediff function to calculate the difference between the current date and the date of birth of employees in AdventureWorks, Inc. The date of birth of employees is stored in the BirthDate column of the Employee table.

SELECT datediff (yy, BirthDate, getdate()) AS 'Age'
FROM HumanResources.Employee

Outputs:

Use Date Functions to Operate with Date Values in Sql Server: SQL Programming

The following table lists the date functions provided by SQL Server.

  • dateadd, adds the number of date parts to the date
  • datediff, calculates the number of date parts between two dates
  • datename, returns date part from the listed date, as a character value (for example, October)
  • datepart, returns date part from the listed date as an integer
  • getdate(), returns the current date and time, day, (date), returns an integer, which represents the day getutcdate, returns the current date of the system in Universal Time Coordinate (UTC) time. UTC time is also known as the Greenwich Mean Time (GMT)
  • month, returns an integer, which represents the month
  • year, returns an integer which represents the year

SQL Server provides the following abbreviation and values of the datepart function

  • Year, Abbreviation -- (yy,yyyy),  may have values (1753-9999)
  • Qartr, Abbreviation -- (qq, q), may have values (1-4)
  • Month, Abbreviation -- (mm, m), may have values (1-12)
  • Day of year, Abbreviation -- (dy, y), may have values (1-366)

Sunday, December 29, 2013

Computer Programming: Add item with value in code file, ASP.NET Example

<%@ Page Language="C#" AutoEventWireup="true" CodeFile="itemwithvalue.aspx.cs" Inherits="itemwithvalue" %>
<!DOCTYPE html>
<html xmlns="http://www.w3.org/1999/xhtml">
<head runat="server">
    <title></title>
</head>
<body>
    <form id="form1" runat="server">
    <div>
   
        <asp:RadioButtonList ID="RadioButtonList1" runat="server" Height="65px" Width="235px">
        </asp:RadioButtonList>
   
    </div>
    </form>
</body>
</html>

Code File
using System;
using System.Collections.Generic;
using System.Linq;
using System.Web;
using System.Web.UI;
using System.Web.UI.WebControls;

public partial class itemwithvalue : System.Web.UI.Page
{
    protected void Page_Load(object sender, EventArgs e)
    {
        if (!Page.IsPostBack)
        {
            RadioButtonList1.Items.Add(new ListItem("ASP.NET", "FIRST NUMBER"));
            RadioButtonList1.Items.Add(new ListItem("WINFORMS", "SECOND NUMBER"));
            RadioButtonList1.Items.Add(new ListItem("WPF", "THIRD NUMBER"));
            RadioButtonList1.Items.Add(new ListItem("WCF", "FORTH NUMBER"));
           
        }
    }
}

Output
Computer Programming: Add item with value in code file, ASP.NET Example
 

Computer Programming : TextBox WatermarkExtender control in Ajax with example

Computer Programming : TextBox WatermarkExtender is used to provide a tip to the user that specifies the type of parameter entered within the text box. This extender attaches to a TextBox control and displays a text within the text box when the web page render for the first time. When the user clicks the text box to insert values, the default text gets hidden.

Public Properties of TextBox Watermark Extender are

TargetControlID : Sets the .ID of the TextBox control to which you want to attach the extender
WatermarkText  : Sets the text to display when the value in the text box is empty.
watermarkCssClass : Sets the CSS class for the text box when it is empty.
 

Lets take a simple example

<%@ Page Language="C#" AutoEventWireup="true" CodeFile="watermark-example.aspx.cs" Inherits="watermark_example" %>
<%@ Register assembly="AjaxControlToolkit" namespace="AjaxControlToolkit" tagprefix="asp" %>
<!DOCTYPE html>
<html xmlns="http://www.w3.org/1999/xhtml">
<head runat="server">
    <title></title>
</head>
<body>
    <form id="form1" runat="server">
        <asp:ScriptManager ID="ScriptManager1" runat="server"></asp:ScriptManager>
    <div>
   
        <asp:TextBox ID="TextBox1" runat="server" Height="18px" Width="205px"></asp:TextBox>
        <asp:TextBoxWatermarkExtender ID="TextBox1_TextBoxWatermarkExtender" runat="server" Enabled="True" TargetControlID="TextBox1" WatermarkText="Use ; as a separator">
        </asp:TextBoxWatermarkExtender>
        <asp:Button ID="Button1" runat="server" Text="Search" BorderColor="Black" BorderStyle="Solid" BorderWidth="2px" Width="71px" />
   
    </div>
    </form>
</body>
</html>
Output
Computer Programming : Watermark Textbox example in asp.net

Friday, December 27, 2013

JAVA Characteristics and Java Virtual Machine: Introduction to JAVA

After completion of compilation process in java, programmer need to know about what the characteristics of java are and what java virtual machine is. In this article we will cover these two topics which are main part in programming.

Java Virtual Machine (JVM)  

As you are aware that any source program needs to be either compiled or interpreted before it can be executed. But with Java, a combination of these two is used. Program written in Java are compiled into Java Byte code, which is then interpreted by a special Java Interpreter for a special platform. Actually this Java interpreter is known as the Java Virtual Machine (JVM).

The machine language for the java Virtual Machine is called Java byte code. Actually the Java interpreter running on any machine appears and behaves like a “virtual” processor chip, that is why, the name – Java Virtual Machine. The Java Virtual is an abstract machine designed to be implemented on the top of existing Virtual Machine can be implemented in software or hardware.

JAVA Characteristics and Java Virtual Machine: Introduction to JAVA, Java Platform

JVM, combined with Java API makes Java Platform. The Java API (Application Programming Interface) are libraries of compiled code that can be used in your programs. In other words, the Java API consist of the functions and variables that programmers are allowed to use in their applications.

Characteristics of Java

Although Java has many and many characteristics that make it eligible for a powerful and popular language. In the following lines, we are going to discuss a few important characteristics of java.
  • Write Once Run Anywhere (WORA): the java programs need to be written just once which can run on different platforms without making changes in the Java programs. Only the Java interpreter is changed depending upon the platform.
  • Light Weight Code: With Java, big and useful applications can also be created with very light code. No huge coding is required.
  • Security: Java offers many security features to make its programs safe and secure.
  • Built-in Graphics: Java offers many built-in graphics features and routines which can be used to make Java application more visual.
  • Object-Oriented Language: Java is object-oriented language, thereby, very near to real word.
  • Supports Multimedia: Java is ideally suited for integration of video, audio, animation and graphics in Internet environment.
  • Platform Independent: Java is essentially platform independent. Change of platform does not affect the original Java program/application.
  • Open Product: Java is an open product, freely available to all. However, there exist some special time-saving Java development kits, which can be available by paying small amounts.
After this, let us move on to discussion of how to create programs in Net Beans Java environment. But before that you must know what rapid application development is.

Thursday, December 26, 2013

How to Work with Basic Controls in NetBeans: Java Programming

After talking about many elementary concepts and features of GUI in Java, we have reached a point where we can design our first application. But prior to that we shall learn to work with some most common controls. And after that we shall design our very first GUI application.

There are many graphical controls that are used in java GUI programming. Here’re the list of common GUI controls used:

  • TextField is a basic field that allows the user to type some textual information. It allows at most one line of input. To input some more lines, programmer have to use TextArea discussed below.
  • Label is another basic control that lets you display uneditable text. It is the basic unit that is used almost in every jFrame in Java GUI Application. Label is used to indicating about to do something like in entry form it indicates about where to enter name, address etc.
  • Button displays common GUI button and performs an action when the users clicks on it or presses Enter key after choosing it. Used when programmer wants to do something on the Frame window.
  • TextArea is a component that is used to input multiple lines of text. It optionally allows the user to edit the text. Programmer can also disable the editing option for the user.

After working a lot in NetBeans IDE, programmer have to save the overall work for further use. Programmer can save the work by clicking File → Save or File → Save As commands. Toolbar have also an icon to do the same task i.e. Save.

In further articles we will do some creativity to learn more about these controls as well as working of these controls in NetBeans IDE.

Use String Functions to Manipulate String Values in Sql Server: SQL Programming

In Sql Programming, programmer can use the string functions to manipulate the string values in the result set. There are list of string functions used in sql server and explained in this article. For example, to display only the first eight characters of the values in a column, you can use the left ( ) string function.

String functions are used with the char and varchar data types. The SQL Server provides string functions that can be used as a part of the character expression. These functions are used for various operations on string.

Syntax:
    SELECT function_name (parameters)

Where
  • Function_name is the name of the function
  • parameters are the required parameters for the string function.
The following table lists the string functions provided by SQL Server
  • Ascii, returns the ASCII code of the leftmost character, e.g. SELECT ascii (‘ABC’) will return ascii code of 'A'.
  • Char, return the character equivalent of the ASCII code value, e.g. SELECT char (65)   
  • Charindex, returns the starting position of the specified pattern in the expression e.g. SELECT charindex (‘E’, ‘HELLO’)
  • Difference, compares two strings and evaluates the similarity between them, returning a value from 0 through 4. The value 4 is the best match e.g. SELECT difference (‘HELLO’, ‘hell’)
  • Left, returns apart of the character string equal in size to the integer_expression    characters from the left e.g. SELECT left(‘RICHARD’, 4) will return RICH
  • Len, returns the number of characters in the character_expression e.g. SELECT len(‘RICHARD’)
  • Lower, returns after converting character_expression to lower case e.g. SELECT lower (‘RICHARD’)
  • Ltrim, removes leading blanks from the character expression e.g. SELECT ltrim (‘RICHARD’)
  • Patindex, returns staring position of the first occurrence of the pattern in the specified expression, or zeros if the pattern is not found e.g. SELECT patindex (‘%BOX%’, ‘ACTIONBOX’)
  • Reverse, returns reverse of the character_expression e.g. SELECT reverse (‘ACTION’)
  • Right, returns a part of the character string, after extracting from the right the number of characters specified in the integer_expression e.g. SELECT right (‘RICHARD’, 4) will return HARD
  • Rtrim, returns after removing any trailing blanks from the character expression e.g. SELECT rtrim (‘RICHARD   ’)
  • Space, spaces are inserted between the first and second word e.g. SELECT ‘RICHARD’+space (2)+’HILL’, will add two spaces between 1st and 2nd word.
  • Str, converts numeric data to character data where the length is the total length, including the decimal point, the sign, the digits, and the spaces and the decimal is the number of places to the right of the decimal point e.g. SELECT str (123.45, 6, 2)
  • Stuff, deletes the number of characters as specified in the character_expression1 from the start and then inserts char_expression2 into character_expression1 at the start position e.g. SELECT stuff (‘Weather’, 2,2, ‘I’) will returns ‘wither’.
  • Substring, returns the part of the source character string from the start position of the expression e.g. SELECT substring (‘weather’, 2,2) will return ‘ea’.
  • Upper, converts lower case characters to upper case e.g. SELECT upper (‘Richard’)

The following SQL query uses the upper string function to display data in uppercase. The Name, DepartmentID, and GroupName columns are retrieved from the Department table and the data of the Name column is displayed in uppercase with a user-defined heading, Department Name:
 
SELECT 'Department Name' = upper (Name), DepartmentID, GroupName
FROM HumanResources.Department

 
Outputs:

Use String Functions to Manipulate String Values in Sql Server: SQL Programming

How to Customize the Result Set using Functions in SQL Server: SQL Programming

SQL server provides some in-built functions to hide the steps and the complexity from other code. Generally in sql programming, functions accepts parameters, perform some actions and return a result.

While querying data from SQL Server, programmer can use various in-built functions to customize the result set. Some of the changes includes changing the format of the string or date values or performing calculations on the numeric values in the result set. For example, if you need to display all the text values in uppercase, you can use the upper () string function. Similarly, if you need to calculate the square of the integer values, you can use the power ( ) mathematical function.

Depending on the utility, the in-built functions provided by SQL Server are categorized as listed below:
All these functions are for specific use in sql programming like string functions are used to manipulate the string in result set, to manipulate date values date functions are used, as so on. Arithmetic operations can also be performed with these functions like add, subtract operations on any of the above listed type of functions.

Functions can be easily used anywhere in the sql programming to build the software composable. Programmer can use these functions in constraints, computed columns, where clauses even in other functions. Overall the result, functions are powerful part in sql server.

Further article will describe about the use and example of above listed functions.

Selection Sorting Algorithm in C Language

Selection sort, also called in-place comparison sort, is a sorting algorithm in computer programming. It is well-known algorithm for its simplicity and also performance advantages. The article shows the process with C language code and an example.

As the name indicates, first we select the smallest item in the list and exchange it with the first item. Then we select the second smallest in the list and exchange it with the second element and so on. Finally, all the items will be arranged in ascending order. Since, the next least item is selected and exchanged accordingly so that elements are finally sorted, this technique is called selection sort.

For example, consider the elements 50, 40, 30, 20, 10 and sort using selection sort.

Selection Sorting Algorithm in Computer Programming: C

Design: The position of smallest element from i'th position onwards can be obtained using the following code:

pos = i;
for(j=i+1; j<n; j++)
{
   If(arr[j] < arr[pos])
   pos = j;
}

After finding the position of the smallest number, it should be exchanged with i'th position. The equivalent statements are shown below:

temp = arr[pos];
arr[pos] = arr[i];
arr[i] = temp;

The above procedure has to be performed for each value of i in the range 0 < i < n-1. The equivalent algorithm to sort N elements using selection sort is shown below:

Step1:    [Input the number of items]
    Read: n
Step2:    [Read n elements]
    for i = 0 to n-1
        Read: arr[i]
    [End of for]
Step3:    for i = 0 to n - 2  do
        pos = i;
        for j = I + 1 to n – 1 do
            if(arr[j] < arr[pos]) then
                pos = j
            [End of if]
        [End of for]
        temp = arr[pos]
        arr[pos] = arr[i]
        arr[i] = temp
    [End of for]
Step4:    [Display Sorted items]
    for i = 0 to n -1
        Write: arr[i]
    [End of for]
Step5:    Exit

C program to implement the selection sort.

main()
{
 int n, arr[10], pos, i, j, temp;
clrscr();
 printf("Enter the number of items:\n");
 scanf("%d",&n);
 printf("Input the n items here:\n");
 for(i = 0; i< n; i++)
{
 scanf("%d",&arr[i]);
 }
for(i = 0; i <n; i++)
    {
        pos = i;
        for(j = i+1; j< n; j++)
            {
                if(arr[j] < arr[pos])
                    pos = j;
            }
            temp = arr[pos];
            arr[pos] = arr[i];
            arr[i] = temp;
    }
printf("The sorted elements are as:\n");
for( i = 0; i < n; i++)
    {
        printf("%d\n",arr[i]);
    }
getch();
}
The program will outputs as:

Selection Sorting Algorithm in Computer Programming: C, output

Advantages

  • Very simple and easy to implement.
  • Straight forward approach.

Disadvantages

  • It is not efficient. More efficient sorting techniques are present.
  • Even if the elements are sorted, n-1 passes are required.

Binary Search in C
Linear Search in C

Tuesday, December 24, 2013

How to Delete Multiple Records from DataGridView in Winforms: C#

To remove multiple records from the DataGridView, programmer need to write some line of code, code may be written in a button's click event that is outside of the DataGridView. The article shows about how to select multiple records of DataGridView and the c# code to remove them with a single mouse click.

When a programmer have to remove a single record entry from the DataGridView, then a command button can be added as discussed. Removing a single record can be performed by the index of the record. Through the index programmer can easily get all the unique values about the record which helps to perform the action.


To remove multiple records, follow the steps written below:
  • Drag-n-Drop DataGridView on the form and set its MultiSelect property to True.
  • Create a list of records (Student Class) and bind this DataGridView with that list.
  • Create a button outside of this DataGridView and generate its click event.
  • Write following C# code in the click event of button to remove multiple records:
private void removeButton_Click(object sender, EventArgs e)
{
DataContext dc = new DataContext();
foreach (var item in dataGridView1.Rows)
{
DataGridViewRow dr = item as DataGridViewRow;
if (dr.Selected)
{
string name = dr.Cells["Name"].Value.ToString();
var student = dc.Student.FirstOrDefault(a => a.Name.Equals(name));
if (student != null)
{
dc.Student.Remove(student);
}
}              
}
dataGridView1.DataSource = null;
dataGridView1.DataSource = dc.Student;
}
  • Run the form and select some of the records as in the image:
How to Delete Multiple Records from DataGridView in Winforms: C#

  • Click on the remove button and all these selected records will be deleted. A single record remain safe shown in the image:
How to Delete Multiple Records from DataGridView in Winforms: C#


So all these simple steps are used to delete multiple as well as single record from the DataGridView. Programmer can also use a confirmation message for the surety of the deletion by the user. To do that, just place all the above code in between the below c# code:

if (MessageBox.Show("Are you sure you want to remove all these records?", "Confirm", MessageBoxButtons.YesNo, MessageBoxIcon.Question).ToString() == "Yes")
{
//above code
}

When the programmer will click on the button then a confirmation message will be shown. After clicking on the "Yes" button, all the selected records will be deleted otherwise none of them.

Monday, December 23, 2013

Computer Programming : How to get height and width of an image in ASP.NET

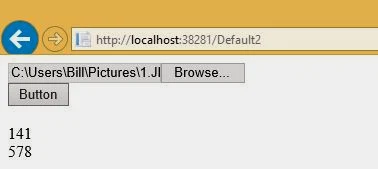
If you want to get uploaded image height and width then you should go for Bitmap class. Suppose I have an image, and I want to get height and width parameter of it. Lets take an simple example

How to get height and width of an image in ASP.NET

You have an image with height and width parameter. You can see in above snap, which is contains 578pixel in wide and 141pixel in height. Now, you want get that these pixel at runtime in ASP.NET.
A Bitmap class is used for getting Height and Width of image.
Encapsulates a GDI+ bitmap, which consists of the pixel data for a graphics image and its attributes. A Bitmap is an object used to work with images defined by pixel data. according to msdn library.

    Simple example

 
<%@ Page Language="C#" AutoEventWireup="true" CodeFile="Default2.aspx.cs" Inherits="Default2" %>

<!DOCTYPE html>

<html xmlns="http://www.w3.org/1999/xhtml">
<head runat="server">
    <title></title>
</head>
<body>
    <form id="form1" runat="server">
    <div>
    
        <asp:FileUpload ID="FileUpload1" runat="server" />
        <br />
        <asp:Button ID="Button1" runat="server" OnClick="Button1_Click" Text="Button" />
        <br />
        <br />
        <asp:Label ID="Label1" runat="server"></asp:Label><br />
         <asp:Label ID="Label2" runat="server"></asp:Label><br />

    
    </div>
    </form>
</body>
</html>
using System;
using System.Collections.Generic;
using System.Drawing;
using System.Linq;
using System.Web;
using System.Web.UI;
using System.Web.UI.WebControls;

public partial class Default2 : System.Web.UI.Page
{
    protected void Page_Load(object sender, EventArgs e)
    {

    }
    protected void Button1_Click(object sender, EventArgs e)
    {

        using (Bitmap bi = new Bitmap(Server.MapPath("~/img/"+FileUpload1 .FileName), true))
            {
                Label1.Text = Convert.ToString(bi.Height);
                Label2.Text = Convert.ToString(bi.Width);
            }


    }
        }
 

Output of the code

How to get height and width of an image in ASP.NET
 

Saturday, December 21, 2013

How to Create a Project in NetBeans GUI Builder: Java Programming

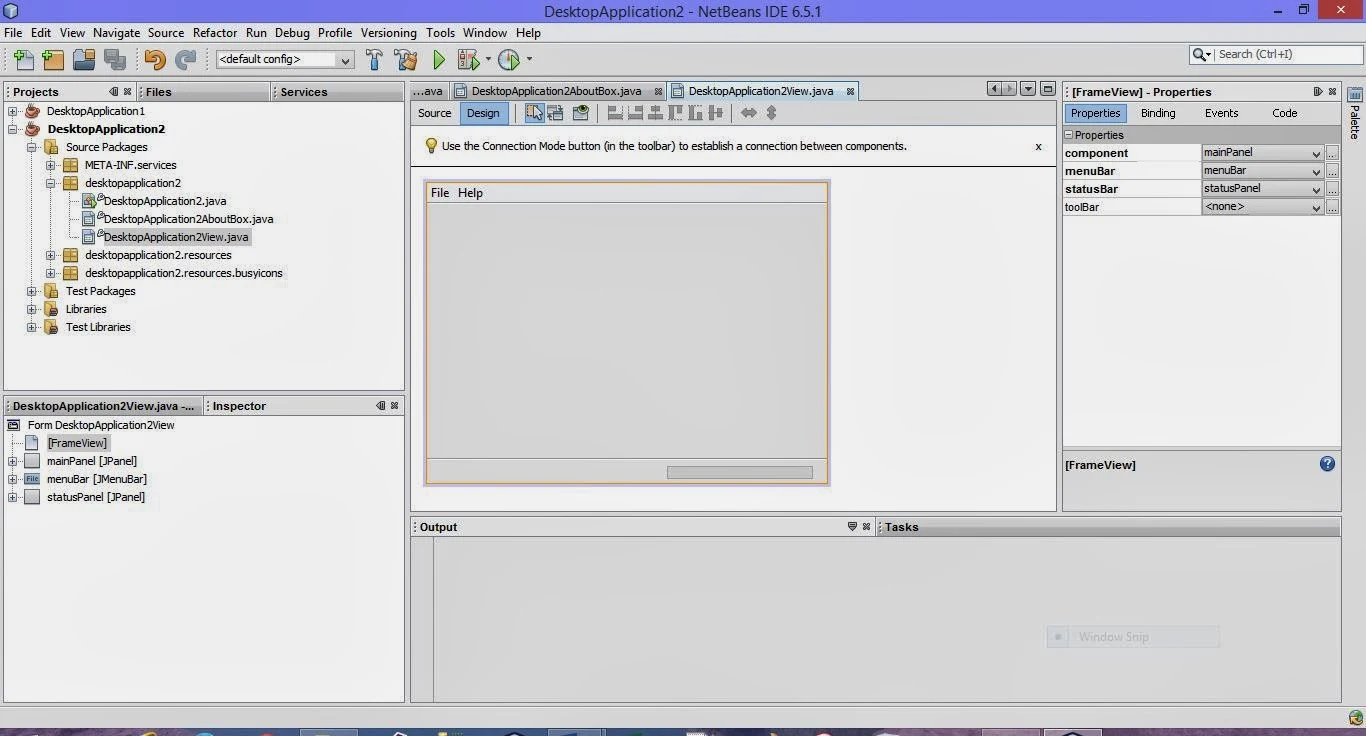
A NetBeans IDE project is a group of Java source files plus its associated Meta data, including project-specific files. A Java application may consist of one or more projects. All Java development in the IDE takes place with in projects, we first need to create a new project within which to store sources and other project files.

To create a new GUI application project:

  • Click File → New Project command. Alternately. You can click the New Project icon in the IDE toolbar or press Ctrl + Shift + N.
  • In the Categories pane, select the Java node and in the projects pane, choose the Java Desktop Application and then Click Next.

How to Create a Project in NetBeans GUI Builder: Java Programming

  • Enter desired name in the Project Name field and specify the project location.
  • Leave the Use Dedicated Folder for storing Libraries checkbox unselected. (If you are using IDE 6.0, this option ids not available.)
  • Ensure that the Set as Main Project checkbox is selected.

How to Create a Project in NetBeans GUI Builder: Java Programming


  • Finally click Finish button.
    Now the NetBeans IDE will create the project folder on your system in the designated location. This folder contains all of the project’s associated files.
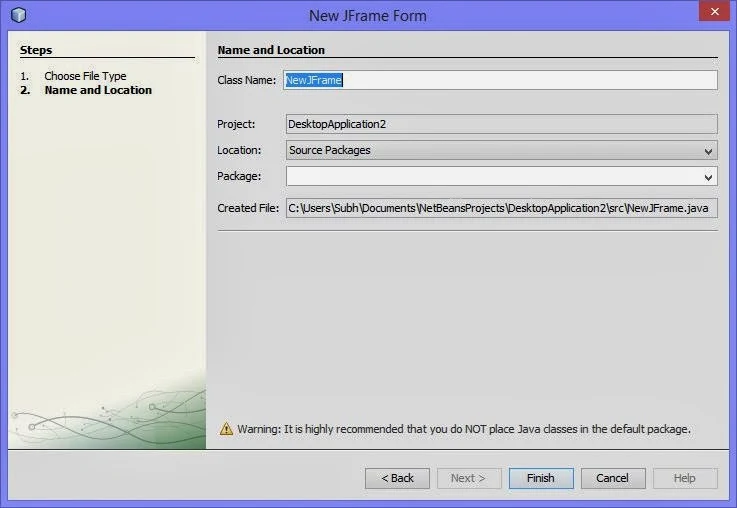
  • Next, you need to first add a frame window to your project where you can add desired components and functionally.
    For this, on the top left pane, under Projects Tab, right click on your project’s name and select New. From the submenu, select JFrame Form. A new Frame dialog box will open as shown:

How to Create a Project in NetBeans GUI Builder: Java Programming

  • In this dialog box, specify the name of the frame being added in the box next to Class Name and click Finish.

This is newly added frame is the top level container of your application. Now in the Design View of this frame, you can add desired components from the Swing Controls under Palette and work further.

Friday, December 20, 2013

Connect SqlDataSource Control with Database, Insert, Update and Delete

How to connect SqlDataSource Control with database, also add extra features like insert, update and delete. Here we will take some steps, these are

Step-1 : Create a SQL Table with some fields like
sno int (primaryKey, Isidentity=true)
name nvarchar(50)
address nvarchar(250)


Step-2 : Add SqlDataSource Control to Design window from toolbox
Step-3 : Select 'Configure Data Source' link using show Smart tag.

'Configure Data Source'


Step-4 : Select Database or ConnectionString from Dropdown menu.
ConnectionString

Step-5 : Select Table-name from Dropdown menu also select Advanced tab.
Table-name from Dropdown menuAdvanced tab

Step-6 : Select Insert, Update and delete checkbox option.
Step-7 : Click to Test Query and  Finish button

Now generate source code in page file

<%@ Page Language="C#" AutoEventWireup="true" CodeFile="Default.aspx.cs" Inherits="_Default" %>
<!DOCTYPE html PUBLIC "-//W3C//DTD XHTML 1.0 Transitional//EN" "http://www.w3.org/TR/xhtml1/DTD/xhtml1-transitional.dtd">
<html xmlns="http://www.w3.org/1999/xhtml">
<head runat="server">
    <title></title>
</head>
<body>
    <form id="form1" runat="server">
    <div>
    Database items
        <br />
        <asp:SqlDataSource ID="SqlDataSource1" runat="server"
            ConnectionString="<%$ ConnectionStrings:xyz %>"
            DeleteCommand="DELETE FROM [emp] WHERE [sno] = @sno"
            InsertCommand="INSERT INTO [emp] ([name], [address]) VALUES (@name, @address)"
            SelectCommand="SELECT * FROM [emp]"
            UpdateCommand="UPDATE [emp] SET [name] = @name, [address] = @address WHERE [sno] = @sno">
            <DeleteParameters>
                <asp:Parameter Name="sno" Type="Int32" />
            </DeleteParameters>
            <InsertParameters>
                <asp:Parameter Name="name" Type="String" />
                <asp:Parameter Name="address" Type="String" />
            </InsertParameters>
            <UpdateParameters>
                <asp:Parameter Name="name" Type="String" />
                <asp:Parameter Name="address" Type="String" />
                <asp:Parameter Name="sno" Type="Int32" />
            </UpdateParameters>
        </asp:SqlDataSource>

    </div>
    </form>
</body>
</html>


Steps to Retrieve Records with SQL Server Management Studio: SQL Programming

As I have discussed in my first SQL article that the database scenario is AdventureWorks, on which we will work on. The AdventureWorks database is stored on the LocalDb (Currently used) database server. The problem we are sorting out is, the details of the sales persons are stored in the SalesPerson table. The management wants to view the details of the top three sales persons who have earned a bonus between $4,000 and $6,000.

To retrieve the specified records, programmer need to create a query first and then execute the query to generate the report. To display the top three sales person records from the SalesPerson table, programmer need to use the TOP keyword. In addition, to specify the range of bonus earned, you need to use the BETWEEN range operator.

To create the query by using the SQL Server Management Studio, just follow simple steps written below:
  • Select Start>Programs>SQL Server Management Studio to display the Microsoft SQL Server Management Studio Window. Connect to Server dialog box is displayed by-default, if not you can simple open it from File>Connect Object Explorer.
  • Select the server name from the Server name drop-down list.

    Steps to Retrieve Records with SQL Server Management Studio: SQL Programming
    Note: Name of the server is computer specific. In this example, the name of the server is (LocalDb)\v11.0. You can use the default server as the database server.
  • Fill the details as given in the image and click on Connect button. It will connect to the server and management studio will be displayed as shown in the image.

    Steps to Retrieve Records with SQL Server Management Studio: SQL Programming
  • Expand the Databases node and it will show all the databases on this server. Now right click on AdventureWorks2012 database and select New Query.
  • Name of the Query Editor window is specific to machine.
  • Type the following query in the Query Editor window:
SELECT TOP 3 *
FROM [AdventureWorks2012].[Sales].[SalesPerson]
Where Bonus BETWEEN 4000 AND 6000

  • Click on Execute (in SQL editor toolbar) or press F5 and check the result as shown in the following image:

Steps to Retrieve Records with SQL Server Management Studio: SQL Programming


Wednesday, December 18, 2013

How to Add Functionality to NetBeans GUI: Java Programming

Programmer can know, to add graphical components in a frame and how to set their properties. But doing much is not sufficient in java programming, because the graphical controls that you add to frame can’t do anything on their own.

In other words, they have the look but not any feel. To add feel i.e. functionality or behaviour to them, you must also know about something called events and listeners. The three major players that add functionality to GUI are:

  • The Event: An event is an objects that gets generated when user does something such as mouse click, dragging, pressing a key on the keyboard etc.
  • Source of the Event: The component where the event has occurred, is the source of the event. For example, if a user clicks (the Event) on a Submit button then the source of this event is Submit button.
  • Event Listener: An event listener is attached to a component and contains the methods/functions that will be executed in response to an event. For example, if a user click on a button, then the buttons event listener will executed some code in response to this event.
    Listener Interface. An event Listener stores all the methods that it will implement in response to events, inside the listener interface. So, you can say that a listener interface stores all event-response-methods or event-handler methods of an event listener.

Commonly used Events and Listeners.


  • ActionEvents: of type ActionListener used to gets activated when the user performs an action with a button or other components. Usually, a user invokes the button by clicking over it. However, the user can also invoke a button action tabbing to the button and pressing the Enter key.
  • ItemEvent of type ItemListener used to gets activated when the selected item in a list control, such as a combo box or list box, is changed.
  • AdjustmentEvent of type AdgustListener used to gets activated when the user drags or moves knob of a scroll bar.
  • ChangeEvent of type ChangeListener used to gets active when the properties of a slider change.
  • KeyEvents of type KeyListener used to gets activate when the user press a key on the keyboard. You can use this event to watch for specific keystrokes entered by the user.
  • ListSelection of type ListSelectionListener used to get activated when an item is selected/deselected from list (JList).
  • MouseEvent of type MouseEventListener used to gets activated when the user does something with the mouse, such as clicks one of the buttons, drags the mouse, or simply moves over another objects.
  • FocusEvent of type FocusEventListener used to gets activated when a components receives or lose focus. Focus is ability to receive input, e.g., you can select from a list box only when it has focus, you can type in a text field only if it has focus.  


Each of the listeners listed above have multiple methods stored in their listener interfaces to respond to different type of events. You are armed with some basic knowledge of GUI functioning in Java so in further articles i will let you know about to create a GUI application using NetBeans.

How to Retrieve Records without Duplication of Values: SQL Programming

Redundancy is each second programmer’s problem in querying with sql programming. Sql programming provides some in-built keyword that may be used to remove this problem. The article shows syntax and use of this keyword with examples.

When there is a requirement to eliminate rows with duplicate values in a column, the DISTINCT keyword is used. The DISTINCT keyword eliminates the duplicate rows from the result set.

The syntax of the DISTINCT keyword is:

SELECT [ALL|DISTINCT] column_names
FROM table_name
WHERE search_condition

Where

  • column_names: name of fields to be displayed in output.
  • table_name: name of table from which records are to be retrieved.
  • Search_condition: mostly used to filter the output.
  • DISTINCT keyword specifies that only the records containing non-duplicated values in the specified column are displayed.

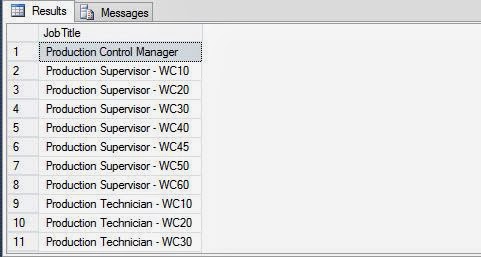
In a query that contains the DISTINCT keyword, you can specify more than one column name. In that case, the DISTINCT keyword is applied to all the columns that are there in the select list. You can specify DISTINCT only before the select list. The following SQL query retrieves all the Titles beginning with PR from the Employee table:

SELECT DISTINCT JobTitle FROM HumanResources.Employee WHERE JobTitle LIKE 'PR%'

Output: The result contains all the records of employee table having PR, the starting two characters. The query will display only the JobTitle field, as specified in the query.

How to Retrieve Records without Duplication of Values: SQL Programming


How to Retrieve Records from Top of Table: SQL Programming

Sql Programming provides a specific keyword that enables programmer to retrieve records from the top of the table. Programmer can use the TOP keyword to retrieve only the first set of rows from the top of a table. This set of records can be either a number of records or a percent of rows that will be returned from a query result.

For example, you want to view the product details from the product table, where the product price is more than $50. There might be various records in the table, but you want to see only the top 10 records that satisfy the condition. In such a case, you can use the TOP keyword.

The syntax of using the TOP keyword in the SELECT statement is:

SELECT [TOP n{PERENT}] column_name [, column_name…]
FROM table_name
WHERE search_conditions
[ORDER BY [column_name [, column_name…]

Where

  • n is the number of rows that you want to retrieve.
  • If the PERCENT keyword is used, then ‘n’ percent of the rows are returned.
  • If the SELECT statement including TOP has an ORDER BY clause, then the rows to be returned are selected after the ORDER BY clause has been applied.

The following SQL query retrieves the top three records from the Employee table where the HireDate should be greater than or equal to 1/1/2002 and less than or equal to 12/31/2005. Further, the record should be displayed in the ascending order based on the SickLeaveHours column:

SELECT TOP 3 *
FROM HumanResources.Employee
WHERE HIreDate >= '1/1/2002' AND HireDate <= '12/31/2005'
ORDER BY SickLeaveHours ASC

Output: The result from the above sql query will be only top three records after satisfying the given condition.

 How to Retrieve Records from Top of Table: SQL Programming


How to Retrieve Records to be Displayed in a Sequence: SQL Programming

We have discussed many situations in which programmer retrieve records based on a condition. The purpose of this clause in sql programming, is not to verify the result, but to sort the result set. Using this clause, programmer can sort the records either in ascending or descending order.

Programmer can use the ORDER BY clause in the SELECT statement to display the data in a specific order. The order may be ascending and descending, depend on the requirement of query result.

The Syntax of the ORDER BY clause:

SELECT select_list
FROM table_name
[ORDER BY order_by_expression [ASC|DESC]
[, order_by_expression [ASC|DESC]…]

Where

  • Select_list: the list of field names to be displayed.
  • Table_name: name of table from which records are to be retrieved.
  • order_by_expression is the column name on which the sort is to be performed.
  • ASC specifies that the values need to be sorted in ascending order.
  • DESC specifies that the values need to be sorted in descending order.

Optionally, you can also specify multiple columns, if you want to sort the result set based on more than one column. For this, you need to specify the sequence of the sort columns in the ORDER BY clause.

The following SQL query retrieves the record from the Department table by setting ascending order on the Name column:

SELECT DepartmentID, Name FROM HumanResources.Department ORDER BY Name ASC

Output: in the output the records are sorted alphabetically in ascending order according to name as shown in the image.

How to Retrieve Records to be Displayed in a Sequence: SQL Programming


Now try the same query with DESC keyword.

SELECT DepartmentID, Name FROM HumanResources.Department ORDER BY Name DESC

Output: in the output the records are sorted alphabetically in descending order according to name as shown in the image.

How to Retrieve Records to be Displayed in a Sequence: SQL Programming

Note: If you do not specify the ASC or DESC keywords with the column name in the ORDER BY clause, the records are sorted in the ascending order.

Tuesday, December 17, 2013

How to Use Properties Window to Change Control’s attribute: Java Programming

The controls/objects that a programmer draw on frame/window have some properties associated with them. Each control have its own properties with some common to other controls, which NetBeans enables to change.

The Properties Window provides an easy way to set properties for all objects in a frame/window. To open the Properties Window (if it is not open), choose the Properties command from the Window menu. You may also press the shortcut key for it which is: Control + Shift + 7.

 How to Use Properties Window to Change Control’s attribute: Java Programming

A property can be of any type such as integer, string etc. These can be set by either a simple textbox or a dropdown list. The whole thing is properties window consist of the following elements:

  • Title box Displays the name of the object for which you can set properties.
  • Properties list The left column under Properties Tab, displays all of the properties for the selected object. You can edit and view settings in the right column.

As in previous article we have name a control using inspector window, now the same thing can be done through this properties window in following simple steps.

  • In the Properties window, from the Properties list, select the name of a property.
  • Type in the right column, or click more to type or select the new property setting.

The below image shows the operation of name a control by properties window. The next article will cover up about some components, events and listeners mostly used in java programming.

 How to Use Properties Window to Change Control’s attribute: Java Programming


What are Naming Conventions in NetBeans: Java Programming

Object Naming Conventions, the process of giving a name to the control, basically used to access a control in coding part of programming language. Java NetBeans IDE have its own rules, described in the article, to name a control while programming.

A control's name is one of its most important attributes because you literally refer to a control by its name whenever you want it to do something. Names are so important that every time you put a control on your form, NetBeans IDE automatically gives a name to it. If programmer add a jButton, NetBeans IDE names it jButton1; if you add a jTextField, it automatically named jTextField1.

However, naming controls like this, may be confusing. While naming controls, you need to take care of these things.
  • Must begin with a letter.
  • Must contain only letters, numbers, and the underscore character (_); punctuation characters and spaces are not allowed.
  • Omit the initial letter "J" in object names and you may add its type at the end of it, like ReCalculateCheckBox for an object of class JCheckBox (not ReCalculateCheckBox!). It is just a recommendation, not a rule laid out by Java.

Friendly Names

When naming is a control, the first letter of the friendly name is generally uppercase. This make it easier to read the control’s name, because you can easily differentiate between the friendly name and the control’s abbreviation e.g. ReadonlyCheckBox.  

Name a control

To name a control in NetBeans, double click the control to be named in the Inspector window and type a new name.

What are Naming Conventions in NetBeans: Java Programming

Alternatively, you can right-click on the control’s name in Inspector window or the control itself in design space and select Change Variable Name………. command. The same process can be done through properties pane. Before you actually start working with controls, you should also know how to setup properties for a control and also about event and listeners. Later articles will describe these with examples.

Change name using Properties Window

How to Perform Actions on Window Controls In NetBeans: Java Programming

There are many controls in the palette tab of NetBeans IDE having specific properties of its own. Those controls can easily be added, resize and delete from the frame, while programming in java. This article have some steps to do these tasks in simple way.

To draw a control on Frame/Window in NetBeans


  • Click the desire control’s icon on the Palette. (Say, for example, we want to draw a label. For this we shall first click at its icon on the palette.)
  • Now drag it to desired location in your Frame/Window.
  • Se the control that you selected, now appear on your frame/window.

How to Perform Actions on Window Controls In NetBeans: Java Programming

When you can add controls to your frame, you might find strange behavior of IDE regarding component positioning and sizing. (This is because of Free Design layout manager.) In order to have full control on component's positioning and sizing, you need to know about Layout Managers. The layout of components on a frame (or panel) is controlled by a layout manager, which determines the final placement of each component. Layout Managers will be covered in next articles.

To Remove a Control from the Frame/window in NetBeans


  • Select the control to be deleted, by clicking it. See, the controls appear selected, notice the rectangular boxes at corners and sides.
  • Press Del (or Delete) key. The selected control gets removed.

Another way of removing a control is:

  • Select it
  • Right-click on it (i.e., after selecting click the right mouse-key).
  • A context menu paper. Select delete command from it.

How to Perform Actions on Window Controls In NetBeans: Java Programming

To Move/Resize a control in NetBeans

To move a control you have drawn, click the object in the middle and drag it to the new location. Now release the mouse button.
To resize a control, select it first and then use its sizing handle to resize it. That is, move the mouse pointer over sizing handles. The mouse pointer will change to double-headed arrow (↔). See the fig. Now drag the sizing handle to desired new position and control will be resized.

While adding, laying out and resizing controls on the frame, if you are not happy with the default behavior of rearranging/resizing of the control, then you may done one thing. Before you put any controls on the form, right click your frame in Design View and select Set Layout. From the sub menu that appears, select Absolute Layout.

How to Retrieve Records containing Null Values: SQL Programming

In Sql programming, when programmer want to retrieve records that have null values in their columns. To get such type of records, sql queries must have NULL operator in the where clause.

A NULL value in a column implies that the data value for the column is not available. You might be required to find records that contain null values or records that do not contain NULL values in a particular column. In such a case, you can use the unknown_value_operator in your sql queries.

The syntax of using the unknown_value_operator in the SELECT query is:

SELECT column_list
FROM table_name
WHERE column_name unknown_value_operator

Where

  • Column_list: list of fields to be shown in output.
  • Table_name: from the records are to be retrieved.
  • unknown_value_operator is either the keyword IS NULL or IS NOT NULL.

The following SQL query retrieves only those rows from the EmployeeDepartmentHistory table for which value in the EndDate column is NULL.

SELECT BusinessEntityID, EndDate FROM
HumanResources.EmployeeDepartmentHistory WHERE EndDate IS NULL

There are few records falling in this category, shown in the output.

How to Retrieve Records containing Null Values: SQL Programming

Consider its opposite case, where some records have some date in the EndDate column.

SELECT BusinessEntityID, EndDate FROM
HumanResources.EmployeeDepartmentHistory WHERE EndDate IS NOT NULL

It will shows few records as shown in the output.

How to Retrieve Records containing Null Values: SQL Programming

How to Retrieve Records that Matches a Pattern: SQL Programming

When retrieving data in sql programming, you can view selected rows that match a specific pattern. For example, to create a report that displays all the product names of Adventure Works beginning with the letter P. This task can be done through the LIKE keyword.

The LIKE keyword is used to search a string by using wildcards. Wildcards are special characters, such as * and %. These characters are used to match patterns and some of them are described with example, mostly used by sql server:

  • %    Represents any string of zero or more character(s)
  • _    Represents a single character
  • []    Represents any single character within the special range
  • [^]    Represents any single character not within the specified range

The LIKE keyword matches the given character string with the specified pattern. The pattern can include combination of wildcard characters and regular characters. While performing a pattern match, regular characters must match the characters specified in the character string. However, wildcard characters are matched with fragments of the character string.

The following SQL query retrieves records from the Department table where the values of Name column begin with ‘Pro’. You need to use the ‘%’ wildcard character for this query.

SELECT * FROM HumanResources.Department WHERE Name LIKE 'Pro%'

Output: Shows all the records satisfy the given condition i.e. starting with Pro

How to Retrieve Records that Matches a Pattern: SQL Programming

The following SQL query retrieves the rows from the Department table in which the department name is five characters long and begins with ‘Sale’, whereas the fifth character can be anything. For this, you need to use the '_wildcard character.

SELECT * FROM HumanResources.Department WHERE Name LIKE 'Sale_'

Output: Shows all the records satisfy the given condition i.e. starting with having sale with single character.

How to Retrieve Records that Matches a Pattern: SQL Programming

© Copyright 2013 Computer Programming | All Right Reserved