-->

Wednesday, June 8, 2016

Save and Retrieve Image into database table in ASP.NET MVC

According to my previous article, Which is written in web form. If you are a web form user then try this article. In this article i will show you, How to save image file into database table using ASP.NET MVC, also retrieve image from table to ASP.NET MVC Application. You know that image file saved in the form binary array. So, First to create a table, in which you can take varbinary(max) type field. I will give you an example of simple table.

CREATE TABLE [dbo].[Brand] (
    [BrandId]    INT             IDENTITY (1, 1) NOT NULL,
    [BrandImage] VARBINARY (MAX) NULL,
    PRIMARY KEY CLUSTERED ([BrandId] ASC)
);


Now, Add a EDMX file to prepare a DataContext as well as model. Now, open a HomeController.cs file to write the code for save file. In this file first to pass model in the view. Add a file control in the view file.


@using (Html.BeginForm("AddImage", "Home", FormMethod.Post, new {enctype="multipart/form-data"}))
{
    @Html.AntiForgeryToken()
    
    <div class="form-horizontal">
        <h4>Brand</h4>
        <hr />
        @Html.ValidationSummary(true, "", new { @class = "text-danger" })
        <div class="form-group">
            @Html.LabelFor(model => model.BrandImage, htmlAttributes: new { @class = "control-label col-md-2" })
            <div class="col-md-10">
                <input type="file" id="image1" name="image1"/>
            </div>
        </div>

        <div class="form-group">
            <div class="col-md-offset-2 col-md-10">
                <input type="submit" value="Submit" class="btn btn-default" />
            </div>
        </div>
    </div>
}

Save file using controller file 

public ActionResult AddImage(Brand model, HttpPostedFileBase image1)
        {
            var db = new Database1Entities3();
            if (image1!=null)
            {
                model.BrandImage = new byte[image1.ContentLength];
                image1.InputStream.Read(model.BrandImage, 0, image1.ContentLength);
                
            }
            db.Brands.Add(model);
            db.SaveChanges();
            return View(model);
        }


Show Image using controller file 

 public ActionResult ShowImage()
        {
            Database1Entities3 db = new Database1Entities3();
            var item = (from d in db.Brands
                        select d).ToList();

            return View(item);
        }
ShowImage View section

@model IEnumerable<WebApplication1.Brand>

@{
    ViewBag.Title = "ShowImage";
}

<h2>ShowImage</h2>
<table>
    <tr>
        @foreach (var item in Model)
        {
        <td>


            @{
            var base64 = Convert.ToBase64String(item.BrandImage);
            var imgSrc = String.Format("data:image/gif;base64,{0}", base64);
            }
            <img src='@imgSrc' style="max-width:100px; max-height:100px;" />
        </td>
        }


    </tr>
</table>

Thursday, May 26, 2016

Anti Xss in ASP.NET MVC

In this ASP.NET MVC Video tutorial i will show you, How to prevent your page from XSS attack. XSS stands for Cross side Scripting attack. Suppose you open your banking website, also open forgery website in other tabs, that sites attack on your banking website also steal your credential information. So, if you are developer then prevent your web page from XSS attacks. Lets see this video:


Friday, April 29, 2016

Similar to TextChanged Event in ASP.NET MVC

This is very good article for web form users who want to get value on TextChanged Event. I mean to say that  TextChanged Event occurs when we move one textbox to another using "Tab" key. When, Web form users moves to MVC projects. He/ She faces some problems in logics. Because, in MVC, For each request we must to call controller. I have an idea to remove such task. I prefer JQuery. So first to Add a ViewModel Class into your project. You can take this sample.

1. Add a new Folder in your project, name of the folder is "viewModel". Now, add a class, which name as addition like

using System;
using System.Collections.Generic;
using System.Linq;
using System.Web;

namespace WebApplication27.viewModel
{
    public class addition
    {
        public int FirstNumer { get; set; }
        public int SecondNumber { get; set; }
        public int result { get; set; }
    }
}

In this we have three public property.Now, Add a controller class in Controller folder. Like that.

using System.Web.Mvc;

namespace WebApplication27.Controllers
{
    public class DefaultController : Controller
    {
        // GET: Default
        public ActionResult Index()
        {
            return View();
        }
    }
}

Add View, By using Right click on Action method name. In View section, i will add code of JQuery. You can see

@model WebApplication27.viewModel.addition

@{
    ViewBag.Title = "Index";
}

<h2>Index</h2>
@using(Html.BeginForm())
{
    @Html.TextBoxFor(m=>Model.FirstNumer)
    @Html.TextBoxFor(m=>Model.SecondNumber)
    @Html.TextBoxFor(m => Model.result)
}
<script src="~/Scripts/jquery-1.10.2.js"></script>
<script>
    $(function () {
        $("#SecondNumber").blur(function () {
            $("#result").val(parseInt($("#FirstNumer").val()) + parseInt($("#SecondNumber").val()))
        });
    })
</script>

Monday, April 18, 2016

Design ASP.NET MVC form using ViewModel class

Welcome, user. Today i would like to share something about Forms and their control like TextBox, Label, DropdownList(SelectListItem), Radio Button etc in ASP.NET MVC. Before going to details, first to share something about ViewModel.
 A ViewModel is a temporary class file which is used to store data values in properties.   
First to take fields which are used in form like UserName, Password, Email, Gender, religions etc. Because we will need controls for each fields. Lets take an simple example. Create a new MVC project.

  1. Right click on your project, Add a new Directory which name should have ViewModel
  2. Add this class file inside the ViewModel

using System;
using System.Collections.Generic;
using System.Linq;
using System.Text;
using System.Threading.Tasks;

namespace MvcApplication1.ViewModel
{
    public class FormVM
    {
        public int Id { get; set; }
        public String UserName { get; set; }
        public String Password { get; set; }
        public String Gender { get; set; }
        public String Religion { get; set; }
        public String Image { get; set; }

        
        public bool IsSubmitted { get; set; }

    }
}

According to the ViewModel class we will take Two TextBox for UserName and Password, Three radio button for Religion, one file control for Image, one DropdownList for Gender and last One Submit control.After add this file, come to controller part. Add a new controller like this.

using MvcApplication1.ViewModel;
using System;
using System.Collections.Generic;
using System.Linq;
using System.Web;
using System.Web.Mvc;

namespace MvcApplication1.Controllers
{
    public class TutorialController : Controller
    {
       public ActionResult AddUser()
        {
            FormVM viewModel = new FormVM();
            viewModel.IsSubmitted = false;
            return View(viewModel);
        }

        [HttpPost]
        public ActionResult AddUser(FormVM model, HttpPostedFileBase file)
        {
            model.IsSubmitted = true;
            if (file != null)
            {
                string pic = System.IO.Path.GetFileName(file.FileName);
                model.Image = pic;
            }
            ViewBag.Values = model.UserName + ", " + model.Password + ", " + model.Gender + ", " + model.Religion + ", " + model.Image;
            return View(model);
        }

    }
}

By above mentioned code AddUser( ) method return a ViewModel class. Also set IsSubmitted property to false. So using ViewModel class you can create a model control into your view class. So i have a view class for you where your control designed. Let see.

@model MvcApplication1.ViewModel.FormVM

@{
    ViewBag.Title = "AddUser";
    List<SelectListItem> listItems = new List<SelectListItem>();
    listItems.Add(new SelectListItem
    {
        Text = "Male",
        Value = "Male",
        Selected = true
    });
    listItems.Add(new SelectListItem
    {
        Text = "Female",
        Value = "Female"
    });
    listItems.Add(new SelectListItem
    {
        Text = "None",
        Value = "None"
    });
}


<h2>AddUser</h2>

@using (Html.BeginForm("AddUser","Tutorial",FormMethod.Post, new { enctype = "multipart/form-data" })) {
    @Html.AntiForgeryToken()
    @Html.ValidationSummary(true)

    <fieldset>
        <legend>FormVM</legend>

        <div class="editor-label">
            @Html.LabelFor(model => model.UserName)
        </div>
        <div class="editor-field">
            @Html.EditorFor(model => model.UserName)
            @Html.ValidationMessageFor(model => model.UserName)
        </div>

        <div class="editor-label">
            @Html.LabelFor(model => model.Password)
        </div>
        <div class="editor-field">
            @Html.PasswordFor(model => model.Password)
            @Html.ValidationMessageFor(model => model.Password)
        </div>

        <div class="editor-label">
            @Html.LabelFor(model => model.Gender)
        </div>
        <div class="editor-field">
           @Html.DropDownListFor(model => model.Gender, listItems, "  Select Gender  ")
        </div>
        <br />
        <div class="editor-label">
            @Html.LabelFor(model => model.Religion)
        </div>
        <br />
        <div class="editor-field">
            @Html.RadioButtonFor(model => model.Religion, "Hindu", new { id = "rbHindu" })
            @Html.Label("Hindu")
            @Html.RadioButtonFor(model => model.Religion, "Muslim", new { id = "rbMuslim" })
            @Html.Label("Muslim")
            @Html.RadioButtonFor(model => model.Religion, "Other", new { id = "rbOther" })
            @Html.Label("Other")
        </div>
        <br/>
        <div class="editor-label">
            @Html.LabelFor(model => model.Image)
        </div>
        <div class="editor-field">
            <input type="file" name="file" id="file" style="width: 100%;" />
            
        </div>

        <p>
            <input type="submit" value="Submit" />
        </p>
    </fieldset>
}

<div>
    @if(Model.IsSubmitted){
        <p>@ViewBag.Values</p>
    }
</div>

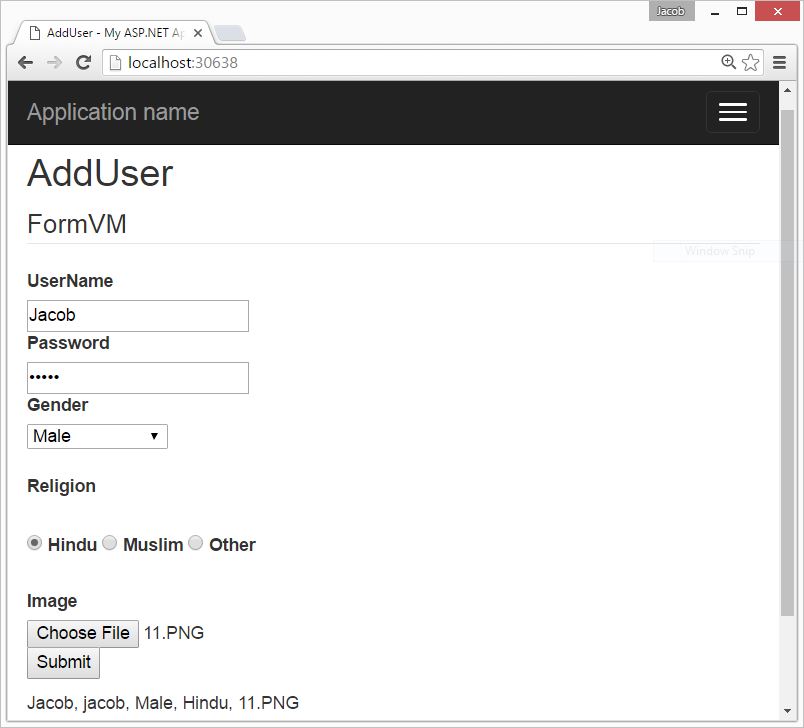
Crate form control according to above mentioned code. When we click on Submit button then value of all control will display on paragraph using ViewBag variable. Now code generate the following output:

Design ASP.NET MVC form using ViewModel class

Tuesday, April 5, 2016

How to show image from database table in ASP.NET MVC

In this article i will show you, How to display image from database in ASP.NET MVC. To do this task, we will use <img /> tag in view section. First of all, Create a connection with the database using Entity Data model (Learn How to use ADO.NET Entity Data Model). In the controller action method pass the list of data to the view. Like that:

 
 private DatabaseEntities db = new DatabaseEntities();

        // GET: Home
        public ActionResult Index()
        {
            return View(db.Employees.ToList());
        }

In the View section: 

@model IEnumerable<WebApplication23.Employee>

@foreach (Employee item in Model)
{
<img src="@Url.Content(item.Database_Picture_column)" width="100" height="100" />

}

Sunday, March 6, 2016

How to retrieve records from database table in MVC

In this article i will show you, How to retrieve record from database table in MVC. This things we have already learned in ASP.NET WEB FORMS, Now the same things we can do in MVC. Before doing this task first to install Entity Framework in the application. Create a Empty MVC project. Add a new database also create table by using this video tutorial. We have a database table with their following fields:

CREATE TABLE [dbo].[Student_Table] (
    [Id]   INT           IDENTITY (1, 1) NOT NULL,
    [Name] NVARCHAR (50) NULL,
    [City] NVARCHAR (50) NULL,
    PRIMARY KEY CLUSTERED ([Id] ASC)
);

Now, Following these steps to retrieve items from table:

Step-1 :  Create a "Student" model class in model folder. Like :

using System.ComponentModel.DataAnnotations.Schema;

namespace WebApplication19.Models
{
    [Table("Student_Table")]
    public class Student
    {
        public int Id { get; set; }
        public string Name { get; set; }
        public string City { get; set; }
    }
}

By using the Table class we can mapped our class to database table. 

Step-2 : Create a "StudentContext" class in model folder. Like

using System.Data.Entity;

namespace WebApplication19.Models
{
    public class StudentContext : DbContext
    {
        public DbSet<Student> students { get; set; }
    }
}

By using "students" property we can communicate with the table.

Step-3 : Create ConnectionString in the Web.Config file, in this way :

<connectionStrings>

    <add name="StudentContext" connectionString="Data Source=(LocalDB)\v11.0;AttachDbFilename=|DataDirectory|\Database.mdf;Integrated Security=True"
      providerName="System.Data.SqlClient" />
  </connectionStrings>
 
here we have a connection name is same as Context Class name.

Step-4 : Now, add a controller in the Controller folder, copy this code under controller action method

using System;
using System.Collections.Generic;
using System.Linq;
using System.Web;
using System.Web.Mvc;
using WebApplication19.Models;

namespace WebApplication19.Controllers
{
    public class HomeController : Controller
    {
        // GET: Home
        public ActionResult Index()
        {
            StudentContext sc = new StudentContext();
            Student singlestu = sc.students.Single(stu => stu.Id == 2);
            return View(singlestu);
        }
    }
}

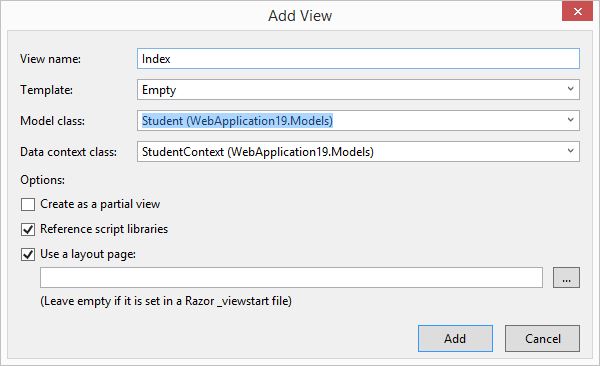
By using the LINQ Query we have to retrieving student details from table who's id is 2. Now, Build the project. Add a View By Right click on Index Action method.Now, appear a screen look like this.

How to retrieve records from database table in MVC

Fill all mentioned fields, according to mentioned snaps. Now, last
Step-5 : Design to view for values.

@model WebApplication19.Models.Student

@{
    ViewBag.Title = "Student";
}

<h2>Single Student Record</h2>
<div>
    Student Id : @Model.Id <br/>
    Student Name : @Model.Name <br/>
    Student City : @Model.City

</div>

Code Generates the following output:
How to retrieve records from database table in MVC


Friday, March 4, 2016

How to install Entity Framework from console and Solutions in MVC

By using the Entity Framework you can can communicate with the Sql Server.  In which we have two approaches i.e "Code First" and "Model First". But, In this article, I will explain you how to install Entity Framework from console and Solutions:
Install From Console:
1. Select "Package Manager Console" by the following path :
 Tools -> NuGet Package Manager--> Package Manager Console

Note : Before type the command in command line, must to ensure your internet connection.

Type command in Command Line:

PM> Install-Package EntityFramework


Install From Solution: 
1. Select "Manage Nuget Packages for Solutions... " by the following path :
 Tools -> NuGet Package Manager--> Manage Nuget Packages for Solutions...

Note : Before type the command in command line, must to ensure your internet connection.
Search Entity Framework in search bar, which reside in right side bar.

Manage Nuget Packages for Solutions...

Thursday, December 10, 2015

How to pass data from controller to view in ASP.NET MVC

If you want to pass value from controller to view in asp.net MVC, we have two methods. The first method of it is ViewBag and last is ViewData, both are used to pass data from controller to view. ViewBag object creates a dynamic variable and ViewData creates a dynamic key like ViewState in ASP.NET.  Learn, How to use ViewBag in MVC for single variable as well as List<String> type variable. 


In controller class, we used ViewBag.Dynamic_variable = "Value" and in View we used @ViewBag.Dynamic_Variable_Name. Also, learn how to pass value from controller to view using ViewData.


Both objects doesnot generate compile time error.

Monday, November 23, 2015

How to determine version of MVC application

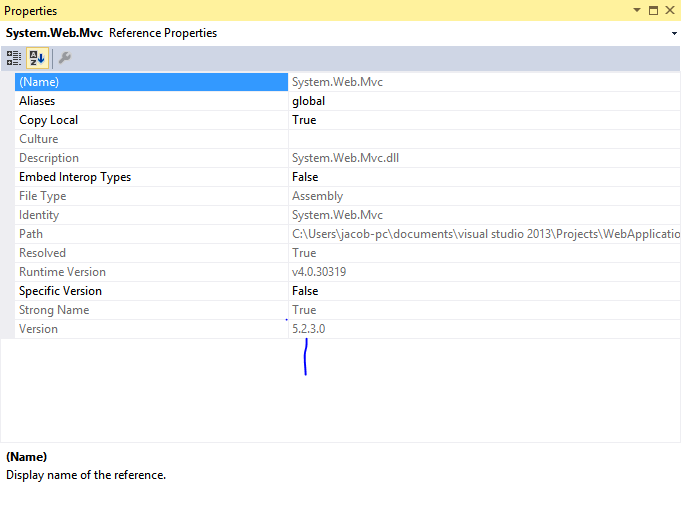
In this article, I will show you how to check  MVC version of application. There are two methods, through which we can get the version of MVC. In the first method we use property of System.Web.MVC namespace. But, How to check, check the mentioned snap shots.

1. Expand References folder 
2. Right click on System.Web.MVC namespace also select property , check the mentioned snap.

II-Method

using System;
using System.Collections.Generic;
using System.Linq;
using System.Web;
using System.Web.Mvc;

namespace WebApplication9.Controllers
{
    public class HomeController : Controller
    {
        // GET: Home
        public string Index()
        {
            return typeof(Controller).Assembly.GetName().Version.ToString();
        }
}
}

Tuesday, November 17, 2015

How to use Hyperlink in MVC

In my previous article i have already learned about hyperlink and their uses, we have already use hyperlink in different application like asp.net. Previous article coves all such things like hyperlink properties and methods. Today i am talking about hyperlink in MVC, and how to use it.


 Hyperlink in MVC
 

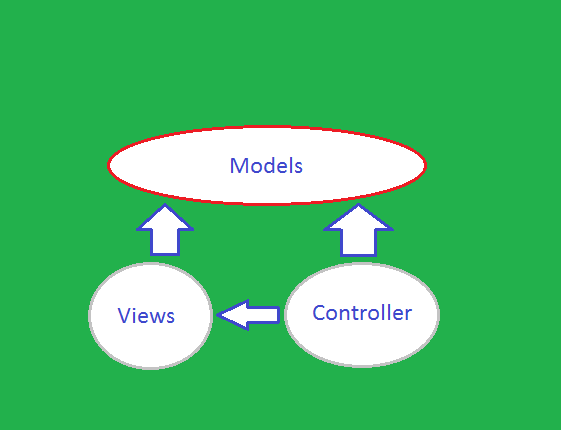
 The given snap shows that how MVC work. According to the sanp view show the all tags of html. In MVC application, we use ActionLink extension of HtmlHelper. I have show the syntax and example of Hyperlink.

Syntax:


@Html.ActionLink(String LinkText, String actionName)

Example


@Html.ActionLink("Hello World","Hello")

Action Method in Controller class


public string Hello()
 {

return "Hello World!";

 }
OK Done this is complete. Now, Today we have also learn how to bind hyperlink from database table in MVC. First to prepare the class for employee entity in model folder also map this with database table(mentioned in previous article), Now your code look like

using System;
using System.Collections.Generic;
using System.ComponentModel.DataAnnotations.Schema;
using System.Linq;
using System.Web;

namespace WebApplication10.Models
{
[Table("Employee")]
public class Employee
{
public int ID { get; set; }
public string Name { get; set; }
public int age { get; set; }

}
}

Prepare the Context class for connecting database in the same model folder.

using System;
using System.Collections.Generic;
using System.Data.Entity;
using System.Linq;
using System.Web;

namespace WebApplication10.Models
{
public class EmployeeContext: DbContext
{
public EmployeeContext()
: base("EmployeeConnection")
{

}
public DbSet<Employee> pl { get; set; }

}

}

Here EmployeeContext() constructor call the base class constructor for making connection. "EmployeeConnection" connectionString available in web.confog file. Prepare the controller class for responding the request, which is generated by the client.

public ActionResult linkEmp()
{
EmployeeContext context = new EmployeeContext();
List<Employee> employeelist = context.pl.ToList();
return View(employeelist);
}

Through the EmployeeContext class, first we retrieve all the data from the table and then store into the employee instance. Now, prepare the view for list of employee.

@model IEnumerable<WebApplication10.Models.Employee>
@using WebApplication10.Models;
@{
ViewBag.Title = "Show the particular employee";
}

<h2>Click to show the details of employee</h2>
<ol>
@foreach (Employee emp in @Model)
{
<li>@Html.ActionLink(emp.Name, "Index", new { id = emp.ID })</li>
}
</ol>

Here, we are using IEnumerable interface for collection and in the ActionLink Method, first argument of that method shows the name of the employee and second parameter show that method, which is call by hyperlink(Mentioned in Controller class) also method contain single parameter like id.

public ActionResult Index(int id)
{
EmployeeContext context = new EmployeeContext();
Employee emp = context.pl.Single(p2=>p2.ID==id);

return View(emp);
}

Code Generate the following output

How to use Hyperlink in MVC

After click on Tarun(Hyperlink), You will get the specific Employee Information.

output use Hyperlink in MVC

Saturday, November 14, 2015

Getting started with MVC 4

Introduction

Model-View-Controller(MVC) has been an important architectural pattern in computer science for many years. Originally named "Tbing-Model-View_Editor in 1979. It was later simplified to Model-View-Controller. It is a powerful and elegant means of separating concerns within an application (for example, separating data access logic from display logic) and applies itself extremely well to web applications.

The MVC separates the user interface of an application into three main aspects:

 The Model  : A set of classes that describes the data you're working with as well as the business rules for how the data can be changed and manipulated.
The View : Defines how the application's user interface(UI) will be displayed.
The Controller : A set of classes that handles communication from the user, overall application flow, and application specific logic.

Lets take an simple example : follow some steps for creating first MVC application
Step-1: Goto file->New->project
Step-2: In left panel select visual c# also select ASP.NET MVC 4 Web application.
MVC template window

Step-3: Select Empty project template in given project template. Also select Razor view engine from engine view and press OK
MVC Project template

Step-4: : In solution explorer , Add new Controller using Right click on Controllers folder and select Add new Controller.
Add new controller window in MVC


Step-5: Change Controller name  (Default1->Home)
Change Controller name in MVC application

Step-6: Your controller contains Index method with action return. Now if you want to print string value then you must change ActionResult to string type. Now you can return string something like "Hello world".
ActionResult change with string type in MVC
ActionResult change with String Type.
String type in MVC 4
Step-7: Now Save and run your Application.
Getting started with MVC 4

Getting Started to Build Web Applications: Introduction to MVC

MVC (Model View Controller), most usable framework for latest web programmer, enables programmer to separates their work in these three names. It is a lightweight and standard design pattern which is familiar to many web developers.

According to the name of this framework, the application divides itself in three things i.e. one contains your logic, one contains your pages (may be razor or aspx pages) and the last one will contain some classes which are used to control the pages redirecting per user clicks.

The following diagram shown about the layers of this framework which includes Business layer, display layer and input control.


Getting Started to Build Web Applications: Introduction to MVC

Model, used to represent the core of web application. To interact with database tables there are some classes have to be written. Those classes must be placed in the model folder to follow the MVC framework. It means all the logic, works for the application, falls in this category.

View, used to decide about the display of data on the pages. Mostly views uses the model data, for the validation or may be other features. When we login in to application with invalid credentials, it requires some valid entries.

Controller, used to control the display data on the views by the model. It is the middle layer of the framework, which decides about what data are to be shown from the model and of course on which view.

Microsoft described some advantages of MVC based application:
  • It makes it easier to manage complexity by dividing an application into the model, the view, and the controller.
  • It does not use view state or server-based forms. This makes the MVC framework ideal for developers who want full control over the behavior of an application.
  • It uses a Front Controller pattern that processes Web application requests through a single controller. This enables you to design an application that supports a rich routing infrastructure. For more information, see Front Controller.
  • It provides better support for test-driven development (TDD).
  • It works well for Web applications that are supported by large teams of developers and for Web designers who need a high degree of control over the application behavior.
Create First MVC Application using Visual Studio

Getting started with MVC Application

Getting started -Introduction

MVC is a framework used for building web application using latest and somewhat different approach. According to this architecture, whole application divides in to three part i.e. Model, View and Controller which is also the pronunciation stands for MVC.
  • Model: keeps the application core. It includes some classes written to interact with database.
  • View: how is to be displayed on the page? falls into this category.
  • Controller: what is to be transfer on the views? falls into this category.


More about MVC can be easily read through here, but we will start some practical work here. I suppose every DotNet programmer knows about Visual Studio. Let’s start with creating a new MVC application using below steps. Step 1. Create new project and select ASP.NET MVC 4 Web Application under the Web categories. Step 2. Change the directory where solution will exist, it takes default if not changed and click on OK button. Step 3. It will asks about the type of application e.g. empty, internet, intranet etc. listed in the image provided. Select Internet application because it loads the default controllers and their actions with authentication.

Getting started with MVC Application

Through this we can only creating application, on the next we will code with empty MVC application. Step 4. Congratulation, you have successfully created a new MVC 4 application. Now run this with F5 or from Start debugging option in DEBUG menu. When it run it looks like the below image. In the browser’s address i.e. http://localhost:port/  localhost is the computer which is running that application at that time, means the client machine and the port is the number assigned for that application.

Getting started with MVC Application

Thursday, October 22, 2015

Default Listing with Insert and Update in MVC 4

MVC 4 provides simple listing procedure through which developer can create CRUD actions for a database table. Awesome thing is developer don’t need to write a single line of code and will complete the task.
We have added new table Category and updated edmx file in earlier article. Now we will create CRUD actions and their views with default MVC 4 structure. We have created empty controller without using any default action but now we will add a controller with all the default actions.
Follow the procedure for creating a controller and in “Add Controller” window name the controller as CategoryController and select the options as selected in the following screenshot and click on Add button:
CategoryController and select the options as selected

This window is prompting for your context class (inherited from DbContext or may be your edmx entities name) file and the model name for which these actions will be created.
After clicking on Add button, it will add a controller with following 5 actions and corresponding views. Those views are not created on the root, but MVC 4 will create those views under new folder with the same name as controller.
  • Create
  • Delete
  • Detail
  • Edit
  • Index
Run your project and go to specified controller/Index page, it will load all the categories your database have. Have a look on the below screenshot, with three records each having three action-link i.e. Edit, Details and Delete. Beside these individual action links this table structure also have Create New action on the top through which it will redirect to another view.

So we have saved lot of time that may waste to write the code for all these actions and also for creating their views. This MVC 4 feature is very simple to use and we can create more control for each table. Developer can customize these actions or their views as per their requirements.
Some developer don’t need all these views or maybe they want to enable all these actions on the single page. In next article we will create listing page for our own and write some line of code for table structure.

Update Edmx When Database Changes in MVC 4

MVC 4: Update Edmx is to make the model as same as the database through which it created. Whatever changes made with the database will not reflect in the Model to perform CURD functions. Suppose we have added a new table with SQL server management studio and want to insert/update some entries with that table using code part. After creating object of database context, notice that we don’t have an instance for that newly added table. To resolve this issue we have to update our edmx using Update Model Wizard as described in this article.

Create new table Category in the same database added earlier and use basic columns like id, name, description, isActive. Open our visual studio project and check that this table have not any existence yet. Open edmx file, right click on the blank space and click on Update Model from Database.

Update Model from Database


  An Update Model wizard will open with options to add tables, views and stored procedures. We have added only a table so expand “Tables” node and select “Categories”. Leave remaining options as they are and click finish.


expand “Tables” node and select “Categories


 After finishing it will reload and will add newly added table, check the edmx file and there are two tables Employee and Categories as shown in below image.

check the edmx file


This update model wizard does following in MVC 4:
  • If a table removed from database, it will remove from the model also and update mapping details.
  • If table has been added, it will insert new object in the existing model and update mapping details.
  • Any modification in the object, this wizard will update the model like to add/remove columns.

Wednesday, April 22, 2015

Listing with Insert and Update MVC Part 1

Listing of records is binding the model with custom list of objects and show on the view page. For this process we will create custom class that will be used to create objects list and then will bind that list with model.
We have learnt how to use default process and create listing with CRUD actions. In this article we will create with our own code blocks. Create a class CategoryD having all the fields saved in the database table Category as:
public class CategoryD
{
public int Id { get; set; }
public string Title { get; set; }
public string Description { get; set; }
public bool IsActive { get; set; }
}
Create a controller CategoriesController with default Index action. This action is empty and write following code fragment in this action:
public ActionResult Index()
{
List<CategoryD> categories = new List<CategoryD>();
using (EmpDbEntities db = new EmpDbEntities())
{
categories = db.Categories.Select(a => new CategoryD
{
Id = a.CategoryId,
Title = a.Name,
Description = a.Description,
IsActive = a.IsActive
}).ToList();
}
return View(categories);
}
Create view for this action and paste below code in this view page:
@model CodeWallMVCApplication.ViewModels.CategoryVM
@{
ViewBag.Title = "Index";
Layout = "~/Views/Shared/_Layout.cshtml";
int i = 1;
}
<h2>Categories List</h2>
<input type="button" value="Create New" id="btnNew" />
<table>
<thead>
<tr>
<td><b>#</b></td>
<td><b>Title</b></td>
<td><b>Description</b></td>
<td><b>Active</b></td>
</tr>
</thead>
<tbody>
@foreach (var item in Model)
{
<tr>
<td>@i</td>
<td>@item.Title</td>
<td>@item.Description</td>
<td>@(item.IsActive ? "Active" : "D")</td>
</tr>
i = i + 1;
}
</tbody>
</table>
Run this project and go to this controller’s action, it will show all the records from categories table. This output is as same as the output in earlier article where the view has been created using default MVC feature.
Listing with Insert and Update MVC Part 1

This is only listing part, we have to insert and update through this same page.  To perform this, just change the category class a little bit and add one more class. We will insert and update category entity in our next article.

Monday, April 20, 2015

Working with Database First: edmx in MVC

Database First approach creates all the model classes, properties and its context from the selecting database and then let the user access those classes for performing CRUD actions. User first have to create database and then follow this article to create an edmx file.
An edmx file is an XML file defines a model used to perform CRUD operations on database. This file can also be used with Entity Framework and contains some information to be used by EF designer. User can change this file to change EF designer and sometimes have to change in edmx file manually.
In previous article we have created a database EmpDb with single table, now we will create an edmx file for this database. By using the same MVC project (used in earlier articles) follow below steps:


  1. Right click on Models folder and Add New Item and then select ADO.NET Entity Data Model, name it whatever you want and click Add.
    Add New Item
  2. The next window is for choosing model contents whether from an existing database or an empty model. Because we have our existing database so select Generate from database and click on next.
    Generate from database

  3. You need to connect with your data connection, click on new connection and select Microsoft SQL Server from data source and then continue. After clicking on next button, it will ask for connection properties.
    new connection and select Microsoft SQL Server

  4. Enter server name or it may be selected by-default if you have any. It will load all the databases by clicking on drop-down for enter database name, select your database and click on OK. You can even test this connection whether it have problem or succeed.
Enter server name or it may be selected
  1. Now the third steps will open again with filled information like whole connection string and name in web.config to be saved. This entities name is changeable, leave it as is and next.
    name in web.config

  2. Next window will ask for entity framework version your project is using. It will detect all you entity framework versions and checked according to compatibility. Look out below image, it will disable V-6 and auto select V-5, so just next this step.
     entity framework version

  3. Choose database objects like tables, stored procedures etc. to be include in edmx file and click on next.
    Choose database objects like tables, stored procedures

  4. Your edmx file have been created as shown below.
 edmx file output

This will have all the tables in classes forms to be easily access by programmer and a constructor with the name of entities saved in web.config file. Now we can easily create our controllers and views as per the tables, we will continue in next article.

Creating a Model in Asp.Net MVC

Creating a Model means create a database table with required fields in form of simple class and its properties. This class must be added to the pre-added folder Models which differentiate this from all the simple classes in the MVC application.
In earlier article we have created a view for an existing action method Index which is by default added. At the same time we have passed some values from the same action to the respective view page. Those values have been passed through ViewBag, used to dynamically share values from controller to view.
Models folder contains all the classes used to represent application model for the application including validation logic and data access. Right click on the Models folder and add a new class Product and add some properties in that class as shown below:
public class Product
{
public int Id {get; set;}
public string Name {get; set;}
public string Description {get; set;}
public string Color {get; set;}
public string Type {get; set;}
public double Price {get; set;}
}
Using this model class we can either create a database through code- first approach or just use it with a List object to show the data on view page. We will use second option here, create a simple list object and pass items to view page.
Create a Controller ProductsController and choose Empty MVC Controller in Template selection. There is a default action method Index, delete and create a new action method List. You can even change its name from Index to List because there is not view page for this action method.
In this action method we will create a simple list of products with some items and then show those items in the list page. Write the below code in this list method:
public ActionResult List()
{
List<Product> productList = new List<Product>();
productList.Add(new Product() { Id = 1, Name = "Mouse", Color = "Black", Description = "", Price = 800, Type = "Electronics" });
productList.Add(new Product() { Id = 2, Name = "Scanner", Color = "White", Description = "", Price = 3000, Type = "Electronics" });
productList.Add(new Product() { Id = 3, Name = "Mobile", Color = "Dark Grey", Description = "", Price = 6000, Type = "Electronics" });
productList.Add(new Product() { Id = 4, Name = "Shirt", Color = "Blue", Description = "", Price = 850, Type = "Cloths" });
productList.Add(new Product() { Id = 5, Name = "Shampoo", Color = "Black", Description = "", Price = 125, Type = "Hair Product" });

return View(productList);
}
Create a View for this action method which will have the same name “List”. In this view file we have to write simple html that will show all the records added in the action method. Write the below code in this view page:
@model IEnumerable<CodeWallMVCApplication.Models.Product>
@{
ViewBag.Title = "List";
}

<h2>Product List</h2>

<table>
<thead>
<tr>
<th>No.</th>
<th>Name</th>
<th>Description</th>
<th>Color</th>
<th>Type</th>
<th>Price</th>
</tr>
</thead>
<tbody>
@foreach (var item in Model)
{
<tr>
<td>@item.Id</td>
<td>@item.Name</td>
<td>@item.Description</td>
<td>@item.Color</td>
<td>@item.Type</td>
<td>@item.Price</td>
</tr>
}
</tbody>
</table>
The first line specifies about the model rendered on this view, remaining code is same as simple html code. Run this application the on the address bar write http://localhost:53420/Products/List and it will show the product list, added on the action method. In the address, port no may be change according to the application created so don’t copy it from here, just run your application.
Creating a Model in Asp.Net MVC

Creating a View in Asp.Net MVC

Creating a View means adding an HTML file for an existing action method in controller. View is the page that is shown to user, whatever HTML you write or CSS you embed is fully applicable for that view.
In earlier article we have created a controller having an “Index” action method which is by default added. We have changed this action method and returns a string to be displayed on browser directly.
When working with views programmer should know about HTML language and should have a little bit knowledge of CSS style-sheets. In this article we will create a view page checking the options that can be applied on creating a view.
Change index action method as it was when created:
public ActionResult Index()
{
return View();
}
Right click on Index and click on Add View. It will show Add View dialog box having a list of options as in below screenshot. We will discuss all these options in later articles, by now just click on Add button.
Right click on Index and click on Add View

Expand the Views folder, it have a new folder having the same name of our controller i.e. Home. All the views created through this controller will be saved in this folder. Open the newly created view, it have only a bit code as shown:
Open the newly created view

Change this code and insert an hyperlink <a href="www.codewalls.com">Code Walls</a>. Run this project and it will default show this page.
Change this code and insert an hyperlink

 
Data on View from Controller
When we create an MVC application as “Internet Application” template then by default Index action method have a Viewbag message defined as shown below:
public ActionResult Index()
{
ViewBag.Message = "Modify this template to jump-start your ASP.NET MVC application.";

return View();
}
Change this message or leave as is (I have changes this message a little bit) and in the view page there is a line showing the output of this viewbag message i.e.
@ViewBag.Message
Run this project and check the message on the page as shown in green ellipse. You can change this in-built template according to your own design scenario. Using ViewBag you can dynamically share the values from controller to view, we will discuss more about it later.
Creating a View in Asp.Net MVC


Friday, April 10, 2015

Creating a Controller in Asp.Net MVC

What is the MVC architecture and how it can be used to build a web application has been discussed in our earlier article. We will discuss about the concept of MVC in context of classes that can be easily accessible in our application. These classes can be created as simply as other classes including properties to be get/set values. MVC stands for Model, View and Controller that divides a web application into three parts. These parts are data, user-interfaces and logics which differentiates everything about an application. Here is a one-line definition about MVC:
  • Model: these are the classes representing your application data including the properties your database have.
  • View: a simple page that will show to user and redirect your complex code into basic HTML. Decides the design in which data will show.
  • Controller: these classes are responsible for what is to be shown in which view.
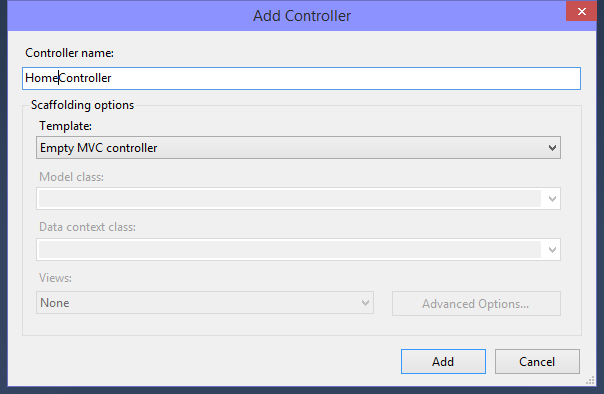
In earlier article, we have created a simple internet application having all the basic folders and packages. Those folders contains App_Start, Content, Controllers, Scripts, Models and of course Views. Now I am starting with an Empty MVC application having only some of these folders and don’t have any code logics. Just right click on Controllers and select Add--> Controller, "Add Controller" window will appear with options listed below:


Controller in MVC


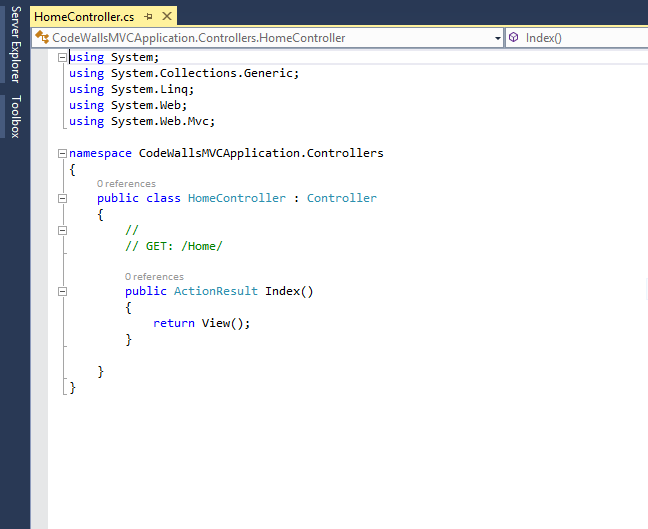
Specify the name “Home” and set Template as “Empty MVC controller” and click on add button will add a “HomeController” under Controllers folder. This controller have only one action “Index” having the structure below:

Controller code view in MVC


Look out the default code, there is only one action added i.e. “Index” having the return type “ActionResult” which is commonly preferred by all the action methods. Basically this action method is used for default view about any controller like listing or home page. Suppose there is a controller for products then the index action will show all the products having functionality like add/edit/delete. Now change this action a little bit as shown:
public class HomeController : Controller 
public string Index() 
{ return "This is my first controller"; } 
}
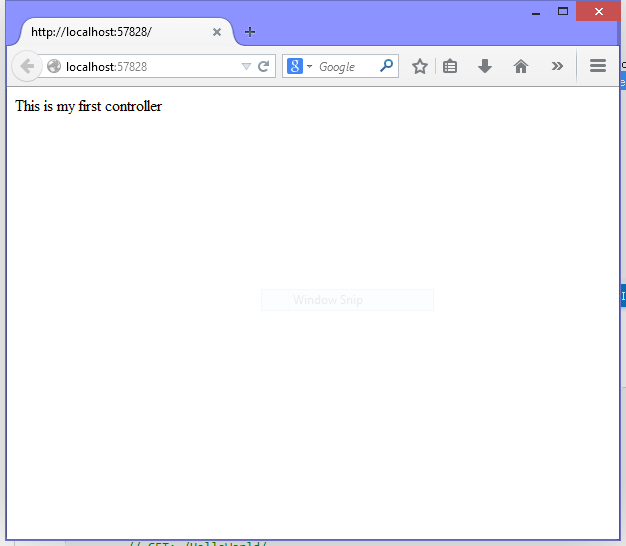
Run this application and it will show the string returned by the above “Index” method.


output:Creating a Controller in Asp.Net MVC


Check out the address in browser, there is only “localhost:portNo” without any controller’s name. This is because the default routing of an MVC application is Controller: Home and Action: Index. That’s why it is showing only the port number of the application.
© Copyright 2013 Computer Programming | All Right Reserved