-->

Thursday, September 10, 2015

BulletedList Web Server Control Overview, binding with Sql Server in ASP.NET C#

Introduction
In this article example i will show you how to bind bulleted list web server control with sql server database. In previous article i explained use of it control using visual studio like how to add value in it at compile time. Lets see the example of bulleted list, which is bind with sql datasource control.


Following some steps for binding bulleted list control using SqlDataSource

Step-1 : Open visual studio
Step-2:  Click  File-->New-->WebSite

starting screen

Step-3: Right click on website name in solution explorer, Add-->Add new item 

web form


Step-4: Make Database table 
Step-5: Drag Bulleted list from toolbox and drop on design window.
Step-6: Select Show smart tag of Bulleted list

show smart tag

Step-7: On Bulledted list task click choose data source link
Step-8: Select New DataSource from Data Source configuration wizard.

choose data source

Step-9: Select SQL Database from Data Source Configuration wizard. and click ok button

data configuration wizard

Step-10 : Select existing database from configure data source.

connection string property

Step-11 : Change Connection name according to you and click "ok".

web.config file

Step-12 : Select table from name ,select table field name and press ok button

table view

Step-13: Click test query button and finish the process
Step-14: Select a data field to display in the bulleted list.
Step-15: Select a data field for the value of the bulleted list. and press ok button.
select one those field in bulleted list

Run your application

how to bind bulleted list in asp.net

Finally source of the code are:


<%@ Page Language="C#" AutoEventWireup="true" CodeFile="Default2.aspx.cs" Inherits="Default2" %>

<!DOCTYPE html>

<html xmlns="http://www.w3.org/1999/xhtml">
<head runat="server">
    <title></title>
</head>
<body>
    <form id="form1" runat="server">
    <div>
    
        <asp:BulletedList ID="BulletedList1" runat="server" DataSourceID="SqlDataSource1" DataTextField="Name " DataValueField="Url">
        </asp:BulletedList>
        <asp:SqlDataSource ID="SqlDataSource1" runat="server" ConnectionString="<%$ ConnectionStrings:ConnectionString %>" SelectCommand="SELECT * FROM [mytab]"></asp:SqlDataSource>
    
    </div>
    </form>
</body>
</html>
Top Related Article

Check, if value exists in Database ASP.NET C#

Introduction
In this article i will show you availability of data in the database table, if exist then return true otherwise return false. In this article we will use linear search algorithm to search the data. So lets see the example of it.

follow some steps for checking data into database
Step 1: Create table in database  http://dotprogramming.blogspot.in/2013/06/how-to-make-database-table-in-visual.html

database table

table value


Step 2:  Take a web form name as "duplicatevalue.aspx"
Step 3:  Design a Webform

design form

Step 4: Make Connection string in web.config file

Step-5 : Create procedure for retrieving data 

CREATE PROCEDURE [dbo].[checkdata]

AS
SELECT * from [Table] 
RETURN 0


Step 6: Double click on "Check Existing" Button and make code 

using System;
using System.Collections.Generic;
using System.Linq;
using System.Web;
using System.Web.UI;
using System.Web.UI.WebControls;
using System.Data.SqlClient;
using System.Data;
using System.Configuration;
public partial class duplicatevalue : System.Web.UI.Page
{
    SqlDataReader rd;

    protected void Page_Load(object sender, EventArgs e)
    {

    }
    protected void Button1_Click(object sender, EventArgs e)
    {
        bool flag = false;

        using (SqlConnection con = new SqlConnection())
        {
            con.ConnectionString =ConfigurationManager .ConnectionStrings ["ConnectionString"].ToString ();
            con.Open();
            using (SqlCommand cmd = new SqlCommand())
            {
                cmd.CommandText = "checkdata";
                cmd.Connection = con;
                cmd.CommandType = CommandType.StoredProcedure;
                rd = cmd.ExecuteReader();
                while (rd.Read ())
                {
                    if (rd["EmployeeId"].ToString().Equals(empid.Text))
                    {
                        flag = true;
                        break;
                        

                    }
                }
                if (flag ==true)
                    result.Text = "ALREADY EXISTS";
                else
                    result.Text = "not existes";

                                
            }
        }

    }
}

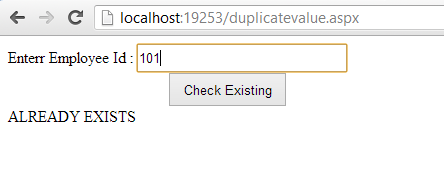
Out put of the program
data exists
not exists

The same article we can do with different method check this article in different style.

Wednesday, September 9, 2015

Login form using entity framework in windows form c#

Introduction
In this article i will give an example of login form using entity framework. We will do login from database table so first of all create database table using entity framework's code first approach. Now, Using linq query we can do this task.

Description
Sometimes anonymous user can harm our application and can change the data stored in our application. That’s why, it is often necessary to permit only authorized users to use our application. There is no predefined method to do this operation in windows forms, so we have to implement it in our way.

If we have username and password in our database then we can implement a better authentication system. So we will create a table in our database named User which will have two columns (Username and Password). Insert some records in that table to check our login control.


In click event of login button write following code:


Here in this code will show a message if user leaves the textboxes empty. First check the username in our database having exactly the same name user entered in textbox. If there is an entry then compare the password.
We can show a message box at each wrong step of user.

Download example.

Tuesday, September 8, 2015

Button work as fileupload control in JQuery

Introduction

In this article i will show you how a button control behaves as fileupload control. Example of button control working as fileupload control. In this article i taken a button and fileupload control but visibility of fileupload is hidden. Get the fileupload control by their id property in JQuery and put the accessed file path into label control. Let see the example


<!DOCTYPE html>
<html xmlns="http://www.w3.org/1999/xhtml">
<head>
    <title></title>
    <script src="http://code.jquery.com/jquery-1.8.2.js"></script>
    <script>
    $(function(){
        $("#fileupload1").change(function () {
            $("#l1").html($("#fileupload1").val().substring($("#fileupload1").val().lastIndexOf("\\") + 1));

        });
    })
</script>
</head>
<body>
    <form id="form1">
        <input type="file" style="display:none" id="fileupload1"/>
        <input type="button" id="Button1" onclick='$("#fileupload1").click()' value="upload"/>
        <label id="l1"></label>

    </form>

</body>
</html>

Code generate the following output


Button work as fileupload control in JQuery

Monday, September 7, 2015

Create Database in c# using code first approach

Introduction

In this article i will show you how to create database in windows form c# using code first approach. Example of code first approach to create database. Entity Framework is an open source object-relational (ORM) framework for ADO.NET. It allows user to create a model by writing code in EF designer. The releases are improving from entity framework 3.5 and onwards. Entity Framework 5 is the stable version for visual studio 2010 and 2012 and updated soon with the latest features.

The main advantages of using Entity Framework 5 are:
  • Speed - You do not have to worry about creating a DB you just start coding. Good for developers coming from a programming background without much DBA experience.
  • Simple - you do not have a edmx model to update or maintain.
Entity framework 5 released with some advanced features like enum support, table-valued functions and performance improvements. In this article we will create a database using entity framework 5 code first approach.

Steps of Creating Database through Entity Framework
  • Create a Project ClassLibrary in Visual Studio.
  • Install EntityFramework from Package Manager Console (required internet connection) using
    • PM> install-package entityframework 
  • Remove InBuilt Class i.e "Class1".
  • Add a new class “Student”.
  • Add another class DataContext (Name may be change) inherited by DbContext
    • DbContext is in System.Data.Entity Namespace.
  • Write the below code in DataContext class 
j
public DataContext()
          :base("Database Name")
{
    if(!Database.Exists("Database Name"))
        Database.SetInitializer(new DropCreateDatabaseAlways<DataContext>());
}
public DbSet<Student> Student { get; set; }


  •  Add a new project2 (Window Form Application) that will be used to execute constructor of DataContext class.
  • Install Entity Framework 5 in this new project also.
  • Create an object of DataContext class in Form1 Constructor.
  • Now run project2 and your Database has been created.
When we will execute the given command to install entity framework, it will execute the stable version i.e. entity framework 5.

Download code file

Insert foreign key in database

Online polling project in asp.net free download

Introduction:
Today i will give a web based polling system, through this you can put your vote online. Free download polling project in asp.net with report. Online polling system is a web based solution.It removes traditional polling system problems such as :
  • Take more time and human resources
  • Does not give instant poll result
  • False voter
  •  Inefficient

Online voting system project


Those problem are major problem in traditional system . If you want to remove such types of problem in traditional system then you will use web-based solution.

Features of Online voting system:
  • Detect false voter
  • Instant poll result
  • Easy method for vote count
  • keep global information
System Requirements : 
  • Visual studio 2010 
  • SqlServer 2008
  • Internet connection
  • Mail_id
 How to run this project :

  • Open website folder in Visual studio 2010
  • Run your project by selecting green triangle button
  • Open voter register page 
  • Fill some required filled and click on submit button
  • Login in Admin panel by username and password
  • Approve Voter by changing flag bit (0 to 1)
  • After approval login in your mail id and copy your secure code
  • Login in voter login panel and fill some required filled(voter-id , securecode , email )
  • After login you can vote now of your desired candidate .
  • Count total vote by admin
  • Show result by admin
If you want to purchase this please contact me on :  narenkumar851@gmail.com

Project Demo

Sunday, September 6, 2015

Select box validation using JQuery

Introduction
In this article i will show you how to validate select box using JQuery. Example of select box validation using JQuery. First to get the id of the select box then get the value of it.

Source Code

<!DOCTYPE html>
<html xmlns="http://www.w3.org/1999/xhtml">
<head>
    <title></title>
    <script src="Scripts/jquery-1.10.2.js"></script>
    <script>
        $(function () {
            $("#Button1").click(function () {
                var a = $("#d1").val();
                if(a=="0")
                {
                    alert("Please select");
                }

            });


        })
    </script>
</head>
<body>
    <select name="d11" id="d1">
        <option value="0" >Select</option>
        <option value="1">Apple</option>
    </select>
    <input id="Button1" type="button" value="button" />
</body>
</html>

Code generate the following output

Select box validation using JQuery

© Copyright 2013 Computer Programming | All Right Reserved