-->

Thursday, April 30, 2015

How to use SQL LIKE operator in asp.net c#

Today when we wrote a program for online job portal. On that time i want to show the job detail from job table using single English alphabet letter. So first of all i bind Dropdownlist with the alphabet letters then also bind Gridview from selected DropdownList letter. For this type of query i need SQL LIKE operator because i want to search items from the table on the basis of selected letter.  Bind the gridview with SqlDataSource with where clause.

 <p>
        Please Select any one letter from given list:</p>

    <asp:DropDownList ID="Letters" DataSource='<%# Alphabet %>' runat="server" />

    <asp:Button ID="Button1" runat="server" Text="Get Job List"  />
<p>


        <asp:GridView ID="GridView1" runat="server" AutoGenerateColumns="False" DataKeyNames="JobId" DataSourceID="SqlDataSource1">

            <Columns>

                <asp:BoundField DataField="JobId" HeaderText="JobId" InsertVisible="False" ReadOnly="True" SortExpression="JobId" />

                <asp:BoundField DataField="JobName" HeaderText="JobName" SortExpression="JobName" />

                <asp:BoundField DataField="Salary" HeaderText="Salary" SortExpression="Salary" />

                <asp:HyperLinkField DataNavigateUrlFields="JobId" DataNavigateUrlFormatString="jobdetail.aspx?JobId={0}" HeaderText="Full Detail" Text="Details" />
            </Columns>

        </asp:GridView>

        <asp:SqlDataSource ID="SqlDataSource1" runat="server" ConnectionString="<%$ ConnectionStrings:ConnectionString %>" SelectCommand="SELECT * FROM [AddJob] WHERE (JobName LIKE @JobName + '%')">

            <SelectParameters>
                <asp:ControlParameter ControlID="Letters" Name="JobName" PropertyName="SelectedValue" Type="String" />
            </SelectParameters>
        </asp:SqlDataSource>

Code Behind page

public partial class Bynamejobsearch : System.Web.UI.Page
{
    protected void Page_Load(object sender, EventArgs e)
    {
        if (!Page.IsPostBack)
        {
            DataBind();
        }
    }
    private List<char> _Alphabet;
    protected List<char> Alphabet
    {
        get
        {
            if (_Alphabet == null)
            {
                _Alphabet = new List<char>();
                for (int i = 65; i < 91; i++)
                {
                    _Alphabet.Add(Convert.ToChar(i));
                }
            }
            return _Alphabet;
        }
    }

}

Code generate the following output:

How to use SQL LIKE operator in asp.net c#


Dark highlighted black line show that how to use select command with like operator. By using LIKE operator we got job detail which is start from letter which is selected in DropdownList. I mean to say first letter come from List and remaining letter can any other letters of English alphabet.

Tuesday, April 28, 2015

How to bind Dropdownlist with whole english characters in ASP.NET C#

I want to say that how to add English alphabets at run time in DropdownList. A intermediate programmer know that each char contain a ASCII value like 65 is a ASCII value of letter 'A'. Similarly again 66 to 90 is a ASCII value of Letter B to Z.  So add a DropdownList in the design page also bind with Alphabet public property. Look like this:

Source page:
<asp:DropDownList ID="Letters" DataSource='<%# Alphabet %>' runat="server" />

Code Behind Page:
public partial class Bynamejobsearch : System.Web.UI.Page
{
    protected void Page_Load(object sender, EventArgs e)
    {
        if (!Page.IsPostBack)
        {
            DataBind();
        }
    }
    private List<char> _Alphabet;
    protected List<char> Alphabet
    {
        get
        {
            if (_Alphabet == null)
            {
                _Alphabet = new List<char>();
                for (int i = 65; i < 91; i++)
                {
                    _Alphabet.Add(Convert.ToChar(i));
                }
            }
            return _Alphabet;
        }
    }
}
In this program i have a list of type char. Use for loop which is start from 65 to 90. Add this char in the list one by one.
How to bind Dropdownlist with whole english characters in ASP.NET C#

Monday, April 27, 2015

Creating a Database in SQL Mgt Studio 2012

Creating a Database is to occupy some space in physical drive for the records saving through the application. These saved records can easily be listed or modified as per user’s requirement. To perform operations like add/edit/delete on these records a person used to create some application having capability of doing so. In earlier article, we have installed SQL Server Management Studio 2012 following some easy steps. This time we will establish a connection with server and create a database EmpDb having only a single table Employee. Start Management studio through all programs or whatever shortcut you have on your system and follow these steps.
  1. First screen will prompt you to establish a connection with server requiring some values as      SQL Server Management Studio
  2.        
  3.  below: Just write (LocalDb)\v11.0 because i have only local db installed in my system, you can change as per your server installation.
  4. On the left side there are some options "Database, Security, Replication, Management" are pre-added. Right click on Database and select New Database, a window will show as below prompting database name:                                                                                                                
    New Database in SQl server management studio
  5. Enter database name "EmpDb" and click on Ok button, it will create a new database with none of tables, views. Now look out the server connection there is a new entry of your database as shown:                                                                                                                                              
    Enter database name "EmpDb
  6. Right click on tables and select New Table, it will show you editor having three columns name, data-types and nullable. Write some columns with their data-types, don’t forgot to make Id a primary key and Identity set to true. Identity property will auto-increment this columns according to data entry. Save this table and enter name “Employee”. You can see the columns and their data-types in the below image:                                                                                          
    New Table in sql server
Your database have easily been created with a single table and some columns. In the next article we create an edmx file for this database to be used for MVC application and will perform operation on this database.

Saturday, April 25, 2015

Nested Gridview example in asp.net c#

Before we talk about nested gridview asp.net c#. First we talk about gridview control. It is a data source control through which we can bind data in the form of table. In this article, we will take two gridview asp.net controls and we will arrange both control in this way, please see the mentioned picture.

Lets to start how to design it

  1. First to add asp.net gridview in the source page
  2. Add a <Columns> tag inside it.
  3. Add single column inside it using TemplateField with HeaderText property, if you want to add more than one column then add equal number of TemplateField inside it.
  4. Show the data in the browser with the help of ItemTemplate, so add it inside Template Field.
  5. Now, the article's main point is here, Add another gridview asp.net controls inside the ItemTemplate, Now your code look like:
     <asp:GridView ID="GridView1" runat="server" AutoGenerateColumns="false">
     <Columns>
    <asp:TemplateField HeaderText="Subject Marks">
     <ItemTemplate>
     <asp:GridView ID="GridView2" runat="server" AutoGenerateColumns="false">
     </asp:GridView>
     </ItemTemplate>
    </asp:TemplateField>
     </Columns>
     </asp:GridView>
  6. Similarly again, repeat the step 2 to 4 for second nested gridview asp.net control. Now, add three columns by using Template Field.
  7. Bind all columns inside the ItemTemplate field of second gridview control, Please see the full code which is mentioned below:
<asp:GridView ID="GridView1" runat="server" AutoGenerateColumns="false">

<Columns>

<asp:TemplateField HeaderText="Subject Marks">
<ItemTemplate>
<asp:GridView ID="GridView2" runat="server" AutoGenerateColumns="false">
<Columns>
<asp:TemplateField HeaderText="Hindi">
<ItemTemplate>
<asp:Label ID="hindilabel" runat="server" Text='<%# Eval("hindi") %>'></asp:Label>
</ItemTemplate>
</asp:TemplateField>
<asp:TemplateField HeaderText="Maths">
<ItemTemplate>

<asp:Label ID="mathslabel" runat="server" Text='<%# Eval("maths") %>'></asp:Label>
</ItemTemplate>
</asp:TemplateField>

<asp:TemplateField HeaderText="English">
<ItemTemplate>

<asp:Label ID="englishlabel" runat="server" Text='<%# Eval("English") %>'></asp:Label>
</ItemTemplate>
</asp:TemplateField>

</Columns>
</asp:GridView>
</ItemTemplate>
</asp:TemplateField>
</Columns>
</asp:GridView>

Friday, April 24, 2015

Display filter ads on the webpage in ASP.NET

If we want to display ads on the webpage then we use Adrotator control in ASP.NET. Without filter ads adrotator control display all ads, which is exist in the xml file. But all ads are not good for website owner because only a content related ad earn more money compare to all ads. So lastly developers decide that they have to design user choice ad system. The KeywordFilter property is created by visual studio developers for ads filtration. Through this property you can display only those ads, which is related to content.

How to use KeywordFilter Property

Advertisements.xml file
<ad>

<Keyword> name of the keyword </Keyword>

<ad>
Adrotator control property
KeywordFilter = name of the keyword which is mentioned in Advertisements file
For more clearance please watch this video:

Thursday, April 23, 2015

Installing SQL Server Mgt Studio 2012

Installing SQL Server is as simple as installing a software following a list of steps. SQL Server 2012 was released in April 2012 and because of its list of features and easiness to use made favorite among professionals and beginners. We will learn about to creating database in SQL Server Management studio after installing it in the system.
Microsoft SQL Server is a powerful and free data management tool, designed for easy development and utilities including:
  • LocalDB (MSI installer) LocalDB is a lightweight version of Express that has all its programmability features. It can be bundled with Application and Database Development tools like Visual Studio and or embedded with an application that needs local databases.
  • Express (Containing only the database engine) Use this if you need to accept remote connections or administer remotely.
  • Express with Tools (with LocalDB) Choose either LocalDB or Express depending on your needs above.
  • SQL Server Management Studio Express (Tools only) This does not contain the database, but only the tools to manage SQL Server instances, including LocalDB, SQL Express, SQL Azure, etc. Use this if you already have the database and only need the management tools.
  • Express with Advanced Services (contains the database engine, Express Tools, Reporting Services, and Full Text Search) This is a larger download than "with Tools" as it also includes both Full Text Search and Reporting Services.
Here are the steps to installing SQL Server Management studio 2012:
  1. Download the executable file from the Microsoft official site. Double click on the .exe file and "SQL Server installation center" window will open.                                                    
    Installing SQL Server Mgt Studio 2012
  2. Select first option "New SQL server stand-alone installation" and it will check all the support rules with a progress bar.                                                                                                  
    New SQL server stand-alone installation
  3. After completing rule check it will opt for license terms that must accept by you for installation. User may also select the option to send feature data to Microsoft or just ignore this checkbox.                                                                                                                         
    User may also select the option to send feature data to Microsoft
  4. It will then install setup files used for preparing the installation into your system showing progress to user. On this step if your system is connected to internet connection then any update available will also be installed with this installation.             
     install setup files used for preparing the installation
  5. Next step will opt for feature selection to be installed as shown in the image. Some features must be installed and those features are only readable as LocalDB and Connectivity tools                                                                                                                              
     only readable as LocalDB and Connectivity tools
  6. User can help Microsoft to SQL server features and services with selecting a checkbox of Error reporting. It is optional.                                                                                                    
     Microsoft to SQL server features
  7. Important step in which the installation process continues with copying all the required files on the system. This step takes more time because of copying required files.                                                                                                                                                       
    Important step in which the installation process
  8. The last step of installation to confirm about installation have successfully completed or having some errors. Successfully completed window will show with list of all the features installed with this installation.                                                                                        
    installation to confirm about installation have successfully completed
Completing these steps you can easily access SQL Server management studio to create database. We will create database with some tables in next article.

Nested gridview asp.net c# with expand and collapse example

In previous example we have already learn about nested gridview asp.net . Now, today we will learn nested gridview asp.net  with expand and collapse feature. Parent Gridview bind with country database table and child Gridview bind with State database table when we select any country. Child Gridview appeared according to country_id column like. Lets start to design parent GridView:

<asp:GridView ID="GridView1" runat="server" AutoGenerateColumns="false" OnRowDataBound="GridView1_RowDataBound">

<Columns>

<asp:TemplateField>
<ItemTemplate>
<a href="JavaScript:expandcollapse('<%# Eval("country_id") %>');">
<img src="plus.gif" border="0" id='img<%#Eval("country_Id") %>' />

</ItemTemplate>

</asp:TemplateField>
<asp:BoundField DataField="country_Id" HeaderText="Country Id" />
<asp:BoundField DataField="country_name" HeaderText="Country Name" />

</Columns>

</asp:GridView>
Here,
  1. AutoGenerateColumns="false" means, automatically generated columns will not display in the Gridview.
  2. OnRowDataBound="GridView1_RowDataBound" means, raise event after bind the parent gridview for next child gridview.
  3. Using template field we create a column in the gridview.
  4. ItemTemplate used for displaying data in the browser.
  5. Both anchor and image tag bind with the country_id using Eval method. Also call a javaScript method when we click on image. Script method define later in the post.
  6. Bind two column with table , now the design window look like
Nested gridview asp.net c# with expand and collapse example

Now, add nested Gridview  using Template field. Similarly again create columns for state table but remember that state table get from country_id so also take country_id inside the template field, see the code
<asp:TemplateField>
<ItemTemplate>
<tr>
<td colspan="100%">
<div id='<%# Eval("Country_Id") %>' style="display:none" />

<asp:GridView ID="GridView2" runat="server" AutoGenerateColumns="false">
<Columns>
<asp:BoundField DataField="state_Id" HeaderText="State Id" />
<asp:BoundField DataField="state_name" HeaderText="State Name" />

</Columns>

</asp:GridView>

</td>

</tr>

</ItemTemplate>

</asp:TemplateField>
Here,
  1. Bind division with the country_Id and set display style as none so its not visible.
  2. GridView with two data Field that are state_Id and state_name.
Now the whole source code is :
<form id="form1" runat="server">
<div>
<asp:GridView ID="GridView1" runat="server" AutoGenerateColumns="false" OnRowDataBound="GridView1_RowDataBound">

<Columns>
<asp:TemplateField>
<ItemTemplate>
<a href="JavaScript:expandcollapse('<%# Eval("country_id") %>');">
<img src="plus.gif" border="0" id='img<%#Eval("country_Id") %>' />


</ItemTemplate>


</asp:TemplateField>
<asp:BoundField DataField="country_Id" HeaderText="Country Id" />
<asp:BoundField DataField="country_name" HeaderText="Country Name" />
<asp:TemplateField>
<ItemTemplate>
<tr>
<td colspan="100%">
<div id='<%# Eval("Country_Id") %>' style="display:none" />

<asp:GridView ID="GridView2" runat="server" AutoGenerateColumns="false">
<Columns>
<asp:BoundField DataField="state_Id" HeaderText="State Id" />
<asp:BoundField DataField="state_name" HeaderText="State Name" />

</Columns>

</asp:GridView>

</td>


</tr>


</ItemTemplate>


</asp:TemplateField>

</Columns>


</asp:GridView>
</div>
</form>
Now, come to the javaScript function which is calling from anchor tag in first TemplateField. Now, copy this code and paste into your <Script> block.
<script>
function expandcollapse(name)
{
var div = document.getElementById(name);
var img = document.getElementById('img' + name);
if(div.style.display=='none')
{
div.style.display = "inline";
img.src = "minus.gif";
}
else
{
div.style.display = "none";
img.src = "plus.gif";
}}

</script>
Here,
  1. <Script> tag, which is include in <head> section
  2. expandcollapse is the function name in which we have a parameter named "name".
  3. parameter take country_id as a value
  4. we have two variable first is used for division which is hide in the second template field and second variable is used for image which is changed according to expand and collapse.
  5. display inline means state table open in the parent table boundary.
Now, come to the code file. The following code demonstrates how to bind  the GridView control with the DataSet also demonstrate how to wok with RowDataBound event.
public partial class Default21 : System.Web.UI.Page
{
protected void Page_Load(object sender, EventArgs e)
{
if(!Page.IsPostBack)
{
bindgridview();

}

}

private void bindgridview()
{
SqlConnection con = new SqlConnection();
con.ConnectionString = ConfigurationManager.ConnectionStrings["btti"].ToString();
con.Open();
SqlCommand cmd = new SqlCommand("select * from [country]", con);
SqlDataAdapter da = new SqlDataAdapter(cmd);
DataSet ds = new DataSet();
da.Fill(ds);
con.Close();
GridView1.DataSource = ds;
GridView1.DataBind();

}
protected void GridView1_RowDataBound(object sender, GridViewRowEventArgs e)
{
if(e.Row.RowType==DataControlRowType.DataRow)
{
SqlConnection con = new SqlConnection();
con.ConnectionString = ConfigurationManager.ConnectionStrings["btti"].ToString();
con.Open();
GridView gv = (GridView)e.Row.FindControl("GridView2");
int countryid = Convert.ToInt32(e.Row.Cells[1].Text);
SqlCommand cmd = new SqlCommand("select * from [state] where country_id="+countryid, con);
SqlDataAdapter da = new SqlDataAdapter(cmd);
DataSet ds = new DataSet();
da.Fill(ds);
con.Close();
gv.DataSource = ds;
gv.DataBind();

}
}
}

Here,
  1. First to bind the gridview with DataSet.
  2. In the RowDataBound event, first to check the selected row is DataRow.
  3. Now, find the nested gridview in the block and bind it with data source.

Wednesday, April 22, 2015

Listing with Insert and Update MVC Part 1

Listing of records is binding the model with custom list of objects and show on the view page. For this process we will create custom class that will be used to create objects list and then will bind that list with model.
We have learnt how to use default process and create listing with CRUD actions. In this article we will create with our own code blocks. Create a class CategoryD having all the fields saved in the database table Category as:
public class CategoryD
{
public int Id { get; set; }
public string Title { get; set; }
public string Description { get; set; }
public bool IsActive { get; set; }
}
Create a controller CategoriesController with default Index action. This action is empty and write following code fragment in this action:
public ActionResult Index()
{
List<CategoryD> categories = new List<CategoryD>();
using (EmpDbEntities db = new EmpDbEntities())
{
categories = db.Categories.Select(a => new CategoryD
{
Id = a.CategoryId,
Title = a.Name,
Description = a.Description,
IsActive = a.IsActive
}).ToList();
}
return View(categories);
}
Create view for this action and paste below code in this view page:
@model CodeWallMVCApplication.ViewModels.CategoryVM
@{
ViewBag.Title = "Index";
Layout = "~/Views/Shared/_Layout.cshtml";
int i = 1;
}
<h2>Categories List</h2>
<input type="button" value="Create New" id="btnNew" />
<table>
<thead>
<tr>
<td><b>#</b></td>
<td><b>Title</b></td>
<td><b>Description</b></td>
<td><b>Active</b></td>
</tr>
</thead>
<tbody>
@foreach (var item in Model)
{
<tr>
<td>@i</td>
<td>@item.Title</td>
<td>@item.Description</td>
<td>@(item.IsActive ? "Active" : "D")</td>
</tr>
i = i + 1;
}
</tbody>
</table>
Run this project and go to this controller’s action, it will show all the records from categories table. This output is as same as the output in earlier article where the view has been created using default MVC feature.
Listing with Insert and Update MVC Part 1

This is only listing part, we have to insert and update through this same page.  To perform this, just change the category class a little bit and add one more class. We will insert and update category entity in our next article.

Monday, April 20, 2015

Working with Database First: edmx in MVC

Database First approach creates all the model classes, properties and its context from the selecting database and then let the user access those classes for performing CRUD actions. User first have to create database and then follow this article to create an edmx file.
An edmx file is an XML file defines a model used to perform CRUD operations on database. This file can also be used with Entity Framework and contains some information to be used by EF designer. User can change this file to change EF designer and sometimes have to change in edmx file manually.
In previous article we have created a database EmpDb with single table, now we will create an edmx file for this database. By using the same MVC project (used in earlier articles) follow below steps:


  1. Right click on Models folder and Add New Item and then select ADO.NET Entity Data Model, name it whatever you want and click Add.
    Add New Item
  2. The next window is for choosing model contents whether from an existing database or an empty model. Because we have our existing database so select Generate from database and click on next.
    Generate from database

  3. You need to connect with your data connection, click on new connection and select Microsoft SQL Server from data source and then continue. After clicking on next button, it will ask for connection properties.
    new connection and select Microsoft SQL Server

  4. Enter server name or it may be selected by-default if you have any. It will load all the databases by clicking on drop-down for enter database name, select your database and click on OK. You can even test this connection whether it have problem or succeed.
Enter server name or it may be selected
  1. Now the third steps will open again with filled information like whole connection string and name in web.config to be saved. This entities name is changeable, leave it as is and next.
    name in web.config

  2. Next window will ask for entity framework version your project is using. It will detect all you entity framework versions and checked according to compatibility. Look out below image, it will disable V-6 and auto select V-5, so just next this step.
     entity framework version

  3. Choose database objects like tables, stored procedures etc. to be include in edmx file and click on next.
    Choose database objects like tables, stored procedures

  4. Your edmx file have been created as shown below.
 edmx file output

This will have all the tables in classes forms to be easily access by programmer and a constructor with the name of entities saved in web.config file. Now we can easily create our controllers and views as per the tables, we will continue in next article.

Creating a Model in Asp.Net MVC

Creating a Model means create a database table with required fields in form of simple class and its properties. This class must be added to the pre-added folder Models which differentiate this from all the simple classes in the MVC application.
In earlier article we have created a view for an existing action method Index which is by default added. At the same time we have passed some values from the same action to the respective view page. Those values have been passed through ViewBag, used to dynamically share values from controller to view.
Models folder contains all the classes used to represent application model for the application including validation logic and data access. Right click on the Models folder and add a new class Product and add some properties in that class as shown below:
public class Product
{
public int Id {get; set;}
public string Name {get; set;}
public string Description {get; set;}
public string Color {get; set;}
public string Type {get; set;}
public double Price {get; set;}
}
Using this model class we can either create a database through code- first approach or just use it with a List object to show the data on view page. We will use second option here, create a simple list object and pass items to view page.
Create a Controller ProductsController and choose Empty MVC Controller in Template selection. There is a default action method Index, delete and create a new action method List. You can even change its name from Index to List because there is not view page for this action method.
In this action method we will create a simple list of products with some items and then show those items in the list page. Write the below code in this list method:
public ActionResult List()
{
List<Product> productList = new List<Product>();
productList.Add(new Product() { Id = 1, Name = "Mouse", Color = "Black", Description = "", Price = 800, Type = "Electronics" });
productList.Add(new Product() { Id = 2, Name = "Scanner", Color = "White", Description = "", Price = 3000, Type = "Electronics" });
productList.Add(new Product() { Id = 3, Name = "Mobile", Color = "Dark Grey", Description = "", Price = 6000, Type = "Electronics" });
productList.Add(new Product() { Id = 4, Name = "Shirt", Color = "Blue", Description = "", Price = 850, Type = "Cloths" });
productList.Add(new Product() { Id = 5, Name = "Shampoo", Color = "Black", Description = "", Price = 125, Type = "Hair Product" });

return View(productList);
}
Create a View for this action method which will have the same name “List”. In this view file we have to write simple html that will show all the records added in the action method. Write the below code in this view page:
@model IEnumerable<CodeWallMVCApplication.Models.Product>
@{
ViewBag.Title = "List";
}

<h2>Product List</h2>

<table>
<thead>
<tr>
<th>No.</th>
<th>Name</th>
<th>Description</th>
<th>Color</th>
<th>Type</th>
<th>Price</th>
</tr>
</thead>
<tbody>
@foreach (var item in Model)
{
<tr>
<td>@item.Id</td>
<td>@item.Name</td>
<td>@item.Description</td>
<td>@item.Color</td>
<td>@item.Type</td>
<td>@item.Price</td>
</tr>
}
</tbody>
</table>
The first line specifies about the model rendered on this view, remaining code is same as simple html code. Run this application the on the address bar write http://localhost:53420/Products/List and it will show the product list, added on the action method. In the address, port no may be change according to the application created so don’t copy it from here, just run your application.
Creating a Model in Asp.Net MVC

Creating a View in Asp.Net MVC

Creating a View means adding an HTML file for an existing action method in controller. View is the page that is shown to user, whatever HTML you write or CSS you embed is fully applicable for that view.
In earlier article we have created a controller having an “Index” action method which is by default added. We have changed this action method and returns a string to be displayed on browser directly.
When working with views programmer should know about HTML language and should have a little bit knowledge of CSS style-sheets. In this article we will create a view page checking the options that can be applied on creating a view.
Change index action method as it was when created:
public ActionResult Index()
{
return View();
}
Right click on Index and click on Add View. It will show Add View dialog box having a list of options as in below screenshot. We will discuss all these options in later articles, by now just click on Add button.
Right click on Index and click on Add View

Expand the Views folder, it have a new folder having the same name of our controller i.e. Home. All the views created through this controller will be saved in this folder. Open the newly created view, it have only a bit code as shown:
Open the newly created view

Change this code and insert an hyperlink <a href="www.codewalls.com">Code Walls</a>. Run this project and it will default show this page.
Change this code and insert an hyperlink

 
Data on View from Controller
When we create an MVC application as “Internet Application” template then by default Index action method have a Viewbag message defined as shown below:
public ActionResult Index()
{
ViewBag.Message = "Modify this template to jump-start your ASP.NET MVC application.";

return View();
}
Change this message or leave as is (I have changes this message a little bit) and in the view page there is a line showing the output of this viewbag message i.e.
@ViewBag.Message
Run this project and check the message on the page as shown in green ellipse. You can change this in-built template according to your own design scenario. Using ViewBag you can dynamically share the values from controller to view, we will discuss more about it later.
Creating a View in Asp.Net MVC


Friday, April 10, 2015

Creating a Controller in Asp.Net MVC

What is the MVC architecture and how it can be used to build a web application has been discussed in our earlier article. We will discuss about the concept of MVC in context of classes that can be easily accessible in our application. These classes can be created as simply as other classes including properties to be get/set values. MVC stands for Model, View and Controller that divides a web application into three parts. These parts are data, user-interfaces and logics which differentiates everything about an application. Here is a one-line definition about MVC:
  • Model: these are the classes representing your application data including the properties your database have.
  • View: a simple page that will show to user and redirect your complex code into basic HTML. Decides the design in which data will show.
  • Controller: these classes are responsible for what is to be shown in which view.
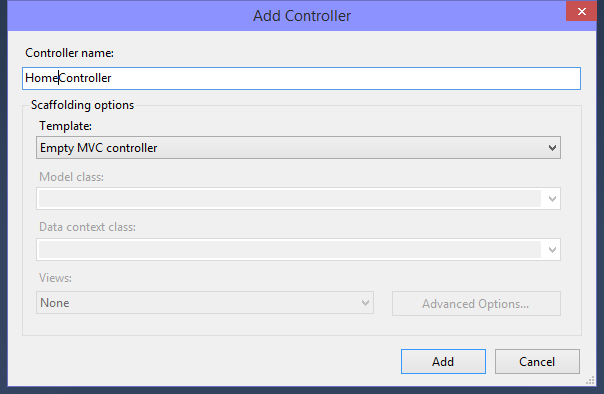
In earlier article, we have created a simple internet application having all the basic folders and packages. Those folders contains App_Start, Content, Controllers, Scripts, Models and of course Views. Now I am starting with an Empty MVC application having only some of these folders and don’t have any code logics. Just right click on Controllers and select Add--> Controller, "Add Controller" window will appear with options listed below:


Controller in MVC


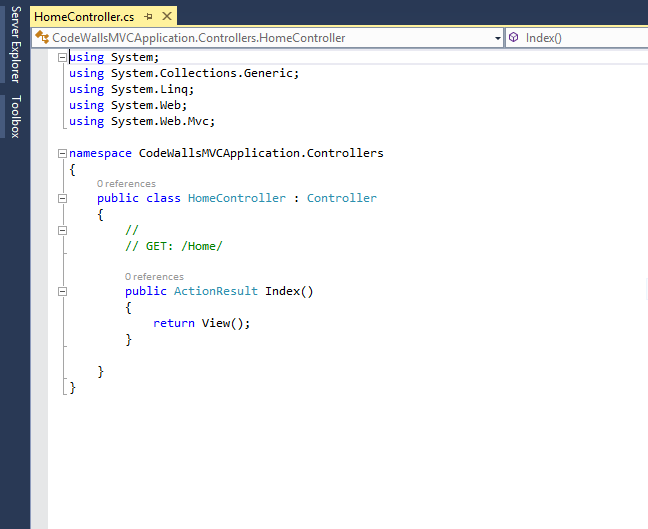
Specify the name “Home” and set Template as “Empty MVC controller” and click on add button will add a “HomeController” under Controllers folder. This controller have only one action “Index” having the structure below:

Controller code view in MVC


Look out the default code, there is only one action added i.e. “Index” having the return type “ActionResult” which is commonly preferred by all the action methods. Basically this action method is used for default view about any controller like listing or home page. Suppose there is a controller for products then the index action will show all the products having functionality like add/edit/delete. Now change this action a little bit as shown:
public class HomeController : Controller 
public string Index() 
{ return "This is my first controller"; } 
}
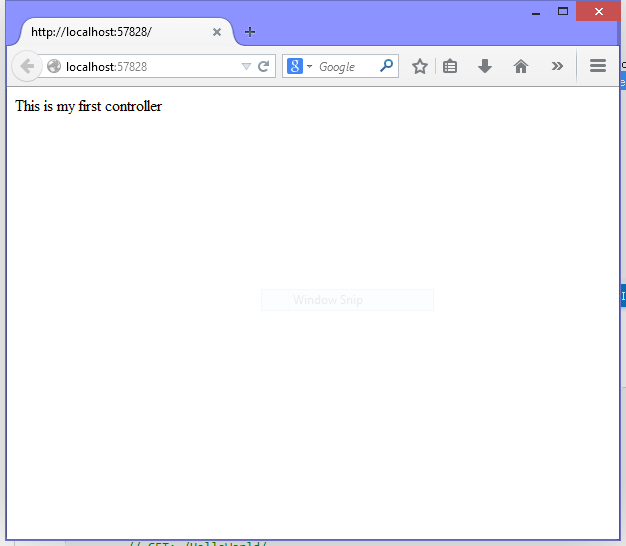
Run this application and it will show the string returned by the above “Index” method.


output:Creating a Controller in Asp.Net MVC


Check out the address in browser, there is only “localhost:portNo” without any controller’s name. This is because the default routing of an MVC application is Controller: Home and Action: Index. That’s why it is showing only the port number of the application.

How to retrieve data from two tables in MVC

Introduction

In this article, i want to bind  hyperlink from one database table like department and when we click on any department name then we will get all employee name, which is stored in second database table. In my previous example, we have to learn how to retrieve data from single database table also learn how-to bind hyperlink in mvc. Today, we will take help of both articles and learn how to retrieve data from two tables in mvc. First to prepare department class with some data members also mapped this with department table, this is already mentioned in previous post. Also add employee class in it.

using System;
using System.Collections.Generic;
using System.ComponentModel.DataAnnotations.Schema;
using System.Linq;
using System.Web;

namespace WebApplication11.Models
{
[Table("Department")]
public class Department
{
public int Id { get; set; }
public string Name { get; set; }

public List<Employee> Employee { get; set; }
}
}

Create DepartmentContext class for retrieving department data from the database  table. If you are use same context for multiple table, MVC 5  generate error.


using System;
using System.Collections.Generic;
using System.Data.Entity;
using System.Linq;
using System.Web;

namespace WebApplication11.Models
{
public class DepartmentContext : DbContext
{
public DepartmentContext()
: base("EmployeeConnection")
{ }
public DbSet<Department> Departs { get; set; }
}
}

Here, connection string save in web.config file. Through Departs property i will get all records from the database table. Now, we create a controller class and view for controller class. In which, i will get all the records from department table using List collection and these items render on the browser using View.


public class DepartmentController : Controller
{
//
// GET: /Department/
public ActionResult Index()
{
DepartmentContext context = new DepartmentContext();
List<Department> dept = context.Departs.ToList();
return View(dept);
}
}

Get the list of department using context instance. Render by the view, so check the view, which is prepare for Department


@model IEnumerable<WebApplication11.Models.Department>
@using WebApplication11.Models;
@{
ViewBag.Title = "Index";
}

<h2>Index</h2>
<ul>
@foreach(Department dt in @Model)
{
<li>@Html.ActionLink(dt.Name,"Index1","Employee",new{DepartmentId=dt.Id},null)</li>
}
</ul>

The Action link method contains some parameters, which are name of the department,  calling method, name of the controller where your method exist and last one is parameter which is pass in the method.  Now, prepare the employee class and EmployeeContext in model folder.


namespace WebApplication11.Models
{
[Table("Employee")]
public class Employee
{
public int EmployeeId { get; set; }
public string Name { get; set; }
public int Age { get; set; }
public int DeptId { get; set; }
}
}

How to retrieve data from two tables in MVC


Similarly again, Create a Context for employee class, In which we can retrieve the data from employee table.

namespace WebApplication11.Models
{
public class EmployeeContext:DbContext
{
public EmployeeContext()
: base("EmployeeConnection")
{

}
public DbSet<Employee> Employees { get; set; }

}
}

Now, create a controller and view for employee class. In which we can create a single method that is Index1 and retrieve the employee information whos department id is selected.


public class EmployeeController : Controller
{
//
// GET: /Employee/
public ActionResult Index1()
{
EmployeeContext context = new EmployeeContext();
Employee emp = context.Employees.Single(emp1 => emp1.DeptId == 1);
return View(emp);
}
}

And create the view for employee.

@model WebApplication11.Models.Employee

@{
ViewBag.Title = "Index1";
}

<h2>Index1</h2>
<p>@Model.Name</p>

Code generate the following output

How to retrieve data from two tables in MVC

fix parameters dictionary contains a null entry

Introduction

Basically that's type of error occurs due to null value. But i have already try to pass some value, manually in the controller function. Always i get this error. Ok let's start to story of the error. I want to get the record from single department table and that's name is hyperlinked. Now, When i click to any hyperlink then open respective employee details, which is stored in another table. What i was done. First i was write the code for retrieving the value from single data base table, on that time, my code run successfully. But in Next time when i wrote the code for retrieving the record from two database table, on that time, i got the error.

What steps i have taken

  1. First step to prepare classes for employee and department
  2. Second step to create a context for both class
  3. third step to prepare a controller for department, as well as prepare view for department
  4. forth step to prepare controller for employee, as well as prepare view for employee.

Error

The parameters dictionary contains a null entry for parameter 'deptid' of non-nullable type 'System.Int32' for method 'System.Web.Mvc.ActionResult linkEmp(Int32)' in 'WebApplication10.Controllers.EmployeeController'. An optional parameter must be a reference type, a nullable type, or be declared as an optional parameter. Parameter name: parameters.

SnapShot


How to fix it

Prepare the seperate Context class for each model. I have two class that is employee and department , If you want to retrieve data from both class then you want to make two seperate context for each. I have two context that is 1. EmployeeContext 2. DepartmentContext

Thursday, April 9, 2015

Access data from database table in MVC

In MVC, we can access data from database easily. When we send any request to the server, respond generated by the controller. Data access from the Model and render by the View. First to make a database table using visual studio 2010 or higher. we have database table that is "Employee", in which have some attributes, these are

CREATE TABLE [dbo].[Employee]
(
[Id] INT NOT NULL PRIMARY KEY IDENTITY,
[Name] NVARCHAR(50) NULL,
[Age] INT NULL
)


  1. First to install entity framework by the "Nuget packages", which is available in tools-->Library Package Manager
  2. This is already available in 4.5 framework or 4.5.1.
ntity framework by the "Nuget packages
  1. Now, add the employee class in model folder with some public properties  like
  2.  
     namespace WebApplication10.Models
    {
    public class Employee
    {
    public int ID { get; set; }
    public string Name { get; set; }
    public int age { get; set; }
    }
    }
    
    
  3. Now, add another class which is EmployeeContext.cs class, which is inherit from DBContext class. DBContext class is available in System.Data.Entity namespace. This class is used for making connection. Now, your code look like
  4.  
    using System.Data.Entity;namespace WebApplication10.Models
    {
    public class EmployeeContext: DbContext
    {
    public DbSet<Employee> empl { get; set; }}
    }
    
    Here, empl is the public property, by which we can create the connection to the database.
  5. Now, add the ConnectionString in the web.config file that is
    <add name="EmployeeConnection" connectionString="Data Source=(LocalDb)\v11.0;AttachDbFilename=|DataDirectory|\Database1.mdf;Initial Catalog=Database1;Integrated Security=True"
    providerName="System.Data.SqlClient" />
    
    
  6. Map the database table with the Employee class using Table class which is available in  System.ComponentModel.DataAnnotations.Schema; namespace, after mapping now your code look like
    using System.ComponentModel.DataAnnotations.Schema;namespace WebApplication10.Models
    {[Table("Employee")]
    public class Employee
    {
    public int ID { get; set; }
    public string Name { get; set; }
    public int age { get; set; }
    }
    }
    
  7. Now, create a EmployeeController  in controller folder, Which is inherit from Controller class. This Controller class is exists in System.Web.Mvc namespace. Also create a public method, which return ActionResult class. Now your code look like
     using System.Linq;
    using System.Web.Mvc;
    using WebApplication10.Models;
    
    namespace WebApplication10.Controllers
    {
    public class EmployeeController : Controller
    {
    //
    // GET: /Employee/
    public ActionResult Index()
    {
    EmployeeContext context = new EmployeeContext();
    Employee emp = context.pl.Single();
    
    return View(emp);
    }
    }
    }
    
    Here we create a instance of EmployeeContext class and invoke the public property of that class.
  8. Now create the view for this program. Before adding the view with their presentation must build the project. Learn How to create the new view
 create the view for this program

  1. Prepare the view and access all the properties of the employee class by the @Model properties.
     @model WebApplication10.Models.Employee
    
    @{
    ViewBag.Title = "Employee Details";
    }
    
    <h2>Employee Details are:</h2>
    Employee Id : <p>@Model.ID</p>
    Employee Name : <p>@Model.Name</p>
    Employee Age : <p>@Model.age</p>
    
    
  2. Now run the code and check your desired output
Access data from database table in MVC

Data Binding in MVC

In MVC, we can access data from database easily. When we send any request to the server, respond generated by the controller. Data access from the Model and render by the View. First to make a database table using visual studio 2010 or higher. we have database table that is "Employee", in which have some attributes, these are
CREATE TABLE [dbo].[Employee]
(
[Id] INT NOT NULL PRIMARY KEY IDENTITY,
[Name] NVARCHAR(50) NULL,
[Age] INT NULL
)
  1. First to install entity framework by the "Nuget packages", which is available in tools-->Library Package Manager
  2. This is already available in 4.5 framework or 4.5.1.
  3. Install Entity Framework By the nuget packages
  4. Now, add the employee class in model folder with some public properties  like
     namespace WebApplication10.Models
    {
    public class Employee
    {
    public int ID { get; set; }
    public string Name { get; set; }
    public int age { get; set; }
    }
    }
    
    
  5. Now, add another class which is EmployeeContext.cs class, which is inherit from DBContext class. DBContext class is available in System.Data.Entity namespace. This class is used for making connection. Now, your code look like
    using System.Data.Entity;namespace WebApplication10.Models
    {
    public class EmployeeContext: DbContext
    {
    public DbSet<Employee> empl { get; set; }}
    }
    
    Here, empl is the public property, by which we can create the connection to the database.
  6. Now, add the ConnectionString in the web.config file that is
    <add name="EmployeeConnection" connectionString="Data Source=(LocalDb)\v11.0;AttachDbFilename=|DataDirectory|\Database1.mdf;Initial Catalog=Database1;Integrated Security=True"
    providerName="System.Data.SqlClient" />
    
    
  7. Map the database table with the Employee class using Table class which is available in  System.ComponentModel.DataAnnotations.Schema; namespace, after mapping now your code look like
    using System.ComponentModel.DataAnnotations.Schema;namespace WebApplication10.Models
    {[Table("Employee")]
    public class Employee
    {
    public int ID { get; set; }
    public string Name { get; set; }
    public int age { get; set; }
    }
    }
    
  8. Now, create a EmployeeController  in controller folder, Which is inherit from Controller class. This Controller class is exists in System.Web.Mvc namespace. Also create a public method, which return ActionResult class. Now your code look like
     using System.Linq;
    using System.Web.Mvc;
    using WebApplication10.Models;
    
    namespace WebApplication10.Controllers
    {
    public class EmployeeController : Controller
    {
    //
    // GET: /Employee/
    public ActionResult Index()
    {
    EmployeeContext context = new EmployeeContext();
    Employee emp = context.pl.Single();
    
    return View(emp);
    }
    }
    }
    
    Here we create a instance of EmployeeContext class and invoke the public property of that class.
  9. Now create the view for this program. Before adding the view with their presentation must build the project. Learn How to create the new view

Before adding the view with their presentation must build the project


  1. Prepare the view and access all the properties of the employee class by the @Model properties.
     @model WebApplication10.Models.Employee
    
    @{
    ViewBag.Title = "Employee Details";
    }
    
    <h2>Employee Details are:</h2>
    Employee Id : <p>@Model.ID</p>
    Employee Name : <p>@Model.Name</p>
    Employee Age : <p>@Model.age</p>
    
    
  2. Now run the code and check your desired output

Data Binding in MVC

© Copyright 2013 Computer Programming | All Right Reserved